
Disk Map Analyzer Support
User Guide
Congratulations on downloading Disk Map Analyzer and taking the first step to cleaning up your hard drive. Disk Map Analyzer by Pocket Bits LLC has been awarded the best new apps on Mac OSX.
Hopefully you’ve opened the app already and seen our instructional screens that include video.
Once you open Disk Map Analyzer, select which drive/folder you would like to scan. You can drag & drop anything to the main window and you’ll see a live animation that you are correctly hovering over our app. You’ll know when it is scanning by the “Scanning” animation on the main screen and you’ll also notice the Disk Map Analyzer icon on your bottom toolbar displaying a loading animation.
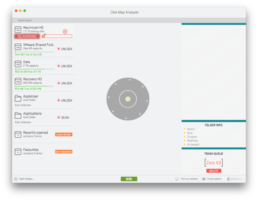
Once the drive/folder is finished mapping, click the “View” button to reveal the beautiful sunburst map.
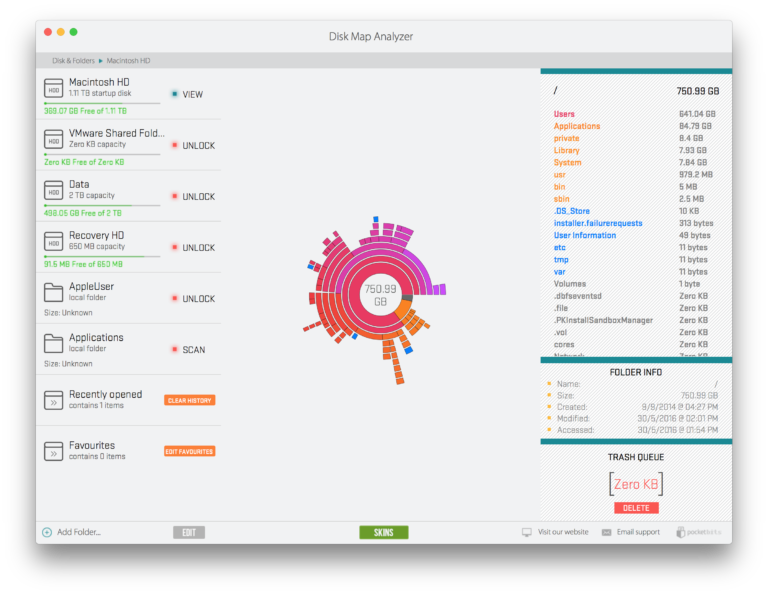
At the highest tier (centermost) you will see the different folders/files. As you move to the outermost layers, you will be traversing down to the lowest tier.
You can hover your mouse over the sunburst map to reveal the file/folder information on the right side. You can also navigate over the file/folder on the right side and you will see that part of the sunburst map blinking on the left sunburst map. Clicking any part of the sunburst will navigate to that file or folder. Our goal was to create a beautiful and intuitive interface that felt new, but familiar.
The right side toolbar will feel very familiar because it mimics the utility of your native OSX Finder. Just like Finder, you can select a file and preview it by pressing “spacebar”. You can also right click any file/folder to reveal it in Finder. You’ll also notice the top of the window shows the file-path that you are currently in, which you can click around to navigate.
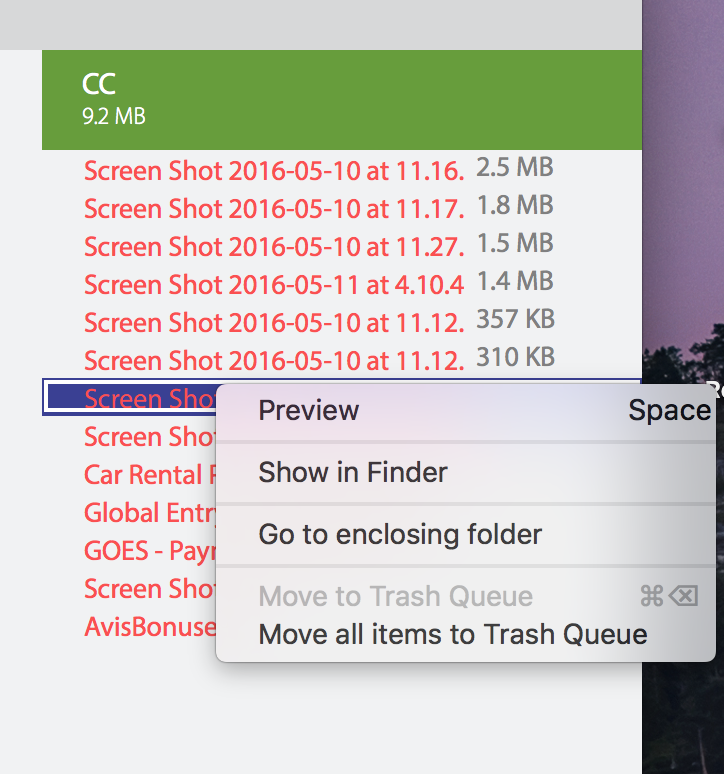
Anything is selectable to move to the trash queue. You can either right click and select “Move to Trash Queue” or you can drag & drop it to the trash queue below.

You’ll see the “Trash Queue” with the blinking animation when you drag & drop a file over the correct area.
The trash queue will then populate and update the size of the total files in the trash queue.
Clicking the left arrow in the trash queue will expand it’s contents to see every file/folder that has been added.
Once you have added all the files/folders for deletion, click “Delete” from the trash queue.
Congratulations, you have just successfully learned more about your hard disk. Not only have you navigated it flawlessly, you have found files to clean up your disk.
New Skins
Don’t forget to check out the 2 skins that are included in this app. Two very unique views that we hope you enjoy. 🙂

“Amazing! I just cleaned up over 15GB of clutter on my iMac that was eating up space with useless backups of old devices and apps that weren’t even installed anymore. I know I wouldn’t have found where these were without the beautiful and easy to read sunburst map.”
“Disk Map Analyzer works so well because there’s nothing to figure out. It’s insanely simple and feels just like using the native OSX. Not only was it easy to see large files clearly and cleanly, but deleting them was a painless and easy process.”
“This app is my number 1 most often recommended app for Mac users. Apple has been shipping computers with SSDs for a while now, but those SSDs fill up with useless junk really fast. People forget that they downloaded a 5GB movie or a Microsoft Office DMG and they just leave those files hanging around. Even advanced users like myself find themselves stumbling upon hundreds of gigs of garbage they can free up for useful space. I love Disk Map Analyzer.”

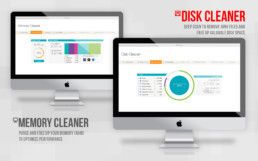
Disk Cleaner Support
User Guide
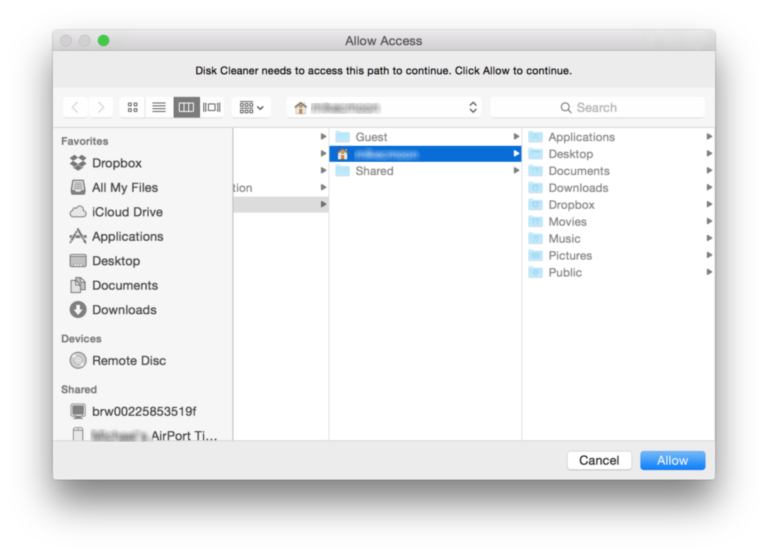
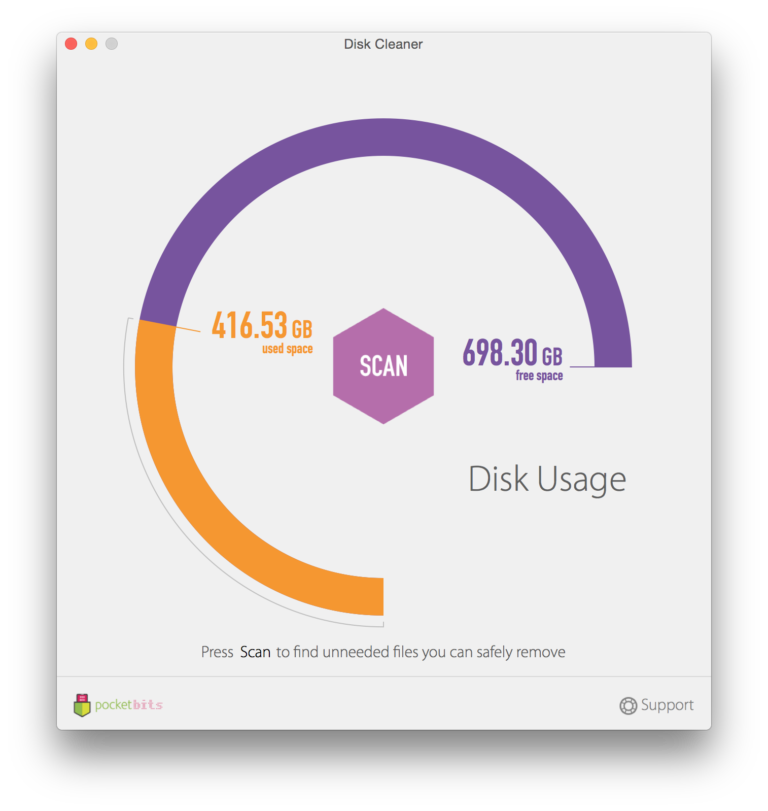
Disk Cleaner is currently the #1 customizable disk cleaner on the Mac App Store. Thank you! When you first launch the app, you will be prompted to give Disk Cleaner access. Please click “Allow” to give Disk Cleaner access.
Disk Cleaner will now display your “Disk Usage”. You will see the used space on your disk and also the free space you have left. If the entire bar is orange (used space), don’t worry…you’ve come to the right app! We’ll help you free up some of that space. 😀
After Disk Cleaner scans for space it can free up, you will be taken to this screen. You will see the amount of space that will be cleaned in orange. “Reclaimable space” shows the total amount of space you can clean by selecting everything.
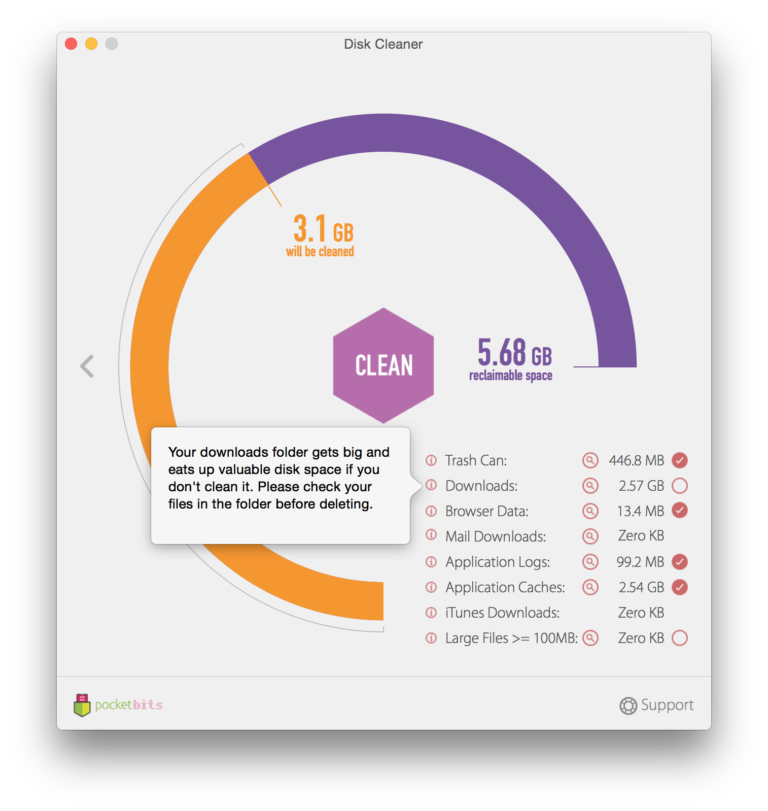
Remember to press the “i” info button to make sure you know what you are deleting! You can even view all of the files it will delete by clicking the magnifying glass.
You’ll also notice “Large Files >= 100MB”. This is unchecked by default. This is a very useful tool that will show you ALL of your large files over 100MB. Be very careful on selecting files here. You don’t want to delete your entire iPhoto library.
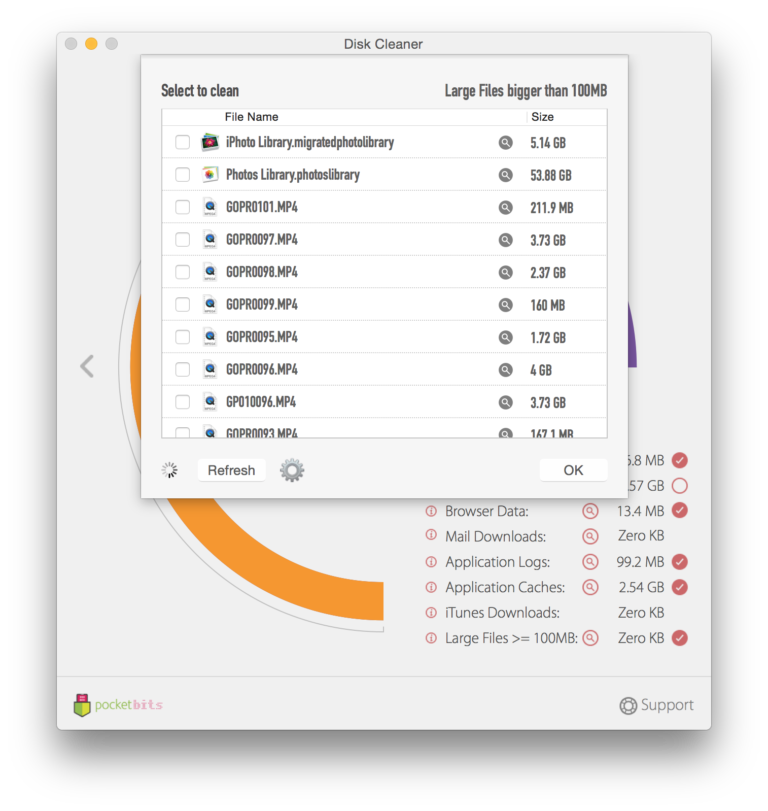
For this example, you’ll see it helps our user find very large GoPro videos taking up valuable space. Clicking the settings cog next to the refresh button will bring up even more options for finding large files on your computer.

You can adjust your settings here to exclude any file extensions you might want to ignore when searching for large files. You can also specify the size of the large files you want to find. Want to find all files over 1GB that are NOT mp4 files? It’s easy with this app. 🙂
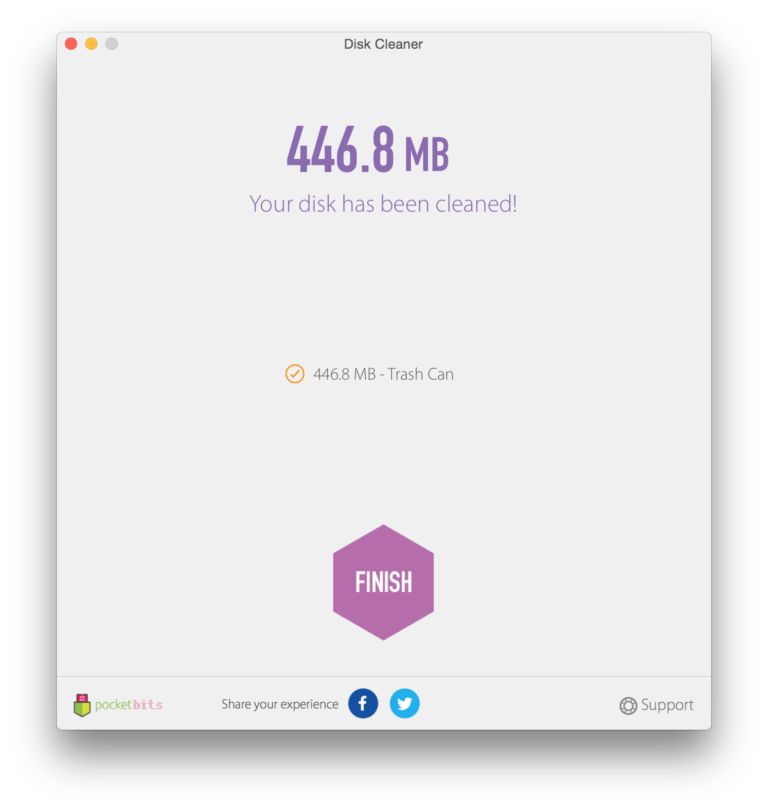
Press “Clean” on the main screen when you are ready to clean up your hard disk. That’s it! You’re done! 🙂
Hope you found this helpful! Let us know below, so we can improve our support. 🙂
Disk Cleaner is an efficient app that scans your entire computer! We scan the most important key locations and not specific disks or hard drives.
≈ 1-Click to Clean ≈
◎ Application Caches
◎ Application Logs
◎ Browser Data
◎ Mail Downloads
◎ Downloads
◎ Trash
◎ iTunes Downloads
◎ Large Files > 100 MB (customizable!)
Click the “i” info button to learn more about these key locations which are taking up your valuable disk space.
Click the magnifying glass to the right to “reveal in finder” all the files you are selecting for deletion.
Click the “i” info button on the left to see a short description.
If you don’t see anything, this may be a memory issue and rebooting your machine should resolve this.
If you do see the app, but it isn’t working properly…it’s most likely because you didn’t “allow” access on the first launch. You will need to reboot your machine and/or reinstall the app.
If the app is opening successfully and you see this blank screen. Check your OSX version. If you are on OSX before 10.9, you will need to update to at least OSX 10.9. This bug is caused on OSX 10.8 and below. We recommend always updating to the newest OSX for the most stability and improved performance. We are always updating our apps to be optimized to the latest OSX updates and features.

If you are still experiencing any similar issues, please send us a screenshot and instructions on how to reproduce it to support@pocketbitsllc.com and we will fix it ASAP. Thank you!
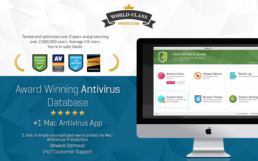
BitMedic AntiVirus Support
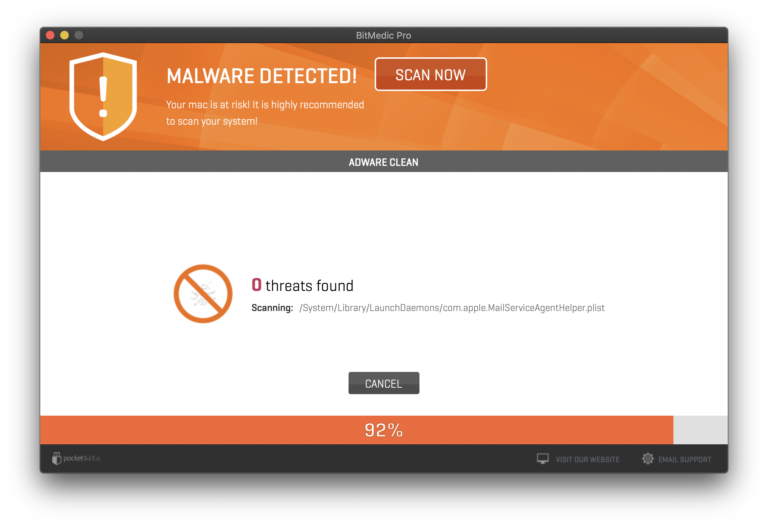
Welcome to BitMedic, the #1 AntiVirus App on the Mac App Store (now with Adware Protection!)
We take pride in bringing you the best protection for your Mac. We are the only AntiVirus app that is USA based, awarded, tested, and certified.
https://www.opswat.com/partners/pocket-bits
https://www.av-comparatives.org/vendors/pocketbits/
Testing Your App
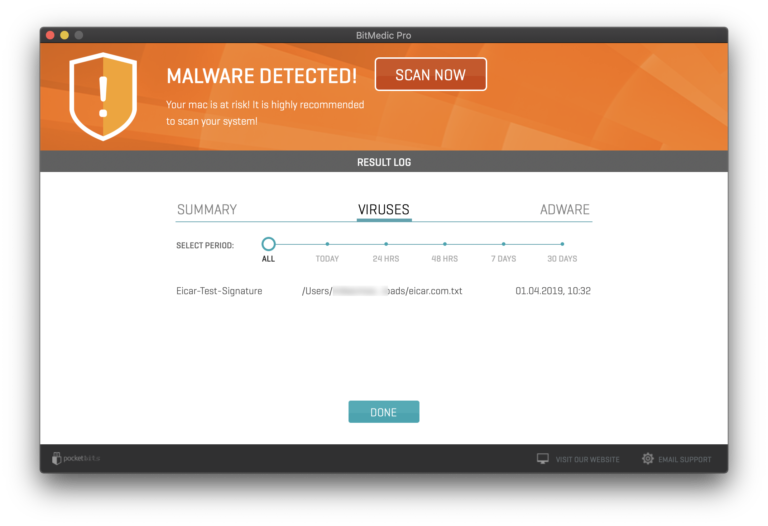
To test to see if your app is correctly scanning for viruses, download the EICAR virus test file.
Learn more here – https://en.wikipedia.org/wiki/EICAR_test_file
Direct download link – https://secure.eicar.org/eicar.com.txt
This will link you to download the EICAR (European Institute for Computer Antivirus Research) test file. This file is harmless and is used for testing purposes only.
You can test any Antivirus app and all the features of BitMedic with this file.
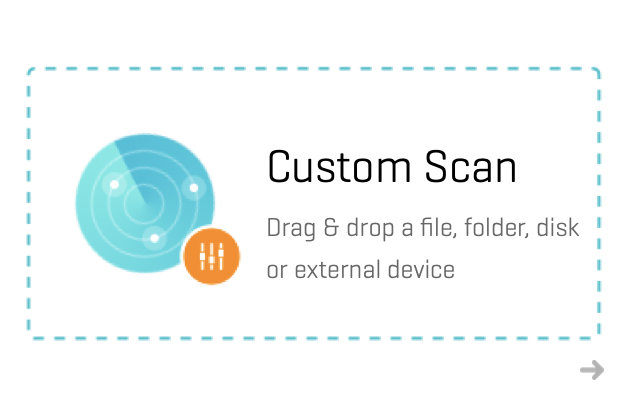
For a quick test, simply Drag & Drop this file into the center “Drop Here” under custom scan.
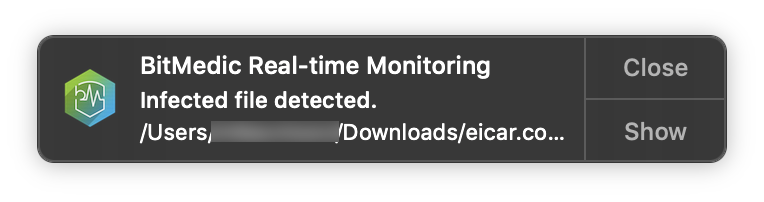
To test Health Monitor, make sure it is turned “On” by clicking the menubar icon and “Turn On”. (Pro Tip: right click to instantly turn on/off) If the file is downloaded to your “downloads” folder on your Mac, Health Monitor should detect this automatically and you will see an alert.


Congrats on hopefully having removed your adware with BitMedic! Now that you’re Mac has been restored, you’ll probably want to prevent any more adware coming back.
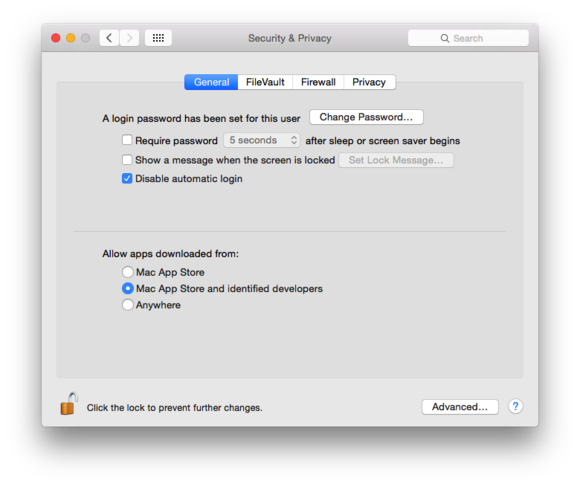
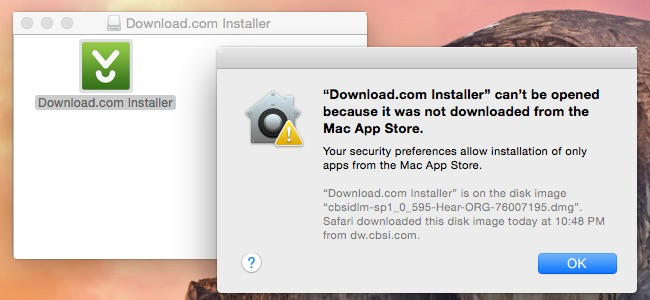
The most effective thing you should do right away is navigate to Settings -> Security & Privacy. Click the Lock icon at the bottom and then switch your setting on the bottom to allow apps downloaded from “Mac App Store” or “Mac App Store and identified developers.”
Now when you try to install anything that isn’t in the App Store or an identified developer, you’ll get a pop-up message that says it can’t be opened.

Another useful tool is installing an AdBlock extension for your web browser to prevent popup ads.
Still infected with Adware? Need not worry! You can always try resetting your browser preferences to default. Get that fresh start of when you first opened Safari. 🙂
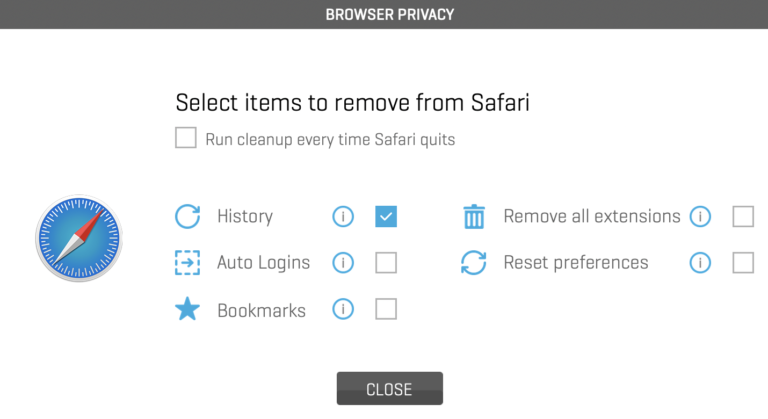
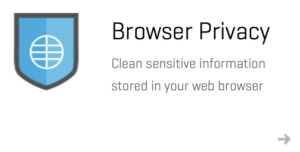
Open “Browser Privacy”. We recommend removing all your browser extensions to make sure you remove all possible Adware. Remember, this will also clear your “Good” extensions that you oh-so-dearly love too. You’ll have to reinstall these.
Select your browser (Safari in our example). Make sure “Remove all extensions” and “Reset Preferences” is turned “on”
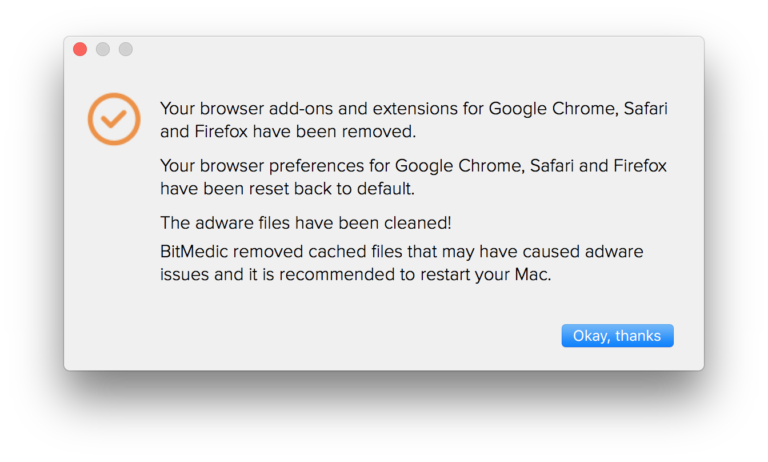
Then click “close” to go back and hit “Clean”.
Make sure your browsers are closed too, or it’ll remind you to close them.
It’ll then clear your browser extensions and reset your browser preferences to default.
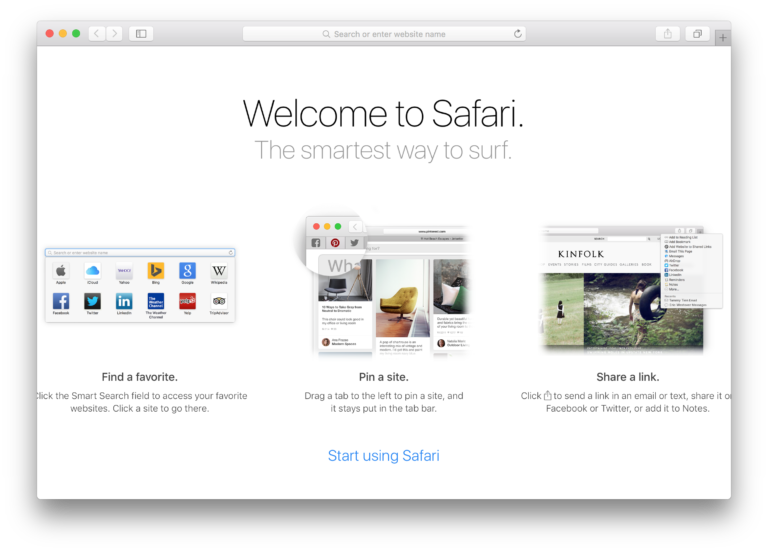
Congrats!
Safari should be as good as new! Make sure it looks like this when you open Safari. Don’t worry, your saved passwords haven’t been reset. You still have them. 🙂
Congratulations, you should now know how to remove all adware and restore your browser back to default. Protect your Mac and your sensitive information by scanning at least once a week.
See tips on “How to PREVENT adware” to protect yourself.
http://support.pocketbitsllc.com/customer/portal/articles/2141506-how-to-prevent-adware
If you are still having adware issues, this article may help.
For any additional questions, please email us at support@pocketbits.com
Hope you found this helpful! Let us know below, so we can improve our support. 🙂
See Wikipedia – https://en.wikipedia.org/wiki/EICAR_test_file
This test file is harmless and not a virus. Use it to test the integrity of AntiVirus apps. If the app can’t detect this simple file, then it is probably not an accurate AntiVirus app. Unfortunately there are a lot of apps out there that claim to be “AntiVirus” apps, but many fail to detect even the most basic files.
Our 3 step protection ensures the best security
Choose “Quick Scan” to quickly scan your Mac for any potential threats.
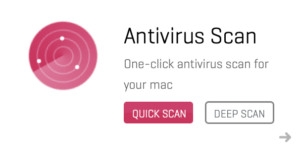
If you have more time, choose “Deep Scan“. This will take a long time (up to 2 hours for 1TB drives), so make sure you have the time to leave your computer on while BitMedic is scanning. BitMedic will scan every nook and cranny for any potential threats. We recommend “Quick Scan“, since this will scan your critical locations only to make sure you are safe.
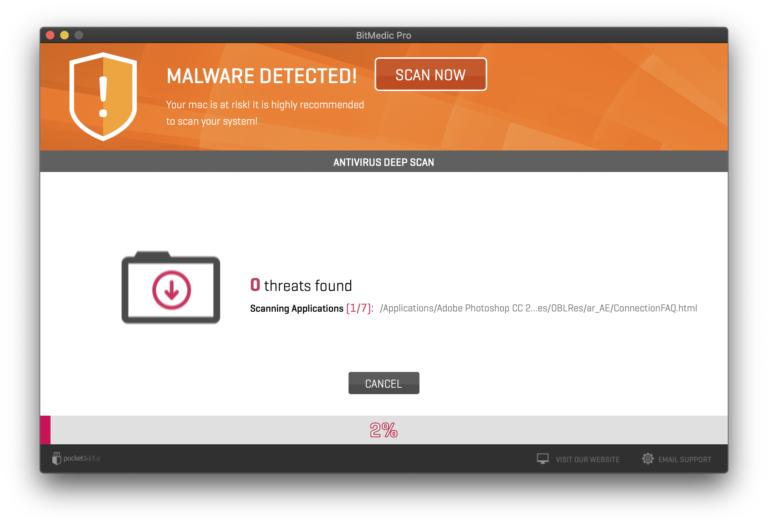
You can also use the Drag & Drop feature for quick scanning specific locations
Simply drag & drop any folder, drive, or file here.

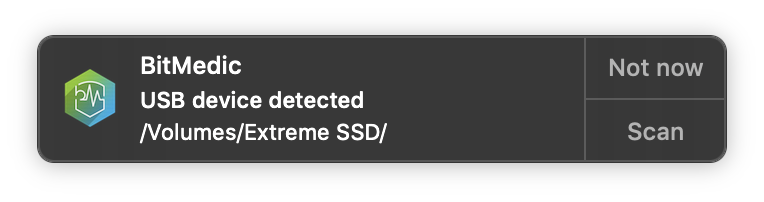
For 24/7 live protection, use BitMedic’s Real Time Health Monitor
Health Monitor watches selected locations 24/7 for any changes. It will automatically detect any harmful changes and any viruses. Remember, this applies to changes only. We recommend scanning the folder first to ensure that it is 100% virus-free and then monitoring it after.
If BitMedic does detect a virus, it will automatically quarantine the file for your safety. You can access your history from the Results Log.
Remember to also scan for adware for additional security
Click “Adware Scan” to scan your Mac for harmful adware and remove them.
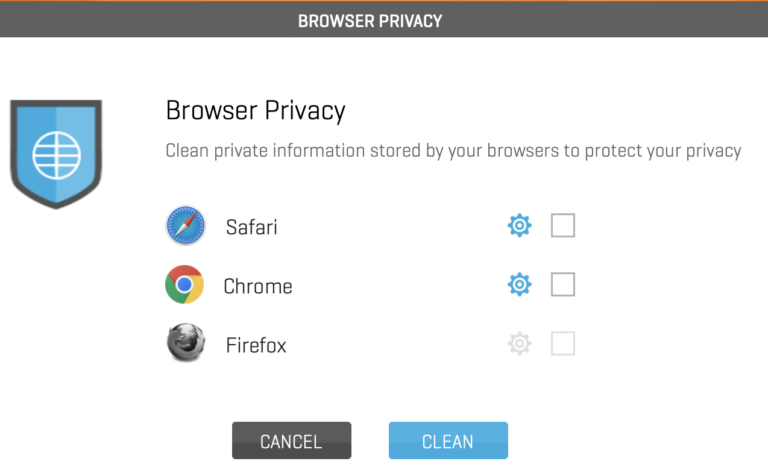
Browser Privacy is great for clearing sensitive information and cleaning adware-like symptoms
Click “Browser Privacy” to select your browsers to clean.
If you are experiencing adware-like symptoms, we suggest selecting “Remove all extensions”.
Remember that this will remove ALL of your browser extensions, so you’ll have to re-install the extensions that you like. It is common for adware to hide under browser extensions, so this is important to clean.
Adware sometimes will also alter your browser settings. “Reset preferences” to restore your browser preferences back to default like brand new.
Congratulations, you should now know how to remove malware and adware. Protect your Mac and your sensitive information by scanning at least once a week.
See tips on “How to PREVENT adware” to protect yourself.
http://support.pocketbitsllc.com/customer/portal/articles/2141506-how-to-prevent-adware
You can also set your browser to automatically clean every time it quits. For Safari, just select “Run cleanup every time Safari quits” and it will run all selected tasks.

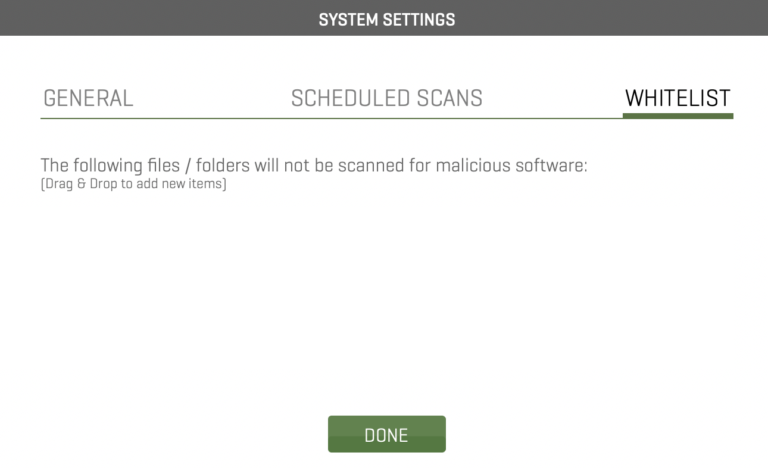
You can also set scheduled antivirus scans to automatically scan for viruses. Just navigate to “System Settings”.

Click “Enable schedule scans” and set your schedule.
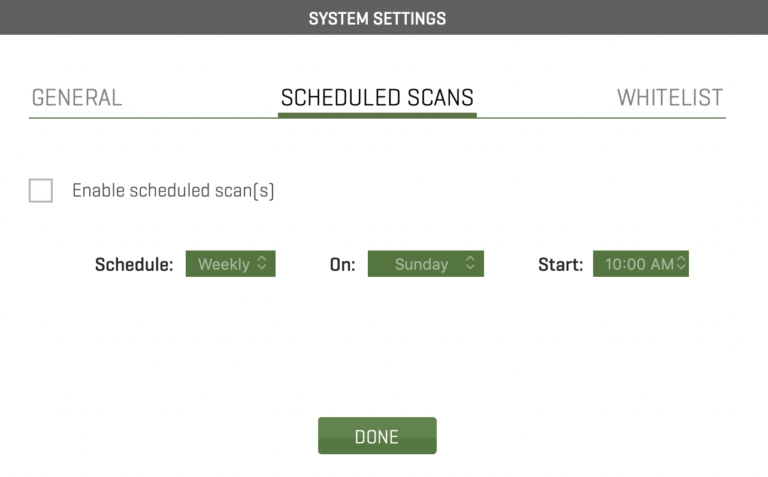
Under system settings, you’ll also have access to other features including “automatically scan new USB drives” which will scan anything that gets plugged in for threats.
We’ve also recently added the “Whitelist” feature for your convenience. Just add any locations that you don’t want scanned to save time during scanning.
For any additional questions, please email us at support@pocketbitsllc.com
Hope you found this helpful! Let us know below, so we can improve our support. 🙂
App Uninstaller Support
App Uninstaller
When applications are installed, there are a lot of moving parts in various directories. These files include application logs, application caches, random plist files, and all sorts of other junk that are left on your Mac when all you do is drag and drop the application icon into the trash. Not everything is removed and all this junk adds up and eats up valuable disk space. App Uninstaller intelligently locates your applications so you can properly uninstall these apps with everything associated with them. This includes all that junk that you no longer need.
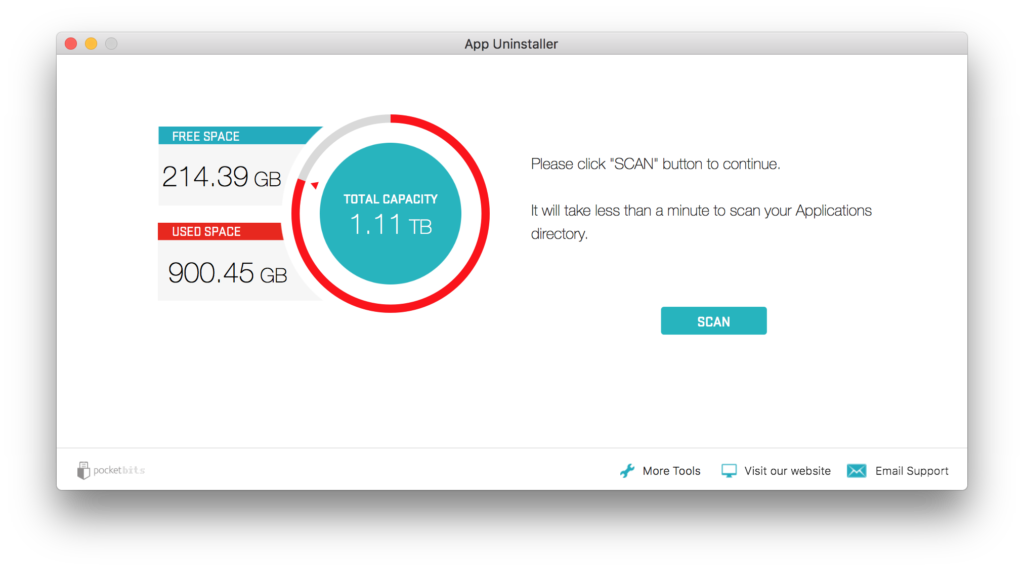
Press “Scan” to get started.
After scanning is completed, you will see a list of apps on the right side. Clicking details will show you all the “junk” or application logs, application caches, and/or anything else related to that app that is hiding on other locations of your hard drive.
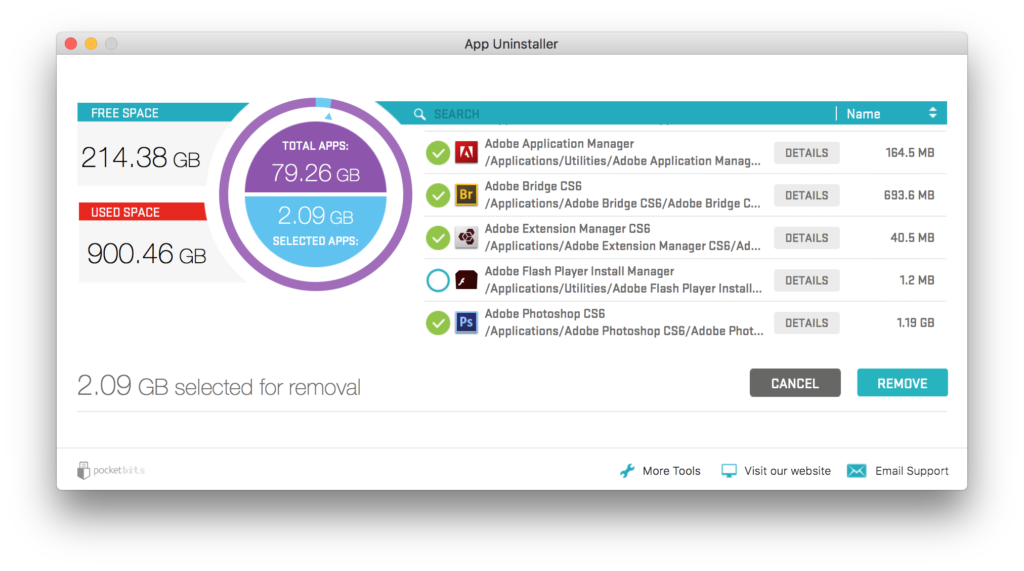
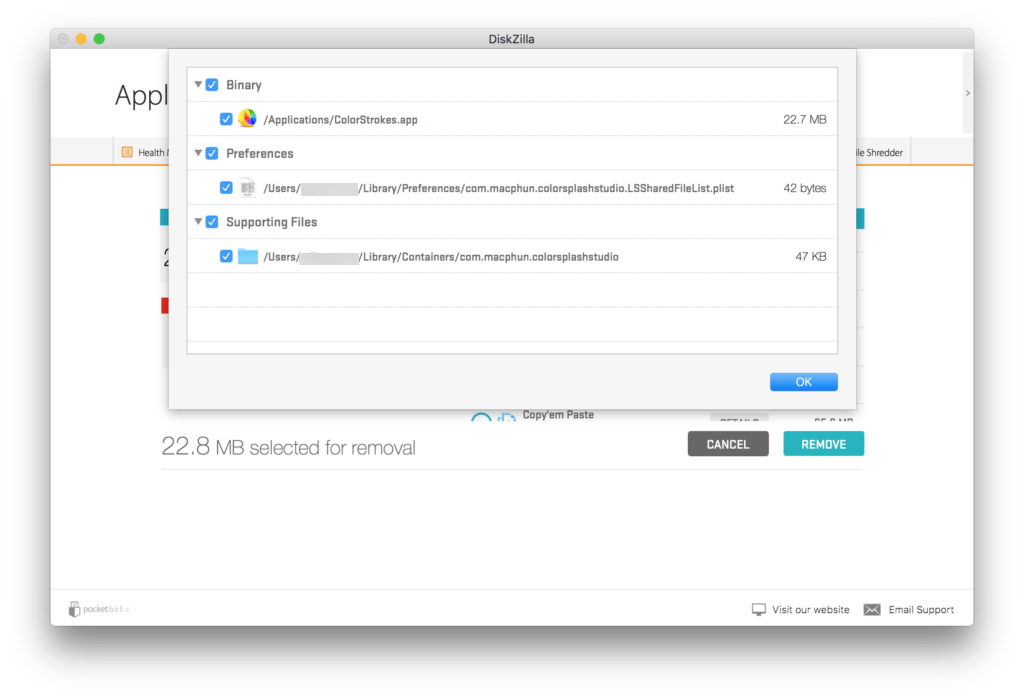
*Please note that core Apple products cannot be removed due to Apple’s sandboxing restrictions.
Click “Remove” when ready and then you will be taken to the confirmation screen. When you click “Proceed”, you will notice action items in red that require you attention.
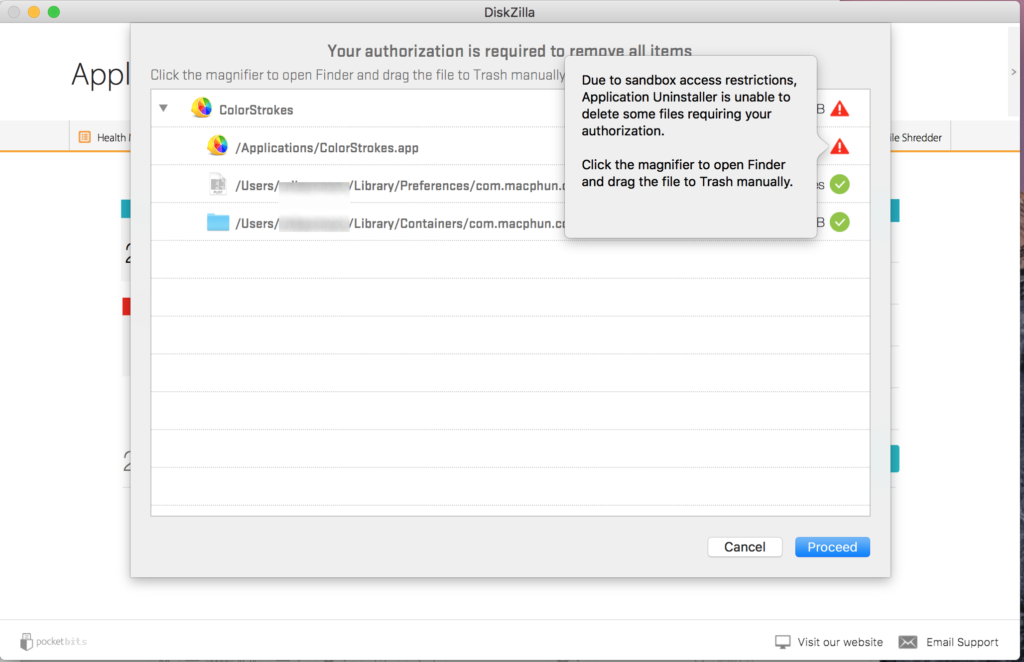
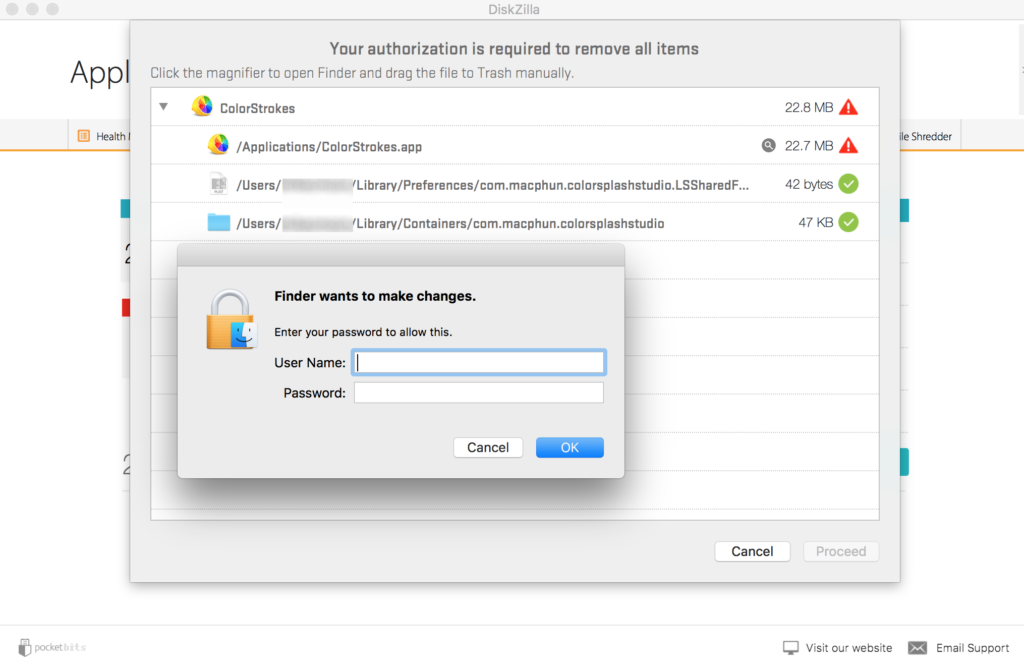
Due to Apple’s sandbox restrictions, you will need to press “Proceed” again and then enter your admin/user password to give your Mac permission to delete these files. Unfortunately Apple only allows apps to be removed in this way. There is no way around this.
Congratulations, you have now successfully properly uninstalled your selected apps along with all of their junk files.
Adware Cleaner Support
Adware Cleaner™ will easily handle all the adware removal for you with 1-click. Our adware signature database is updated regularly to bring you the best security. We take pride in being your #1 Adware Cleaner app.
User Guide
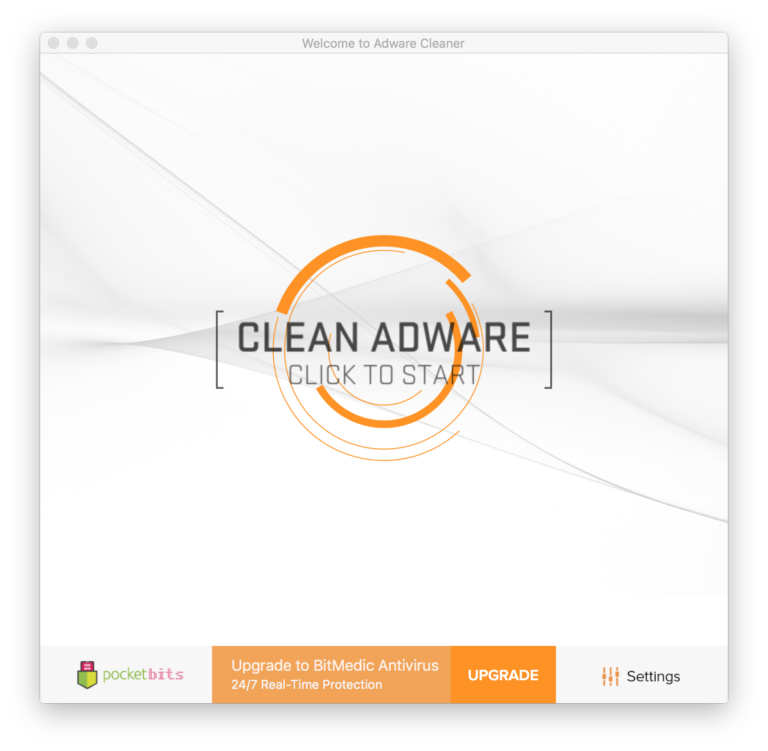
Congratulations on downloading the #1 Adware Cleaner for Mac!
Adware Cleaner makes removing your adware and restoring your browser, an easy and painless experience. Our 3-step protection will clean and restore your Mac once again!
You’ll first want to try “Remove Adware from your Mac” to scan all the critical locations that adware can hide and remove your browser extensions.
It is common for adware to hide itself as a browser add-on and extension. Removing all your extensions from your browser (Safari, Chrome, and/or Firefox) will clean this adware. Note: This will also remove all of the extensions you have installed. You’ll need to re-install your favorite extensions again. Just be careful not to re-install any adware also.
Now press the giant animated “Clean Adware” button up top.
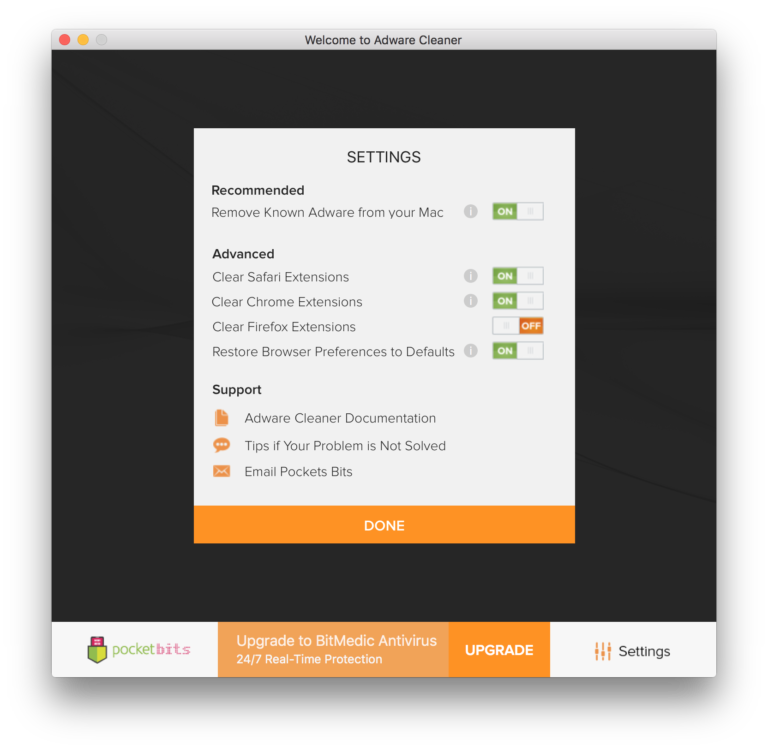
For web browsers with altered settings, Adware Cleaner can help reset your web browser back to its default settings. Click “Settings” on the bottom right.
Just check “Reset Browser Preferences to Default”.
Congratulations! This concludes our 3-step process.
- Remove Adware from your Mac. (scan critical locations)
- Remove adware browser add-ons that hijack your navigation. (removes all add-ons/extensions)
- Reset your web browsers to default settings. (for adware that altered your settings)
How to PREVENT more adware
Congrats on hopefully having removed your adware with Adware Cleaner! Now that you’re Mac has been restored, you’ll probably want to prevent any more adware coming back.
The most effective thing you should do right away is navigate to Settings -> Security & Privacy. Click the Lock icon at the bottom and then switch your setting on the bottom to allow apps downloaded from “Mac App Store” or “Mac App Store and identified developers.”

Now when you try to install anything that isn’t in the App Store or an identified developer, you’ll get a pop-up message that says it can’t be opened.
Another useful tool is installing an AdBlock extension for your web browser to prevent popup ads.
How to Remove Adware
Removing adware is relatively simple.
The hard part is looking for the specific key files to delete and keeping up to date with the latest adware information and knowing which key files to look for and delete.
This guide will help walk you through removing the most common adware for free. 🙂
If you want a useful Mac app that will do this for you with the click of 1-button, then it’s worth checking out Adware Cleaner on the Mac App Store. These instructions may seem daunting, so some people may want to take the easier road using the app.
1. Check Your Browser Extensions
It is very common for Adware to hide in your browser extensions and/or add-ons. Look at your extensions you have installed in your browser:
Safari – From the Safari menu, go to Preferences -> Extensions, near the right side of the row of icons along the top of the window.
Chrome – From the Chrome menu, go to Preferences -> Extensions item in the list on the left side of the window.
Firefox – Go to Add-ons from the Tools menu, then look at both the Extensions and Plugins lists in the window that opens.
There are lots of good browser extensions out there, but be careful which ones you decide to install. If you see extensions that you don’t remember installing, it is most likely adware. Below is a list of some common Adware that you might see installed.
Omnibar, GoldenBoy, Texiday, Listchack, InKeepr, Nariabox, Celipsow
See Genieo Removal https://support.norton.com/sp/en/us/home/current/solutions/v103415336_EndUserProfile_en_us
savekeep, saVe keeep, suave keepo, or anything similar
Delete all of the following browser extensions that you find: savekeep, saVe keeep and suave keepo.
jollywallet cash back
Delete the “jollywalet cash back” browser extension.
Vidx, Viddxx, Vidox, Viidax, ViiDDx, MacVX (and variants like MacVaX), MacCaptain, MacPriceCut, SaveOnMac, Mac Global Deals or MacDeals, MacSter, MacXcoupon, Shop Brain (or variants like SShoP Braaiin), MacMin (and variants like MacMMin, MaucMino, etc)
Delete any browser extensions with the following names:
Vidx (or variants such as ViddX, Vidox, Viidax and ViiDDx)
MacVx (or variants such as MacVax or MacVox)
MacCaptain
MacPriceCut
SaveOnMac
Mac Global Deals
MacDeals
MacSter
MacXcoupon
Shop Brain (or variants such as SShoP Braaiin)
MacMin (or variants such as MacMMin or MaucMino)
MacCost
Move the following items to the trash.
/Applications/Vidx.app
/Applications/MacMin.app
/Library/Application Support/VidToMP3
/Library/Application Support/fa4e8.94b.550d413f
~/Library/Application Support/osxDownloader
MacMin (and variants like MacMMin, MaucMino, etc) – see Vidx removal
Awesome Screenshot
Remove this extension
Shopy Mate, PalMall, FlashMall, Cinema-Plus Pro (and variants like Cinema + HD, Cinema + Plus + or Cinema Ploos)
Delete all of the following browser extensions that you find: Shopy Mate, FlashMall, Cinema-Plus Pro(and variants like CinemaPlus, CinemaPro, Cinema + HD, Cinema + Plus + or Cinema Ploos).
Move the following items to the trash.
/Applications/WebTools.app
/Applications/WebShopper.app
~/Applications/WebTools.app
~/Applications/WebShopper.app
/Library/cinemapro1-2/
~/Library/cinemapro1-2/
~/Library/WebTools/
~/Library/Application Support/webHelperApp/
~/Library/Application Support/WebShopper/
~/Library/LaunchAgents/WebServerSocketApp
~/Library/LaunchAgents/UpdateDownloder
~/Library/LaunchAgents/com.webhelper.plist
~/Library/LaunchAgents/com.webtools.update.agent.plist
~/Library/LaunchAgents/com.webtools.uninstaller.plist
Search App by Ask
Delete any extension called something like Search App by Ask.
Move the following items to the trash.
~/Library/Application Support/Sponsors.framework
MacShop, MacSmart, News Ticker Remover, Shopper Helper Pro, Photo Zoom, Best YouTube Downloader, ArcadeYum, Extended protection, Video download helper, FlashFree, RecipeHub, iLivid, CustomSearchForSafari, Media Player, MusixLib, GoMovix, MovixHub, AdBlock Super, Webpage Screenshot, NewTabTV, WalletBee
Remove these extensions
PremierOpinion
See removal guide https://www.pcrisk.com/removal-guides/8226-premier-opinion-surveys
Opti-Page, Toppy
Delete all of the following browser extensions that you find: Opti-Page, Toppy.
Move the following items to the trash.
~/Library/Application Support/Google/Chrome/Default/chromex
~/Library/Application Support/Google/Chrome/Default/chromexdm
~/Library/Application Support/mediahm
~/Library/LaunchDaemons/com.mediahm.operator.update.plist
Codec-M
Delete the Codec-M browser extension.
Move the following items to the trash.
~/Library/Application Support/Codec-M
~/Library/LaunchAgents/com.codecm.uploader.plist
/Applications/Codec-M.app
Yontoo and/or Torrenthandler
Delete the Yontoo and Torrenthandler browser extensions.
Anything claiming to be Adobe Flash Player
Delete any Safari extensions claiming to be Adobe Flash Player. The real Flash Player does not use a browser extension.
ChatZum
Delete the ChatZum browser extension.
Move the following items to the trash.
/Applications/ChatZumUninstaller.pkg
/Library/Application Support/SIMBL/Plugins/SafariOmnibar.bundle
/Library/Internet Plug-Ins/uid.plist
/Library/Internet Plug-Ins/zako.plugin
Conduit, MyBrand, Trovi, Search Protect, SP, or anything ending with Community Toolbar
Delete any Conduit, MyBrand, Trovi or Search Protect browser extensions that you find, as well as any with a name ending in “Community Toolbar.” (e.g. Genealogy Gems Podcast Community Toolbar, SB Tool Bar Community Toolbar, WiseConvert Community Toolbar, MovieBario Community Toolbar, etc)
Move the following items to the trash.
/Library/InputManagers/CTLoader/
/Library/LaunchAgents/com.conduit.loader.agent.plist
/Library/LaunchDaemons/com.perion.searchprotectd.plist
/Library/Application Support/SIMBL/Plugins/CT2285220.bundle
/Library/Application Support/Conduit/
/Applications/SearchProtect.app
/Applications/SearchProtect/
~/Library/Application Support/Conduit/
~/Library/Internet Plug-Ins/ConduitNPAPIPlugin.plugin
~/Library/Internet Plug-Ins/TroviNPAPIPlugin.plugin
~/Conduit/
~/Trovi/
Searchme, Slick Savings, Amazon Shopping Assistant, Ebay Shopping Assistant, Domain Error Assistant
Delete all of the following browser extensions that you find: Searchme, Slick Savings, Amazon Shopping Assistant, Ebay Shopping Assistant, Domain Error Assistant.
Move the following items to the trash.
~/Library/LaunchAgents/com.spigot.SearchProtection.plist
~/Library/LaunchAgents/com.spigot.ApplicationManager.plist
~/Library/Application Support/Spigot/
Set Search Settings, searchtab, any extension with a name like xxsearch (where “xx” can be anything), such as jbsearch or mtsearch, and any extension with a person’s name, such as JeffKekkoor BrianDeer
Delete all of the following browser extensions that you find: Set Search Settings, searchme, searchtab, and any extension with a name like xxsearch (where “xx” can be anything), such as jbsearch or mtsearch. In addition, extensions whose names are a person’s name, such as JeffKekko or BrianDeer, should be disabled.
GoPhoto.it
Delete the GoPhoto.it and jollywallet cash back browser extensions.
2. Check Your Libraries
Adware can install “LaunchAgents” to keep running in the background 24/7. Look in two different LaunchAgents folders to see a file matching the description. If you do, it’s Adware.
~/Library/LaunchAgents
com.codecm.uploader.plist
Delete the Codec-M browser extension.
Move the following items to the trash.
~/Library/Application Support/Codec-M
~/Library/LaunchAgents/com.codecm.uploader.plist
/Applications/Codec-M.app
anything with the word “genieo” in it
Genieo removal – https://support.norton.com/sp/en/us/home/current/solutions/v103415336_EndUserProfile_en_us
a set of three files, each with names starting with the same text and ending in “.download.plist”, “.ltvbit.plist” and “.update.plist”
Genieo removal – https://support.norton.com/sp/en/us/home/current/solutions/v103415336_EndUserProfile_en_us
Safari Security, files ending in “_enabler.plist”, “_enabler.sh”, “_updater.plist”, “_updater.sh”. WebSocketServerApp, com.webhelper.plist, com.webtools.update.agent.plist, anything starting with com.crossrider.wss. UpdateDownloader, anything similar to com.extensions.updater69337.agent.plist or com.extensions.updater69337.ver
Delete all of the following browser extensions that you find: Shopy Mate, FlashMall, Cinema-Plus Pro(and variants like CinemaPlus, CinemaPro, Cinema + HD, Cinema + Plus + or Cinema Ploos).
Move the following items to the trash.
/Applications/WebTools.app
/Applications/WebShopper.app
~/Applications/WebTools.app
~/Applications/WebShopper.app
/Library/cinemapro1-2/
~/Library/cinemapro1-2/
~/Library/WebTools/
~/Library/Application Support/webHelperApp/
~/Library/Application Support/WebShopper/
~/Library/LaunchAgents/WebServerSocketApp
~/Library/LaunchAgents/UpdateDownloder
~/Library/LaunchAgents/com.webhelper.plist
~/Library/LaunchAgents/com.webtools.update.agent.plist
~/Library/LaunchAgents/com.webtools.uninstaller.plist
/Library/LaunchAgents
anything with the word “genieo” or “texiday” in it, or with a name starting with “com.installer.completer”
Genieo removal – https://support.norton.com/sp/en/us/home/current/solutions/v103415336_EndUserProfile_en_us
com.conduit.loader.agent.plist
Delete any Conduit, MyBrand, Trovi or Search Protect browser extensions that you find, as well as any with a name ending in “Community Toolbar.” (e.g. Genealogy Gems Podcast Community Toolbar, SB Tool Bar Community Toolbar, WiseConvert Community Toolbar, MovieBario Community Toolbar, etc)
Move the following items to the trash.
/Library/InputManagers/CTLoader/
/Library/LaunchAgents/com.conduit.loader.agent.plist
/Library/LaunchDaemons/com.perion.searchprotectd.plist
/Library/Application Support/SIMBL/Plugins/CT2285220.bundle
/Library/Application Support/Conduit/
/Applications/SearchProtect.app
/Applications/SearchProtect/
~/Library/Application Support/Conduit/
~/Library/Internet Plug-Ins/ConduitNPAPIPlugin.plugin
~/Library/Internet Plug-Ins/TroviNPAPIPlugin.plugin
~/Conduit/
~/Trovi/
com.vsearch.agent.plist (There are a number of variants that substitute other random words for “vsearch” in this file name)
Move the following items to the trash.
/Library/Application Support/VSearch
/Library/LaunchAgents/com.vsearch.agent.plist
/Library/LaunchDaemons/com.vsearch.daemon.plist
/Library/LaunchDaemons/com.vsearch.helper.plist
/Library/LaunchDaemons/Jack.plist
/Library/PrivilegedHelperTools/Jack
/System/Library/Frameworks/VSearch.framework
/System/Library/Frameworks/v.framework
You may also find files with the following names, where “xxx” can be any word:
/Library/LaunchAgents/com.xxx.agent.plist
/Library/LaunchDaemons/com.xxx.daemon.plist
/Library/LaunchDaemons/com.xxx.helper.plist
/Library/LaunchDaemons
Jack.plist, com.vsearch.daemon.plist or com.vsearch.helper.plist
Move the following items to the trash.
/Library/Application Support/VSearch
/Library/LaunchAgents/com.vsearch.agent.plist
/Library/LaunchDaemons/com.vsearch.daemon.plist
/Library/LaunchDaemons/com.vsearch.helper.plist
/Library/LaunchDaemons/Jack.plist
/Library/PrivilegedHelperTools/Jack
/System/Library/Frameworks/VSearch.framework
/System/Library/Frameworks/v.framework
You may also find files with the following names, where “xxx” can be any word:
/Library/LaunchAgents/com.xxx.agent.plist
/Library/LaunchDaemons/com.xxx.daemon.plist
/Library/LaunchDaemons/com.xxx.helper.plist
com.perion.searchprotectd.plist
Delete any Conduit, MyBrand, Trovi or Search Protect browser extensions that you find, as well as any with a name ending in “Community Toolbar.” (e.g. Genealogy Gems Podcast Community Toolbar, SB Tool Bar Community Toolbar, WiseConvert Community Toolbar, MovieBario Community Toolbar, etc)
Move the following items to the trash.
/Library/InputManagers/CTLoader/
/Library/LaunchAgents/com.conduit.loader.agent.plist
/Library/LaunchDaemons/com.perion.searchprotectd.plist
/Library/Application Support/SIMBL/Plugins/CT2285220.bundle
/Library/Application Support/Conduit/
/Applications/SearchProtect.app
/Applications/SearchProtect/
~/Library/Application Support/Conduit/
~/Library/Internet Plug-Ins/ConduitNPAPIPlugin.plugin
~/Library/Internet Plug-Ins/TroviNPAPIPlugin.plugin
~/Conduit/
~/Trovi/
PremierOpinion.plist
See removal guide https://www.pcrisk.com/removal-guides/8226-premier-opinion-surveys
/Library/Internet Plug-Ins
zako.plugin
Delete the ChatZum browser extension.
Move the following items to the trash.
/Applications/ChatZumUninstaller.pkg
/Library/Application Support/SIMBL/Plugins/SafariOmnibar.bundle
/Library/Internet Plug-Ins/uid.plist
/Library/Internet Plug-Ins/zako.plugin
Still No Adware Found?
Check your symptoms to make sure you have adware or spyware. You might just be experiencing popup ads that can be blocked using the useful adblock browser extension – https://getadblock.com
Hopefully this isn’t the case, but you could possibly have Malware. BitMedic is a great AntiVirus app available on the Mac App Store for removing Malware.
Don’t forget to see our guide on How to PREVENT more adware.
If you have any questions, feel free to email us at support@pocketbitsllc.com.
If you are still experiencing problems after running Adware Cleaner, make sure you’ve done the following.
- Scanned your Mac using the option of removing adware from your Mac.
- Scanned your Mac using the advanced options of clearing your browser extensions and restoring your browser preferences back to default.
- Restarted your computer. This is necessary.
If you’ve done all of the above and are still experiencing problems, there are a few things you can try next.
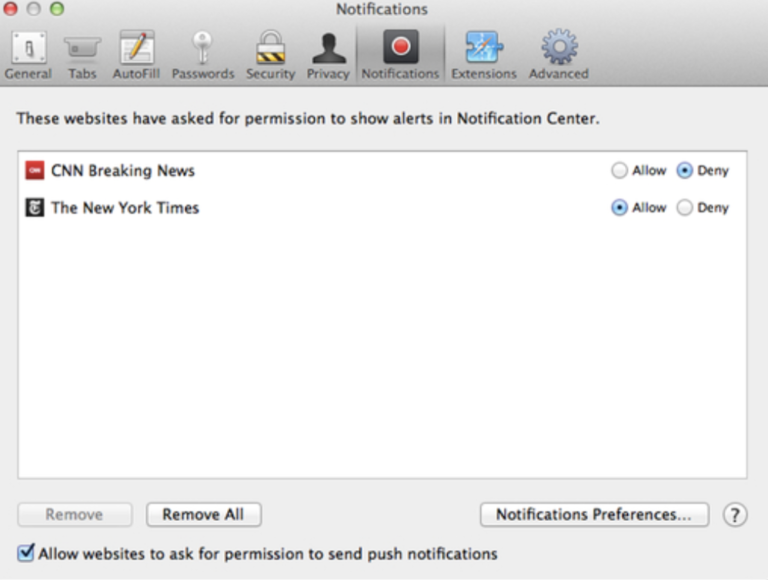
Are you getting Mac OSX notification ads?
If you’re seeing the notification popup on the top right corner of your screen with no web browsers open, then you might have allowed and given permissions to a specific website to send you notification.
To disable these, open up Safari and go to “Preferences” from the top left pull-down menu and click “Notifications”.
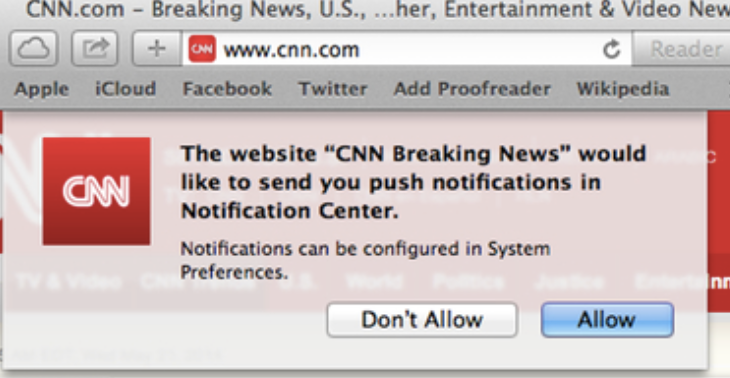
You can “Deny” all the websites that are sending bothersome alerts. You can also “Remove All” to disable all them in bulk.
On the bottom left, you can uncheck “Allow websites to ask for permission to send push notifications” to stop Safari from asking you about push notifications completely. Safari will ignore all push notification requests from websites. (this is only av
Is the problem on a specific website?
If the problem is happening on specific websites only, it most likely isn’t adware since you’ve already cleared your browser extensions. Your browser extensions is where adware will like to hide. We recommend installing an adware blocker browser extension. http://getadblock.com
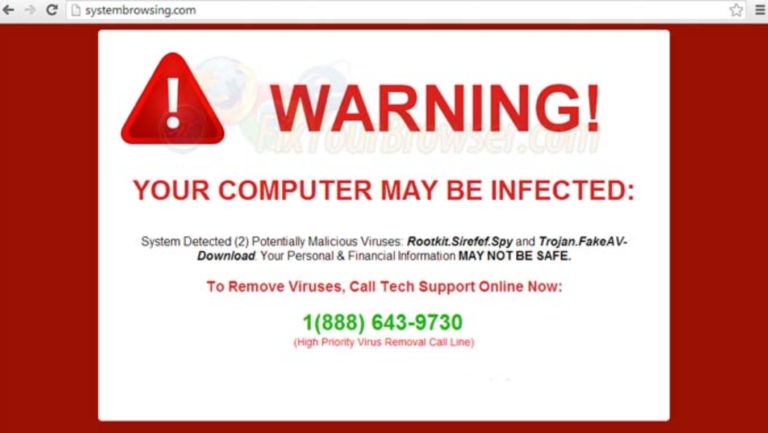
Are you getting fake scam pop-ups about a virus?
If you’re getting pop-up scams about having a virus or threats/warnings, these are not caused by adware. They are scam websites. Ignore these and do not call the number or install any software.
Send us your adware problems
If you’ve done all of the above and you’re still getting adware problems, it could be new adware that hasn’t been discovered yet and is clever enough to avoid the standard browser extension. Choose the contact button inside our app to email us a screenshot and steps to reproduce the adware issue.
Make sure you have adware
Check to make sure you are infected with adware and not a malware virus. Make sure you’ve followed all of the above steps to also confirm that it definitely IS adware and not anything else.
If you are experiencing malware virus problems, you can use our BitMedic Antivirus app to protect yourself.
https://itunes.apple.com/us/app/bitmedic-antivirus-malware/id1001746820?mt=12
View Hidden Files in the Finder
The Finder does offer an option to view hidden files. However, this isn’t a graphical option — you have to enable it with a terminal command and restart the Finder for your changes to take effect.
To view hidden files in the Finder, open a Terminal window and run the following commands in it, pressing Enter after each one:
defaults write com.apple.finder AppleShowAllFiles TRUE
killall Finder
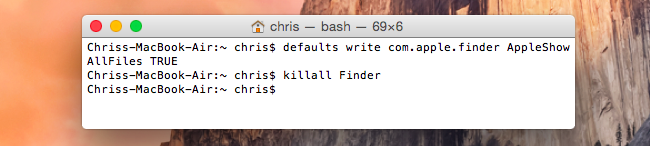
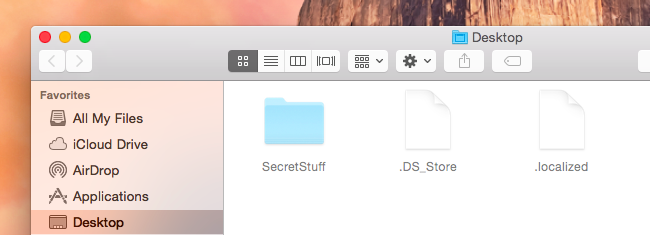
This command tells Finder to show hidden files and then restarts it. It’ll show all those hidden files and folders once you’re done. They appear partially transparent to distinguish hidden files and folders from normally unhidden ones.
Want to stop Finder from showing hidden files and folders? Run the following command to disable this option and restart the Finder:
defaults write com.apple.finder AppleShowAllFiles FALSE
killall Finder

Screen Snap
Screen Snap
Managing your windows and cleaning up your desktop easy
- Snap your windows into place and clean up your desktop!
- Improve your productivity by maximizing your workspace
- An essential tool for any Mac

Color Accent Studio Pro
Color Accent Studio Pro
Add a touch of color to your photos
- Add a touch of color for dramatic effect.
- Paint color to black and white photos.
- Add custom colors to your photos.

Secure File Deletion
Secure File Deletion
Digital File Shredder
- #1 fastest algorithm for secure file deletion for Mac
- 3 methods for secure deletion including United States DoD 5220.22-M
- Up to 35-passes. Gutmann method for utmost security.

Green Screen Studio Pro
Green Screen Studio Pro
Chromakey Green Screen on Mac
- Chromakey algorithm replaces your green screen with any background
- Manual tools for editing images with no green screen
- Featured on Macworld, EatAppleNews, and many more!
DiskZilla™
DiskZilla™
8 Award Winning Apps in 1
- OVER 2,000,000 USERS. 10,000 RATINGS. AVERAGE RATING 4.9
- DiskZilla™ combines 8 award winning apps into one package
- Memory Cleaner, Disk Cleaner, Adware Cleaner, Disk Map Analyzer, Duplicate File Cleaner, App Uninstaller, File Shredder, Health Monitor