
Superimpose Studio Support
I am text block. Click edit button to change this text. Lorem ipsum dolor sit amet, consectetur adipiscing elit. Ut elit tellus, luctus nec ullamcorper mattis, pulvinar dapibus leo.
You can find a lot of useful information on how to use Superimpose Studio under the “Info” button on the top toolbar.
Here’s a great demo of Superimpose Studio on the iPhone by EatAppleNews.com
If you have just downloaded the app or have updated to the newest version, remember to reboot your device. Just like Windows and Mac OSX, rebooting is recommended after installing new software.
Many bugs are due to memory issues. You can also try uninstalling and reinstalling the app. Photography apps are very memory intensive and this should resolve it.

Sleep Alarm Clock Support
Welcome to Sleep Alarm Clock. The only app with soothing video backgrounds proven to help you fall asleep better.
Clock – Nightstand Mode
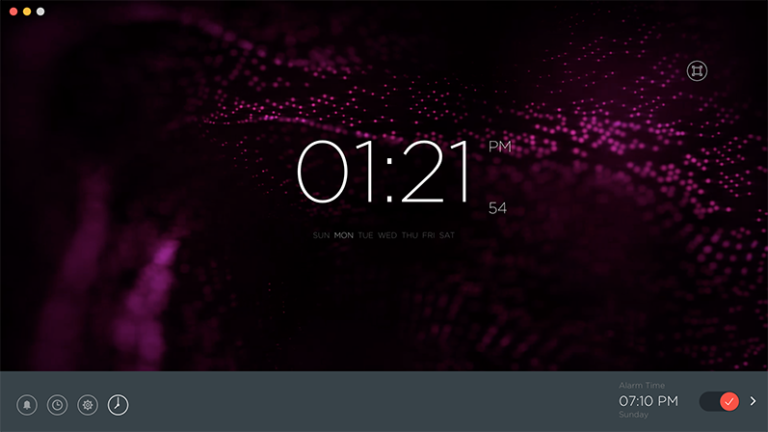
The right most button (4th button from the left) is the home “Clock” screen. You can always return here to view the time and turn your Mac into a beautiful bedside clock. The top right button will maximize the screen to turn your entire display into the clock.
Alarm
Click the leftmost button to access the alarm screen.
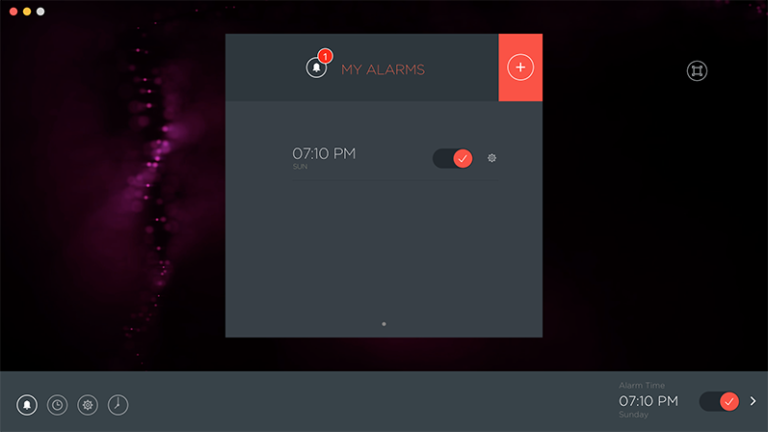
You’ll notice the “Pro” version supports multiple alarms. You can turn on/off and edit all your alarms here. Click the “+” button to add more alarms.
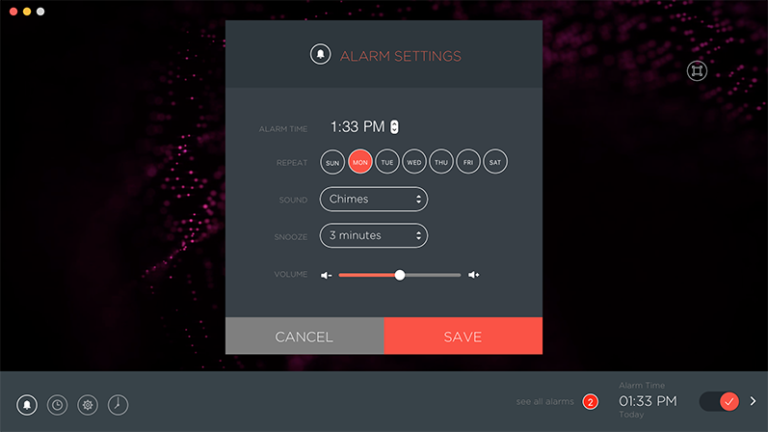
Click the settings cog to adjust your alarm settings. You can set one or multiple days for your alarm to go off. Choose the snooze duration for each specific alarm too. Our alarms are completely customizable.
Your next active alarm will always display on the bottom right. If you have multiple alarms, it will show you the counter to display the number of alarms you have active.
Important: Alarms won’t go off if you put your Mac to Sleep mode or shut it down. We recommend leaving your Mac open and letting it fall asleep on its own.
If you’d still like to use the Sleep mode there’s another way to ensure that Alarm Clock will sound on time. To set scheduled start up:
1) Open System Preferences on your Mac
2) Go to Energy Saver
3) Click Schedule
4) Select Start up or wake and set the time five minutes before the next alarm
Your Mac will wake up automatically and this will ensure your alarm will go off.
Note: Never close the lid of your MacBook. With the lid closed your Mac enters the “deep sleep” mode and is not able to wake up on its own.
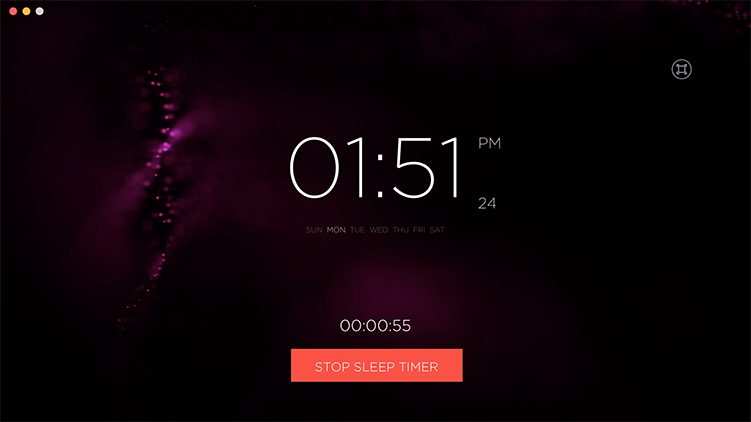
Sleep Timer
Access the Sleep Timer on the bottom menu (2nd button from the left). Our Sleep Timer will help you fall asleep easier while listening to your favorite sounds.
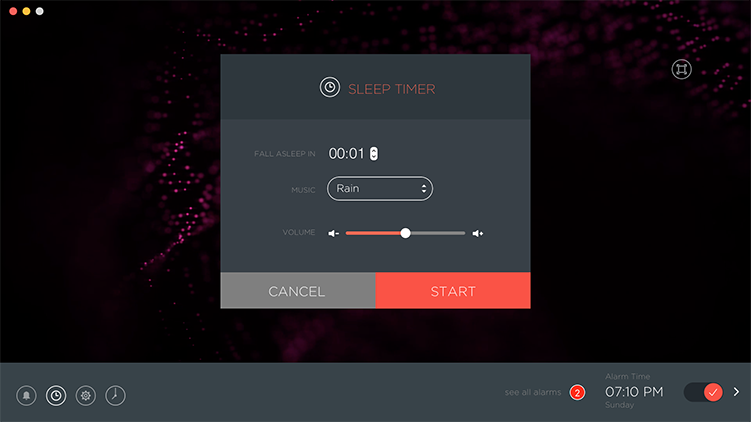
In the top example, the user has decided to listen to “Rain” for 1 minute while falling asleep.
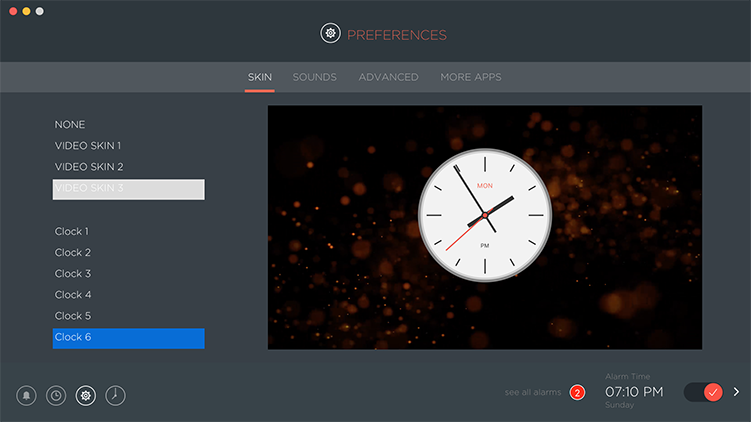
Settings
The settings cog will take you to more customizable options for your alarm clock. Here you can choose video skins, display clocks, custom sounds you can add, and other small neat features.
Important and Useful Tips to Never Miss an Alarm
– Make sure your computer is plugged in
– Don’t close the lid on your MacBook
– Keep external speakers turned “ON” or unplug them and check your internal speaker’s volume level
– Set your scheduled startup on your Mac when switching to sleep mode
For any additional questions, please email us at support@pocketbitsllc.com
Hope you found this helpful! Let us know below, so we can improve our support. 🙂
Privacy Guard Support
Privacy Guard has the #1 fastest algorithm for secure deletion on the Mac App Store.
What is secure deletion?
When a file is deleted from your Mac, it is still recoverable. Even when you empty the trash. Only the reference to the file is removed from the file system table. The file still exists on disk until other data overwrites it, leaving it vulnerable to recovery. So your sensitive information that you thought was deleted permanently is still recoverable and can be targeted by hackers.
Privacy Guard prevents lurkers and snoopers from recovering your private information by using proprietary advanced algorithms that make data recovery impossible. Your information will be securely deleted!
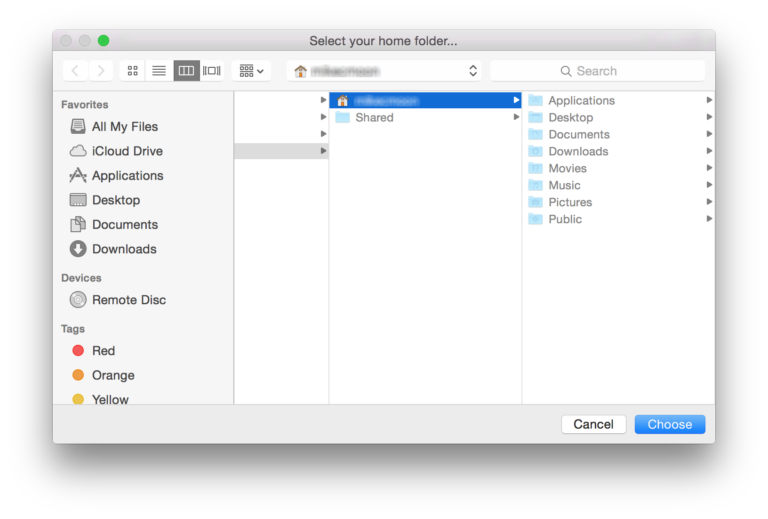
Start by clicking “Select User Folder”
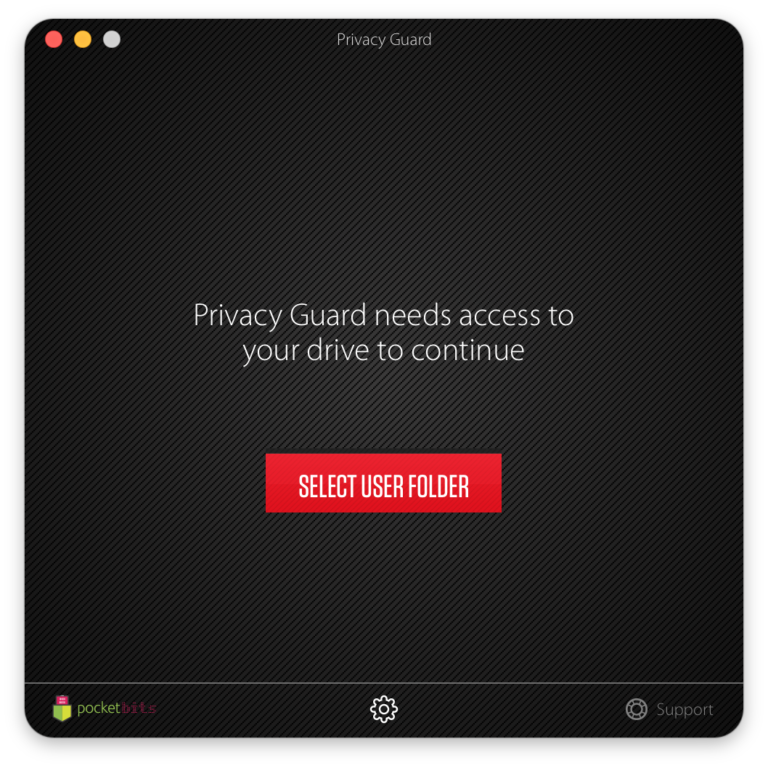
It will take you to your default home folder. Click “Choose” to give Privacy Guard access.
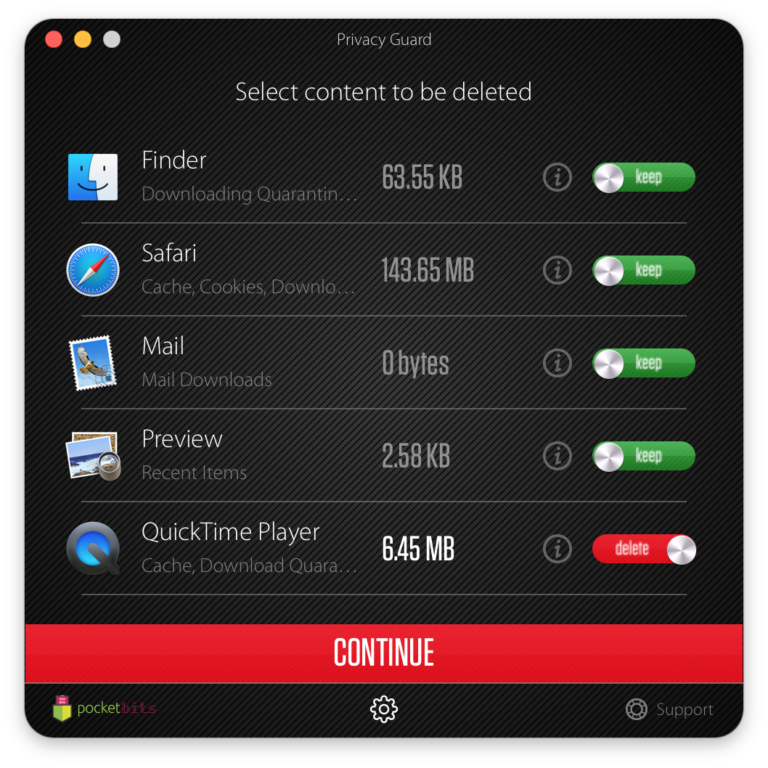
Securely remove all that bulk that is weighing down the speed of your Mac. If your web browser is starting to run clunky, it’s because of pesky files that violate your privacy and allow targeted advertisements to collect data on you. Privacy Guard deep scans your Mac to find and remove files that track your location, browsing history, cookies, flash cookies, and other temporary files to stop spammers and advertisers from spying on your system.
Privacy Guard is optimized to efficiently scan the most vulnerable locations.
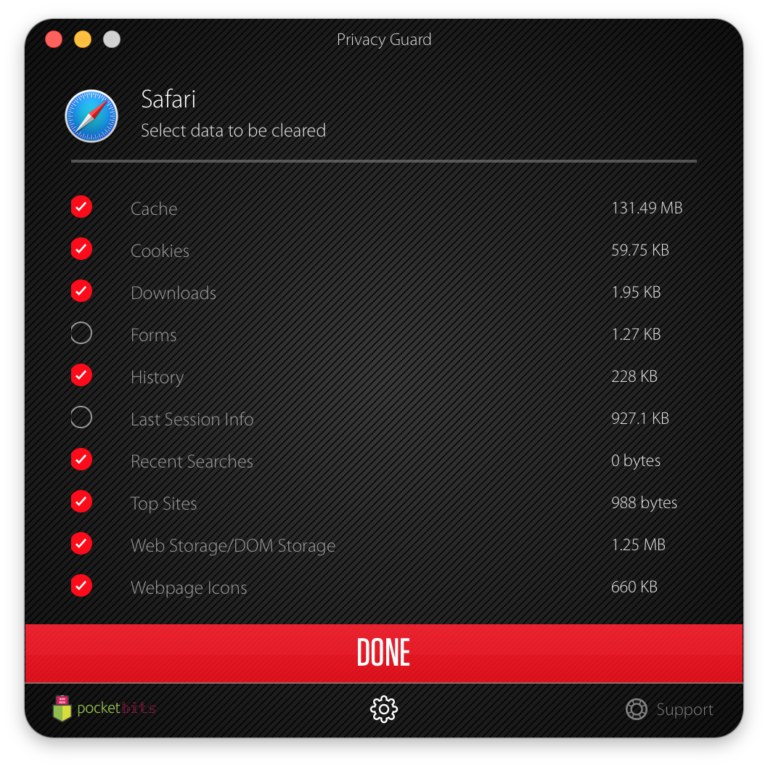
◎ Web browsers (Safari, Chrome, Firefox, etc)
◎ Flash Player (Cookies)
◎ Mail Downloads
◎ Preview (Recent Items)
◎ QuickTime Player (Cache, Download Quarantine History)
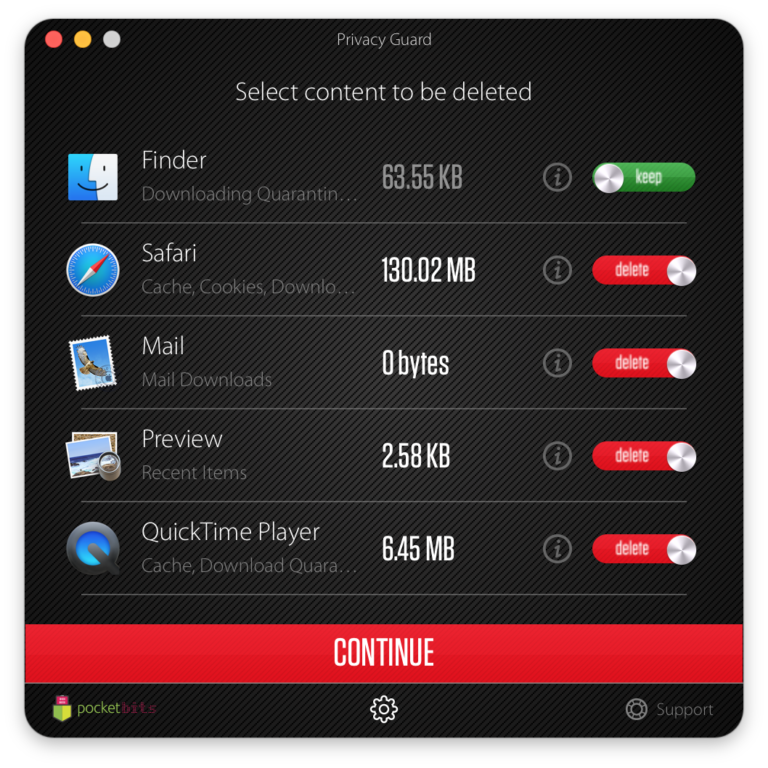
Click the “i” info buttons to see the lower level details of each category. For advanced users, customize which sections to delete.
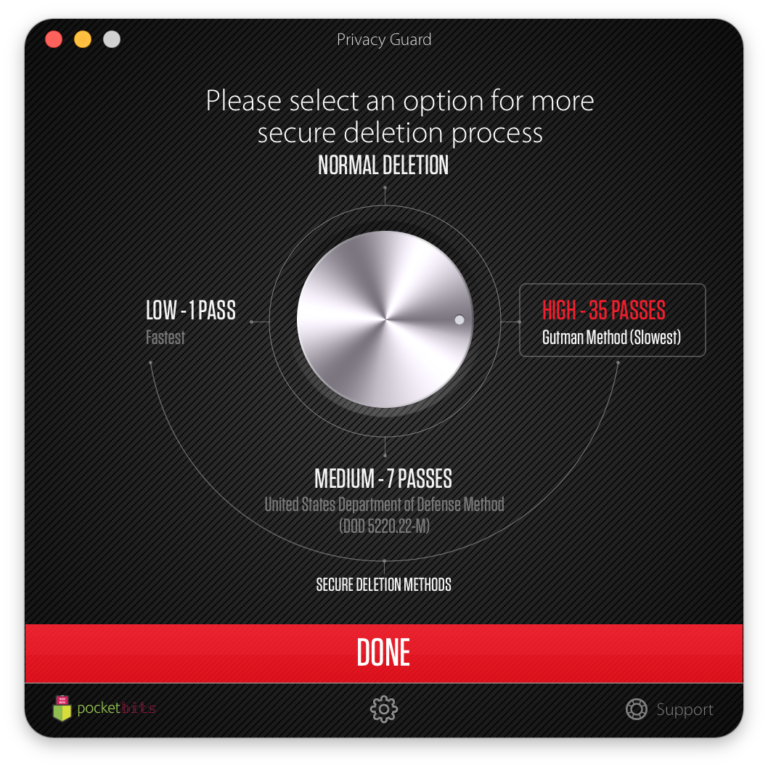
Press the settings cog on the bottom to reveal the options for secure deletion. Privacy Guard gives you 3 levels of secure deletion and 1 option for standard/normal deletion (not secure).
◎ Quickly and SECURELY overwrite your threats with 1-pass
◎ Overwrite your threats with United States Department of Defense Method (DoD 5220.22-M) 7-passgovernment standard
◎ File recovery won’t be an option with the MOST SECURE 35-pass Gutmann method
What is a pass and what’s the difference between 1-pass, 7-pass, and 35-pass?
It’s the number of passes you overwrite your data. In theory, overwriting it once should do the trick to make the data unrecoverable. 7-passes of overwriting data will ensure more security, but take a little longer. 35-passes would be the most secure of all.
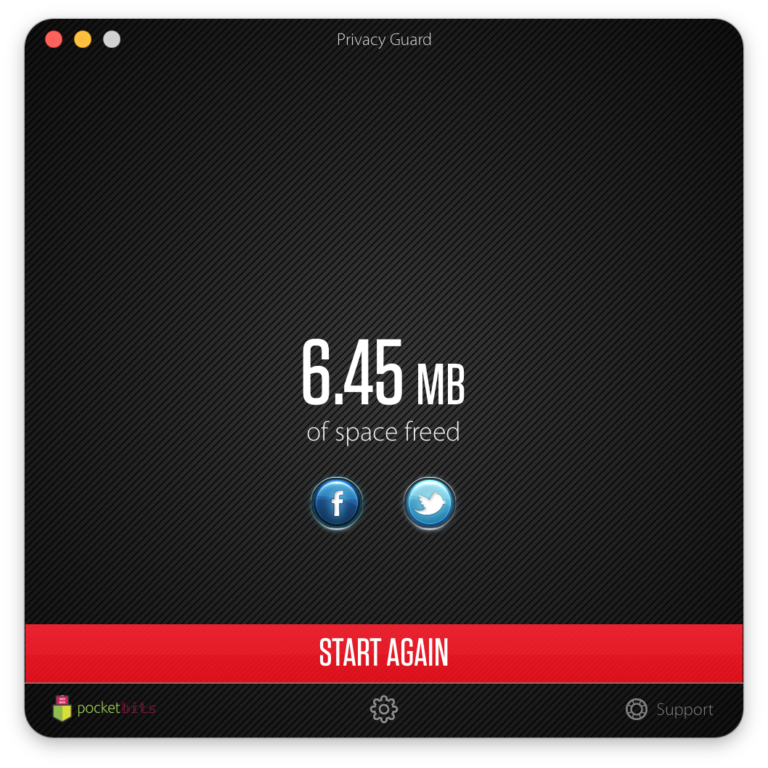
After you select which parts to “keep” and which parts to “delete”, press “Continue”.
Congratulations, you’ve freed up space on your hard disk and you are now secure!
Let us know if this was helpful below. Email us at support@pocketbitsllc.com if you have any other questions.
Yes! People can still access your sensitive and private information you have deleted.
When a file is deleted from your Mac, it is still recoverable. Even when you empty the trash. Only the reference to the file is removed from the file system table. The file still exists on disk until other data overwrites it, leaving it vulnerable to recovery. So your sensitive information that you thought was deleted permanently is still recoverable and can be targeted by hackers.
This is where Privacy Guard is the most useful. It uses secure deletion to overwrite the data. Making recovery impossible. Your sensitive information will be permanently deleted.
Memory Medic Support
Memory Medic breaks down your system memory into a more granular view. You will see the exact usage by memory type. (e.g Wired, Compressed, File Cache, App Memory). You will also see which apps are using significant memory.
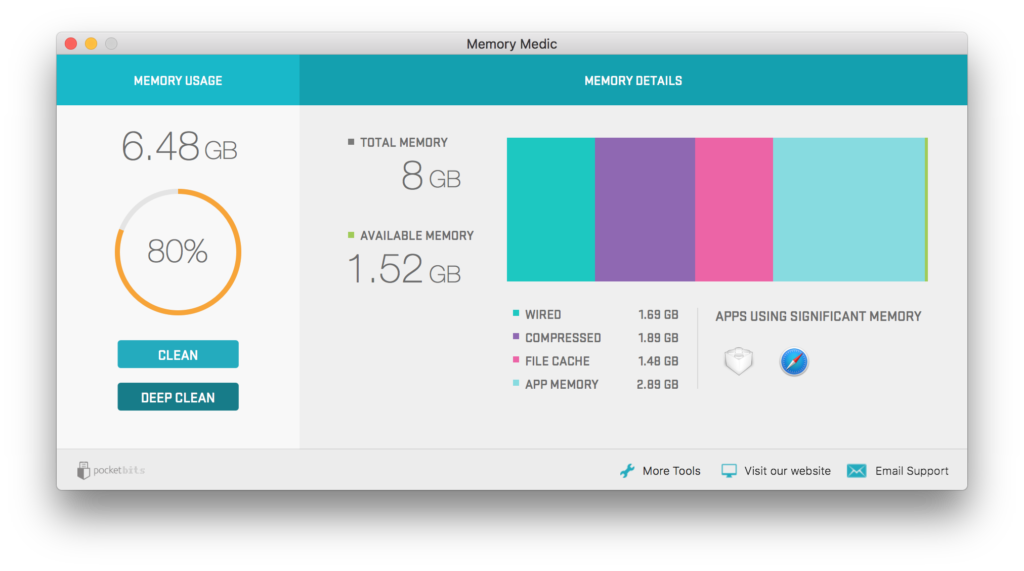
Click “Clean” to free up space. You will immediately see the results.
“Deep Clean” uses our proprietary algorithm to free up even more memory.
*Tip: Memory cleaner is most efficient when used after closing a memory intensive application you don’t plan on using for a while.

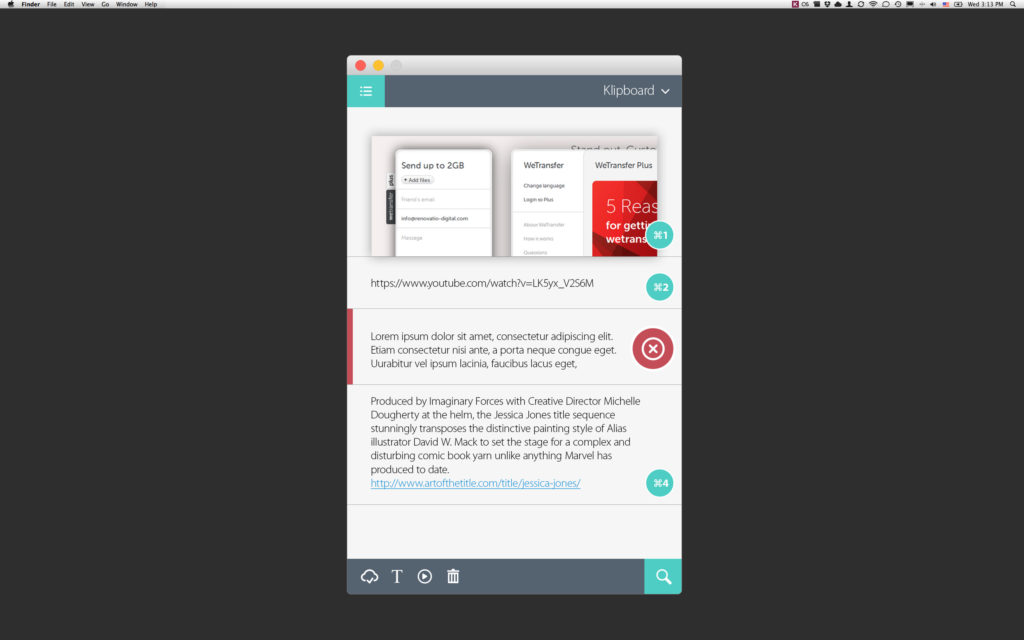
Klipboard Support
Welcome to Klipboard! Your intelligent clipboard manager. Klipboard helps manage all of your copied clippings for easy access. It will help you stay organized and improve your productivity.
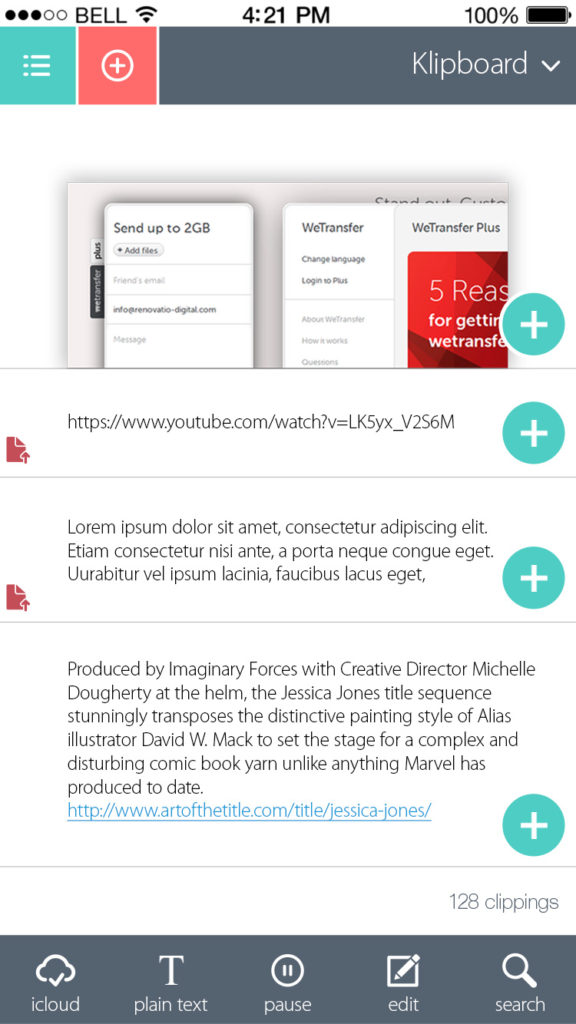
The “+” buttons will allow you to copy your clipping onto your clipboard. You will be able to paste this wherever you want.
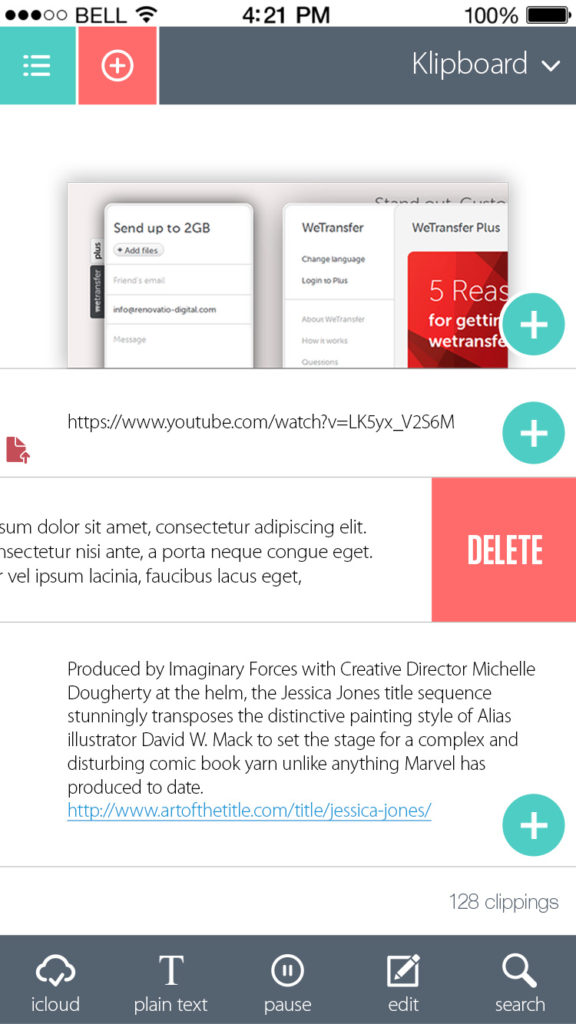
Swipe left to delete a clipping.
You will also notice 5 options in the menu bar below.
- iCloud – This will sync your clippings on to iCloud and all the devices connected to your iCloud account with Klipboard installed (e.g. your Mac, iPod, iPad, other iPhones)
- Plain Text – This will switch to plain text mode and won’t copy fonts face, type, size, etc.
- Pause – This will pause saving to your Klipboard. When you don’t want to save certain items to your Klipboard.
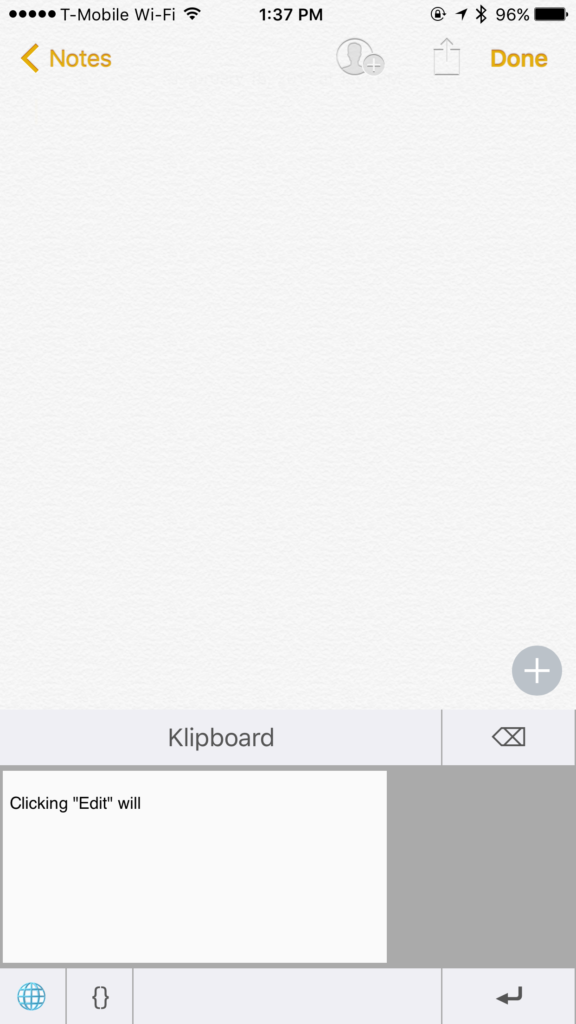
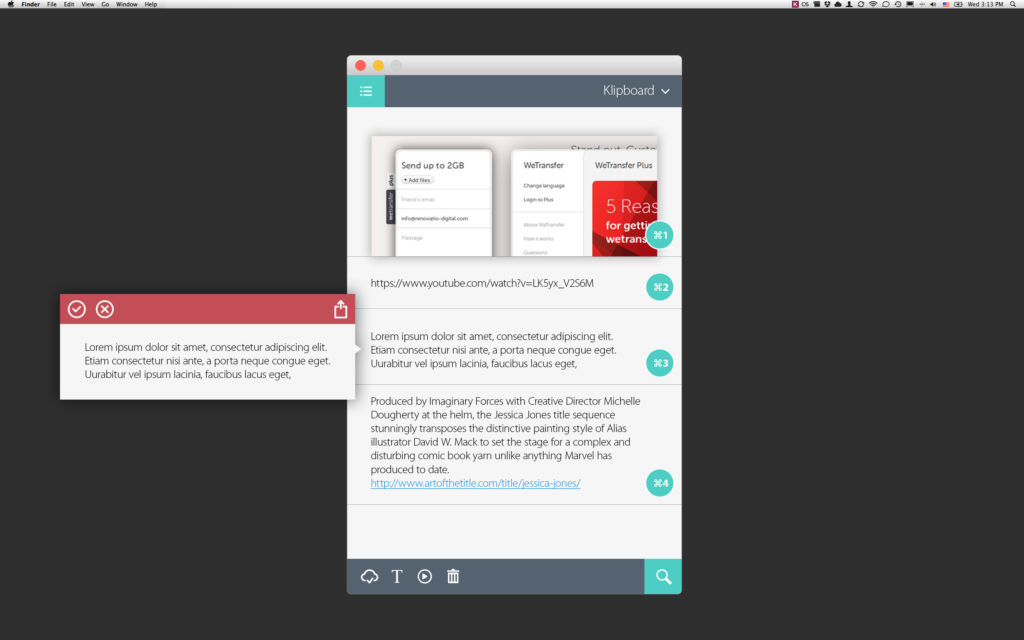
- Edit – You can edit any of your clippings.
- Search – This is useful when you have hundreds of clippings to search through.
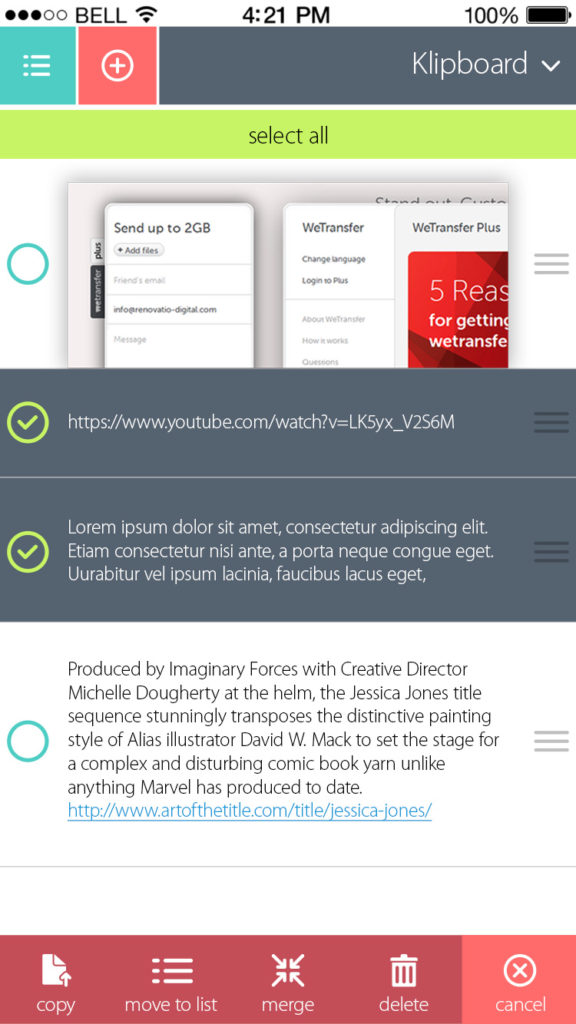
Clicking “Edit” will allow you to edit any of your clippings. You can also select multiple clippings to move to a list for organization or even merge them into one single clipping.
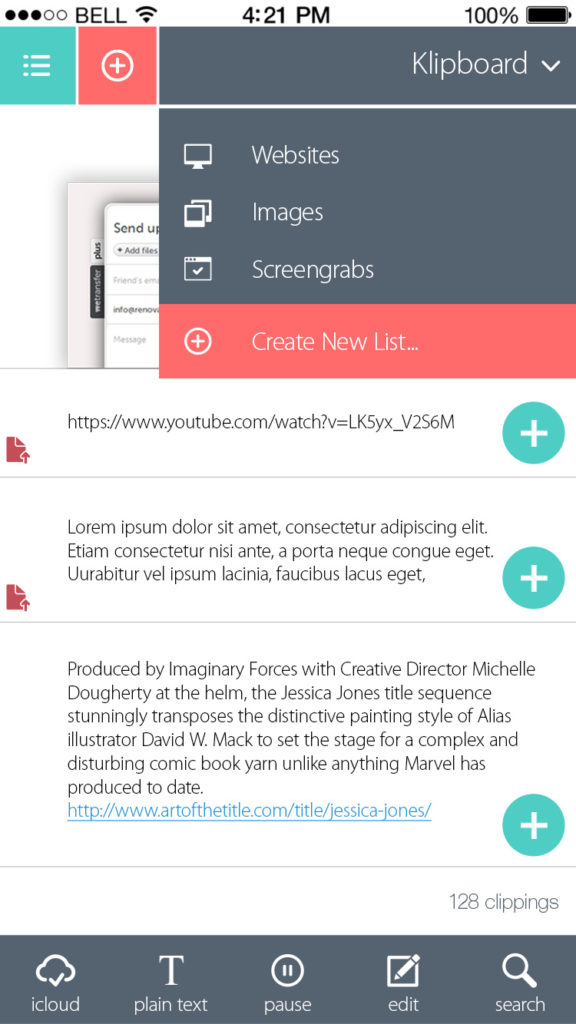
The pulldown menu at the top right will show you the different default lists available. By default, we organize your current clippings into websites and images. Navigate back to the “Klipboard” root list to view all of your clippings together. You can “Create New List” to stay organized and create custom lists for specific related clippings.
How to add and use your Klipboard keyboard
Go to your iOS settings -> General ->Keyboard -> Keyboards -> Add New Keyboard… -> Klipboard
This will add your Klipboard keyboard to your current selectable keyboards.
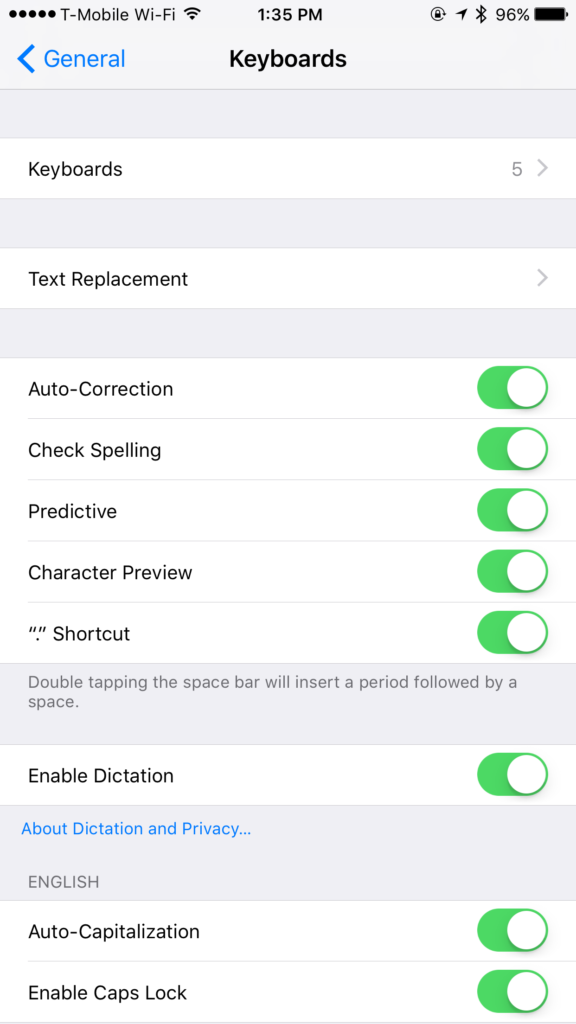
You will now be able to easily access your Klipboard from your keyboard and insert any of your clippings.
Hope you found this helpful! Let us know below, so we can improve our support. 🙂
Welcome to Klipboard! Your intelligent clipboard manager. Klipboard helps manage all of your copied clippings for easy access across all of your iOS and Mac devices. It will help you stay organized and improve your productivity.
Below is the introduction overlay you see when you first open Klipboard on macOS.
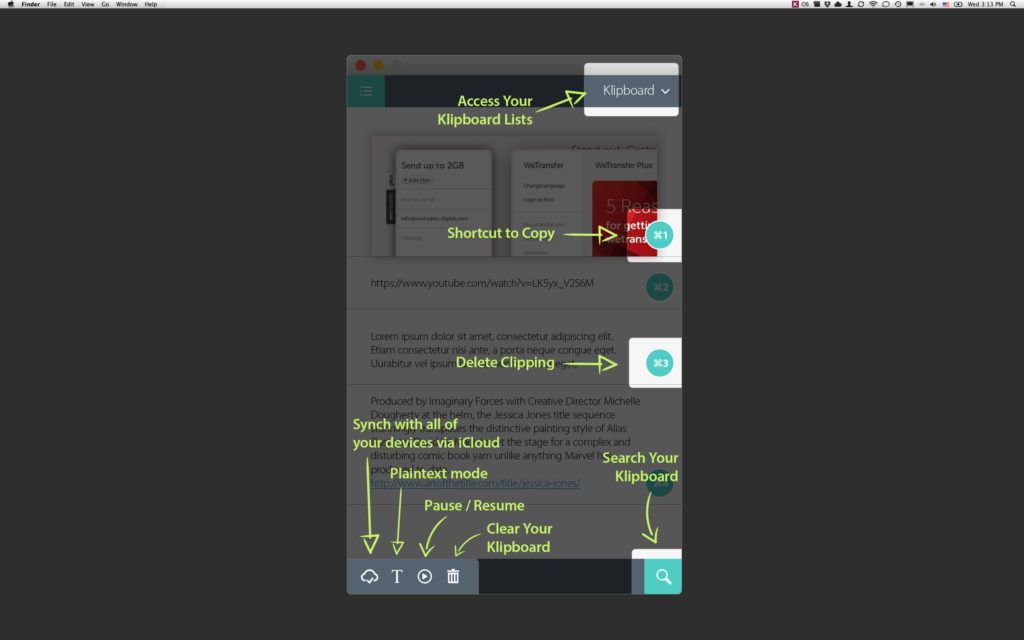
Let’s start from the top with “Klipboard Lists”.
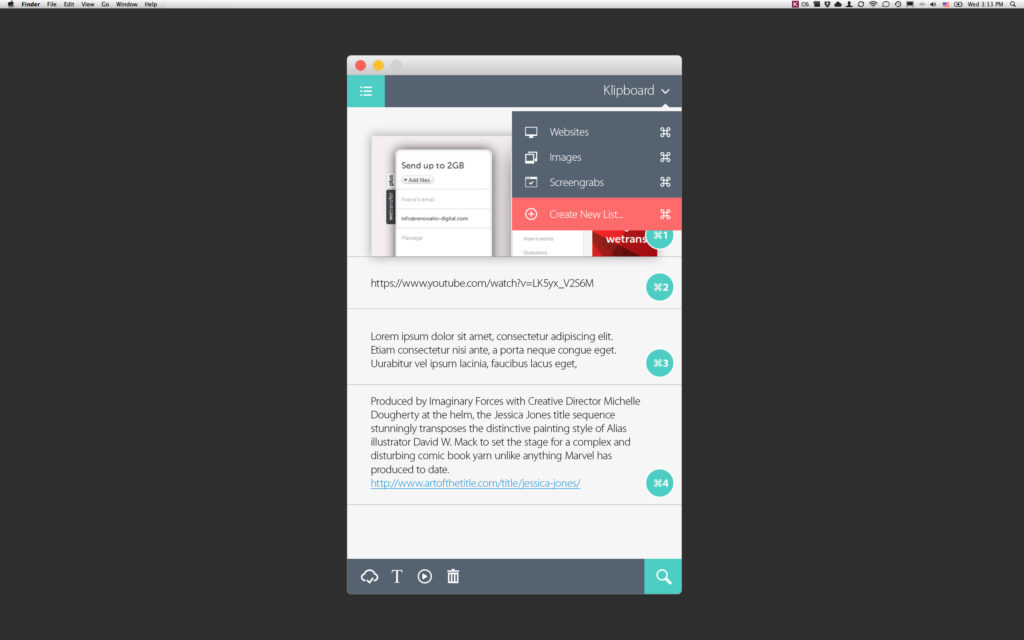
You default root list is the list titled “Klipboard”. Here you will see all of your clippings. Default pre-set lists include images and websites. You can choose “Create New List” to create new category lists to organize your other clippings.
On the main screen, you will notice the shortcut keys on the right-side. These shortcut combinations allow you to easily copy these saved clippings onto your current clipboard. Right click to delete or edit any clipping.
You will also notice 5 options in the menu bar below.
- iCloud – This will sync your clippings on to iCloud and all the devices connected to your iCloud account with Klipboard installed (e.g. your Mac, iPod, iPad, other iPhones)
- Plain Text – This will switch to plain text mode and won’t copy fonts face, type, size, etc.
- Pause – This will pause saving to your Klipboard. When you don’t want to save certain items to your Klipboard.
- Clear – This will completely clear and delete all of your clippings from your Klipboard.
- Search – This is useful when you have hundreds of clippings to search through.
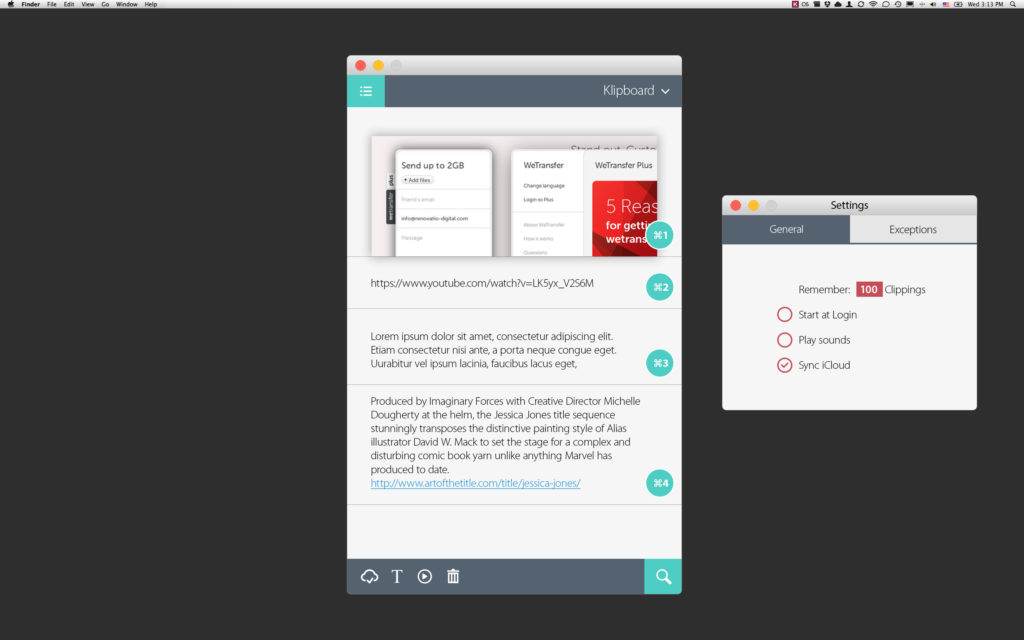
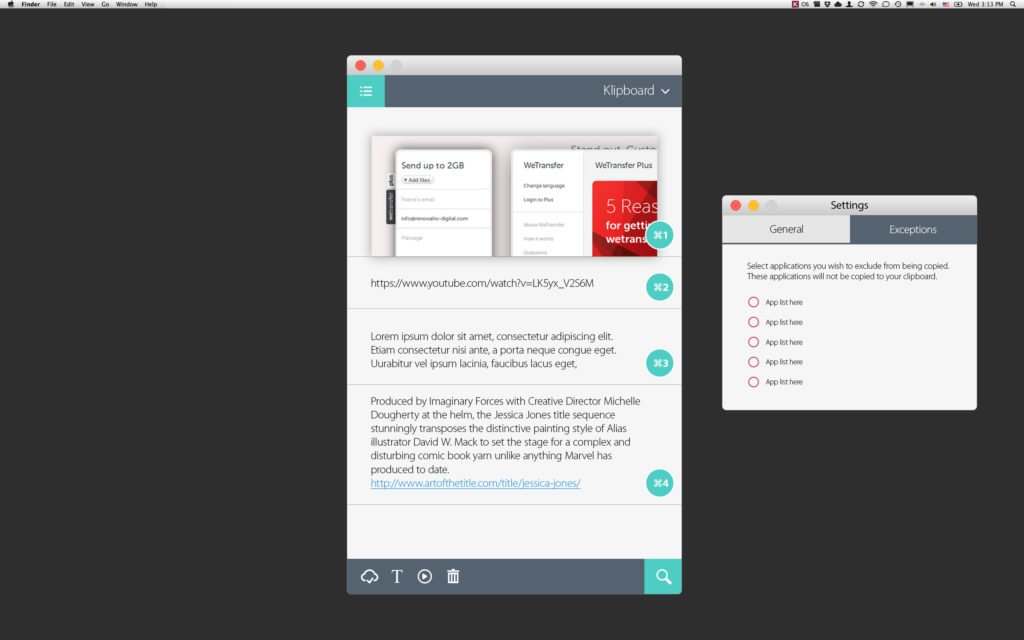
Settings will allow you to edit how many clippings to save and also access “exceptions”. “Exceptions” is our blacklist where you can exclude any private apps where you do not wish to copy sensitive information onto your Klipboard.
Hope you found this helpful! Let us know below, so we can improve our support. 🙂
Green Screen Studio Support
You can find a lot of useful information on how to use Green Screen Studio under the “Info” button on the top toolbar.Here’s a great demo of Green Screen Studio on the iPhone by EatAppleNews.com
Here’s a great demo of Green Screen Studio on Mac OSX by EatAppleNews.com
If your image is having trouble getting all of the green screen removed using the Auto Green Screen button, check your green screen. Any blemishes or shadows may affect the green screen technology from properly identifying the green screen.
The biggest challenge when setting up a green screen is even lighting and the avoidance of shadow, because it is best to have as narrow a color range as possible being replaced. A shadow would present itself as a darker color to the camera and might not register for replacement.
Please try rebooting your device, as many bugs are due to memory issues. You can also try uninstalling and reinstalling the app. Photography apps are very memory intensive and this will usually resolve it.
If you have just downloaded the app or have updated to the newest version, remember to reboot your device. Just like Windows and Mac OSX, rebooting is recommended after installing new software.
Many bugs are due to memory issues. You can also try uninstalling and reinstalling the app. Photography apps are very memory intensive and this should resolve it.

General Support
All purchases and refunds are handled directly by Apple.
If you would like to ask for a refund for our application that you have purchased on Mac App Store, you should contact Apple Mac App Store Support by going to the following link:
http://www.apple.com/support/mac/app-store/contact/
There, click on the Account and Billing button and request a refund.
Please be specific about why you request the refund.
Apple handles all purchases and refunds. For detailed instructions on getting a refund, visit the following link:
http://gizmodo.com/5886683/how-to-get-a-refund-from-the-app-store
Quit the app by navigating to the top menubar and selecting “Quit” from the pulldown menu OR shortcut press CMD+Q together while the window is active.
Open Finder and navigate to your Applications folder. Drag & drop the app to your Trash and empty your Trash Can.
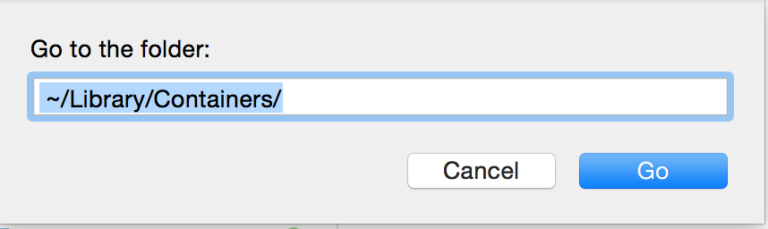
To remove all traces of the app, you can also press SHIFT + CMD + G to open up the shortcut and navigate to ~/Library/Containers/
From here you will see stored data from all of your apps. Just look for the app you just removed to remove all traces of it. All done! 🙂
To reset the app back to the default settings when it was first installed you will need to remove all traces of the app’s configuration.
Open Finder.
Press SHIFT + CMD + G to open up the shortcut and navigate to ~/Library/Containers/
From here you will see stored data from all of your apps. Just look for the app that you wish to remove the saved configuration files. It will usually follow the format of com.developername.appname.
If you can’t see this folder, it may be “hidden”, please follow the steps on this website.
Reboot your machine after deleting this and then restart the application.
If your app is crashing frequently, we’ll help debug and fix this issue. We’ll need to see the crash logs from you to help us diagnose any issues. Crash logs contain information about what the app was doing just prior to the crash. To find a log file, please open ~/Library/Logs/DiagnosticReports/ in the Finder. You may have to hold down the option key when using the Go menu in the Finder to open the Library folder (this is needed on Lion and above).
Duplicate Photo Cleaner Support
User Guide
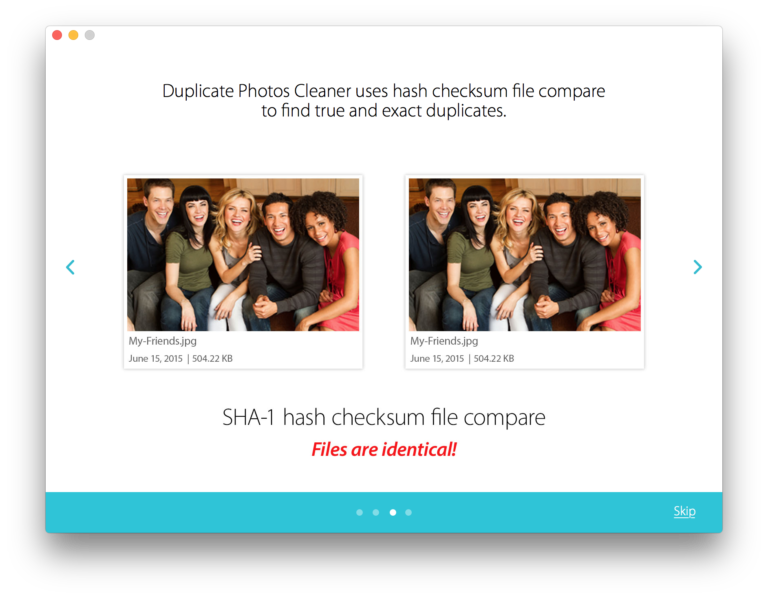
Congratulations on downloading Duplicate Photo Cleaner, the #1 fastest duplicate photo scanning algorithm on the Mac App Store.
We use a true SHA-1 checksum file compare to ACCURATELY find legitimate duplicates. This means that it finds all duplicate photos by looking at the actual HASH value. So if the contents of the file are changed in anyway, then it is no longer a legitimate duplicate since the hash values are different. Duplicate Photo Cleaner does not remove similar photos. Only TRUE and EXACT duplicates with the same hash value. Renaming a file does not change the file contents, so Duplicate File Cleaner will still find all duplicates even if they are named differently.
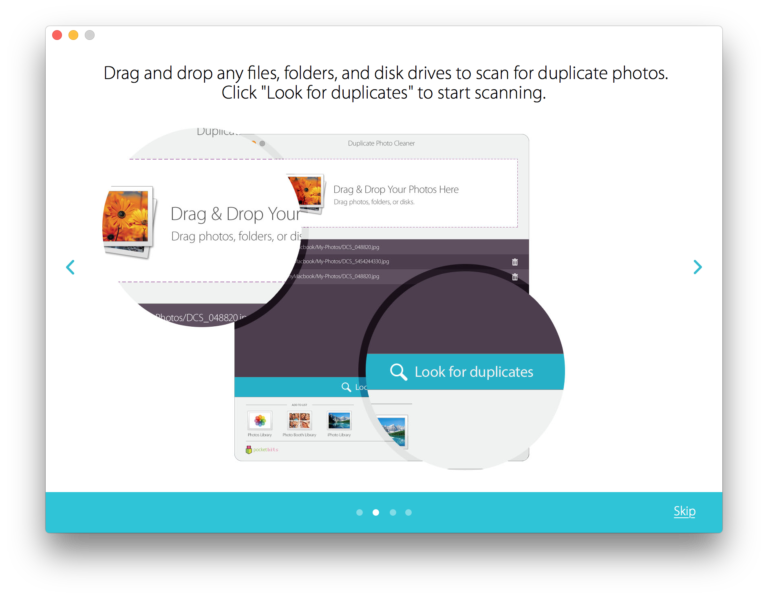
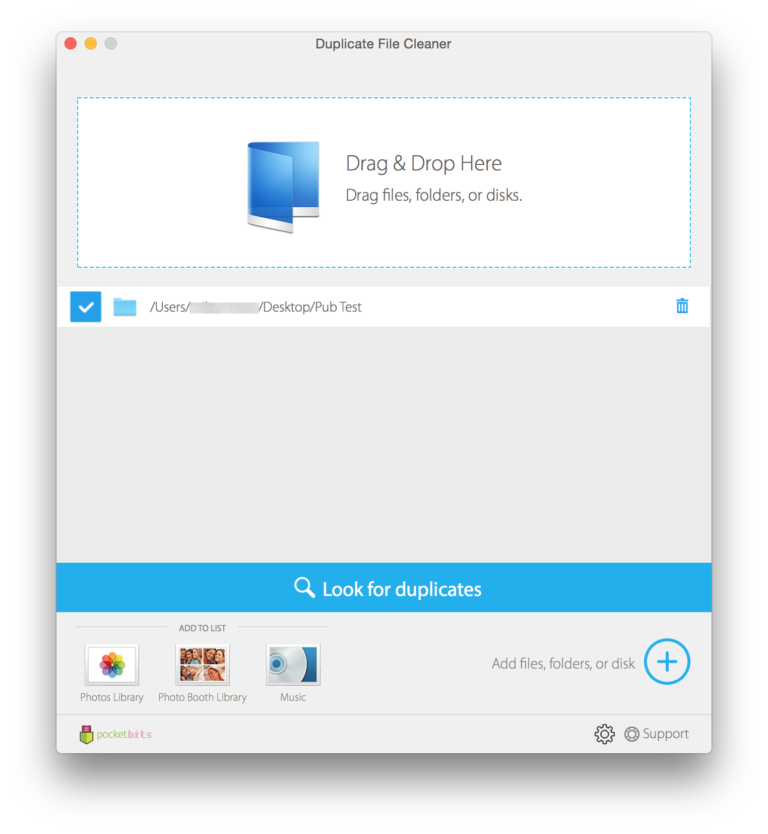
Getting started is easy and painless. Just drag & drop any folder to find all your duplicates.
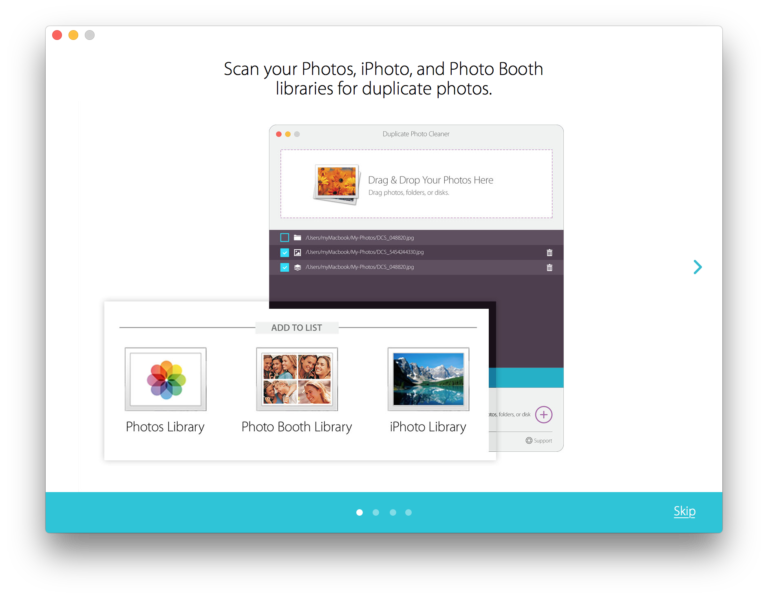
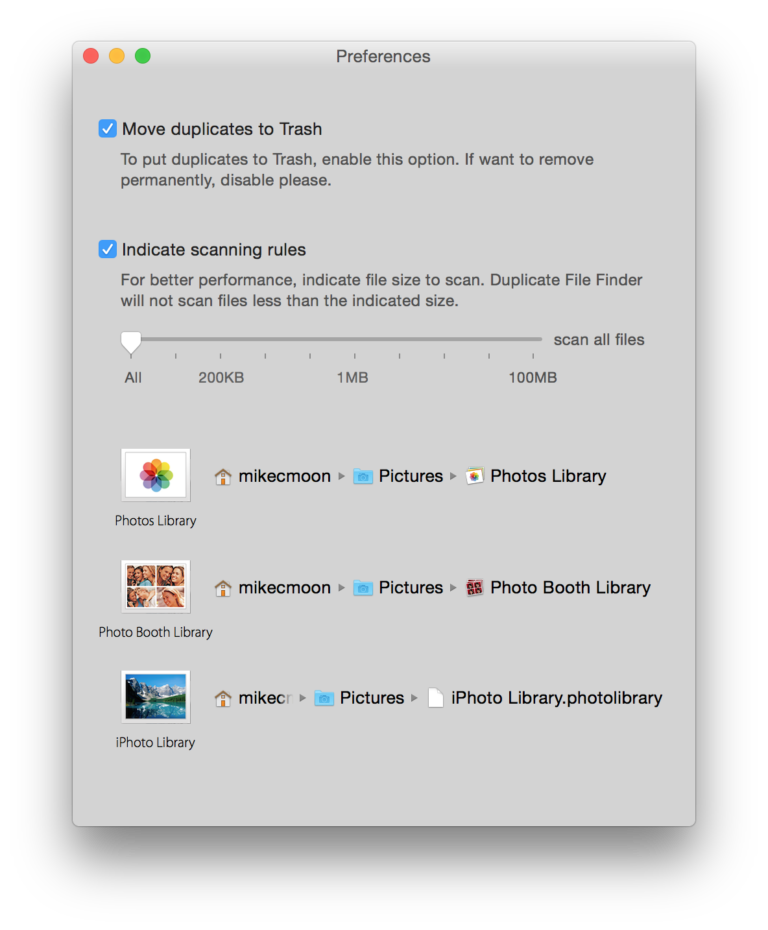
Scan your iPhoto, Photo Booth, and Photos Libraries for duplicates by adding them from the icons on the bottom left (*please remember to close Photos/iPhoto applications when scanning).
If you’ve moved the location of your photos, iphoto, or photo booth libraries, you can select the settings icon on the bottom or navigate to the top menu Duplicate photos Cleaner -> Preferences.
From here you can edit/change the location of your libraries. You can also choose to automatically move deleted files to the trash or to permanently delete them automatically.
We suggest “Move duplicates to Trash” just in case you accidently remove duplicates you might want to recover.
You’ll also see scanning rules which allow you to only scan photo files larger than a certain file size. This is useful if you’re only removing duplicate photos to free up more disk space and don’t want to bother with smaller photo sizes.
Once you’ve added all of the locations you want to scan, just click “Look for duplicates”.
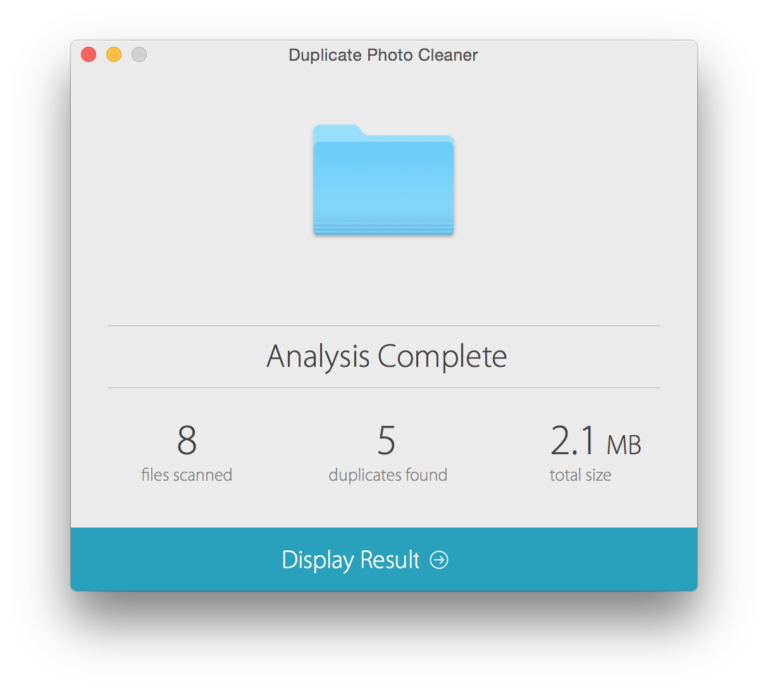
If it detects duplicates, you can click “Display Result” to choose which duplicates to remove.
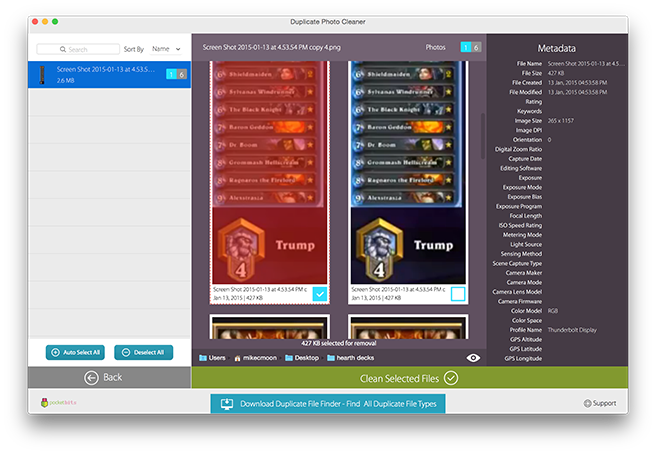
Click “Auto Select All” to automagically select all duplicate photos and keep the original photo. You will be able to see thumbnails of every duplicate photo and the metadata. You can see the file name up top and the file location on the bottom. Click the “eye” icon on the bottom to reveal the location in Finder to see the files.
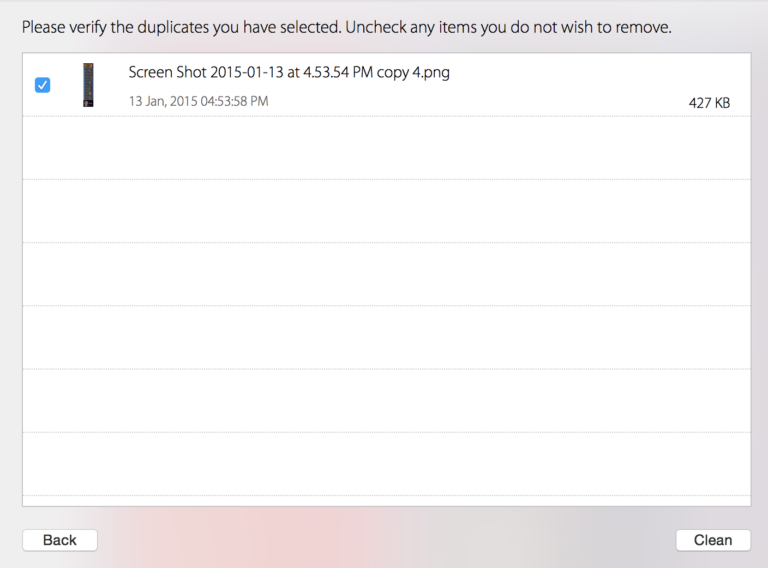
Click “Clean Selected Files” to remove all of your duplicate photos. You will get one more confirmation screen to make sure the selected files are the files that you want to delete.
That’s it! You’ve successfully removed your duplicate photos! Congratulations! 🙂
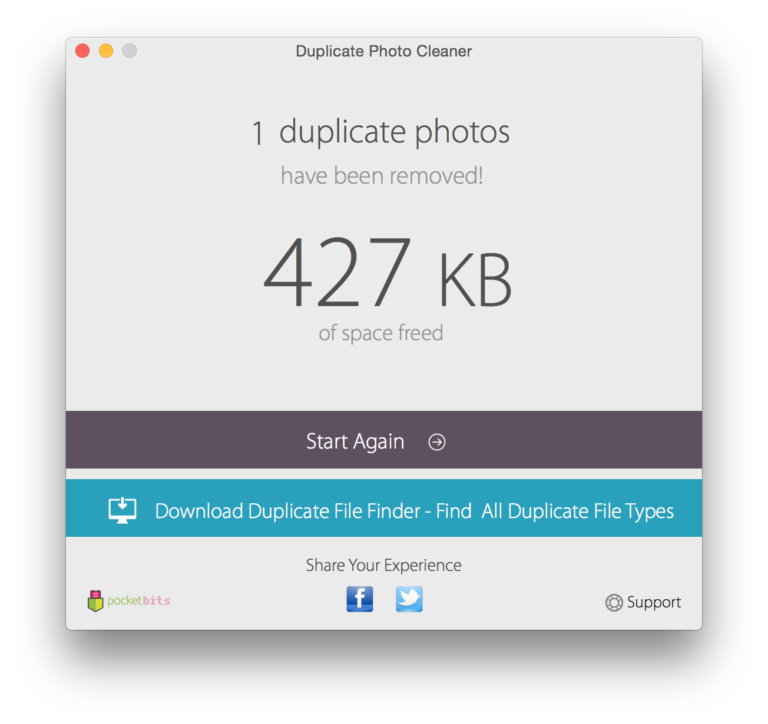
Hope you found this guide useful. Let us know down below. Email us at support@pocketbitsllc.com with any comments, bugs, or suggestions. We’d love to hear from you! Your love and support helps us update our apps to continue bringing you the very best of apps. Thank you!
To check the SHA-1 and/or MD5 hash checksum of your files, navigate to your terminal. You can use the shortcut to open up spotlight and type “terminal”.
Once in termal you can type the syntax:
shasum /path/to/file
To verify a file named “test.png” and “test2.png” in the current folder we’re in, it would be:
shasum test.png test2.png
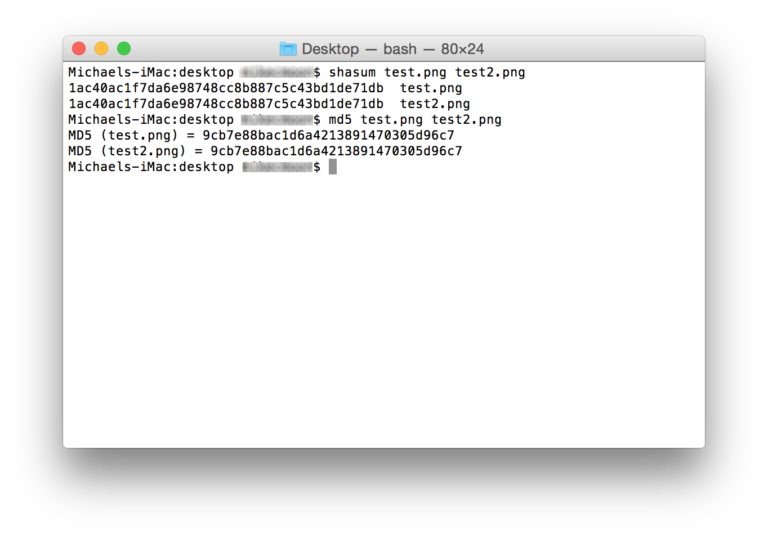
That long hexadecimal string is the SHA1 hash.
Similarly for MD5, you can type the same syntax:
md5 /path/to/file
To verify a file named “test.png” and “test2.png” in the current folder we’re in, it would be:
md5 test.png test2.png
In the above screenshot you can also see the MD5 example.
For more details on checking your hash, you can visit the following links.
http://osxdaily.com/2012/02/05/check-sha1-checksum-in-mac-os-x/
Please remember to close Photos/iPhoto applications when scanning. Run the scanner after you close the applications and it should work. 🙂
If you are on a network drive or external drive, files can only be permanently deleted because they do not have “.trash”. Remember to set settings to permanently delete under preferences/settings in the app for these drives.
Warning: They will be permanently deleted and NOT recoverable.
Duplicate Photo Cleaner uses a true SHA-1 checksum file compare to ACCURATELY find legitimate duplicates. This basically means that it finds all TRUE duplicate files by looking at the actual HASH value. Renaming a file with a different name doesn’t change this. Similar photos are not exact duplicates and do not have the same hash value.
If the photo contents are altered, then it is no longer a legitimate duplicate and Duplicate Photo Cleaner will not flag it as a duplicate.
If it is not detecting your images as duplicates, then they are not TRUE duplicates. They were altered. Duplicate Photo Cleaner only finds all legitimate duplicate files.
You can check your SHA-1 and MD5 hash checksums to see if they are true duplicates by following the guide in this article:
Duplicate File Cleaner Support
User Guide
Duplicate File Cleaner uses a true SHA-1 checksum file compare to ACCURATELY find legitimate duplicates. This means that it finds all duplicate files by looking at the actual HASH value. So if the contents of the file are changed in anyway, then it is no longer a legitimate duplicate since the hash values are different. Renaming a file does not change the file contents, so Duplicate File Cleaner will still find all duplicates even if they are named differently.
Getting started is easy and painless. Just drag & drop any folder to find all your duplicates.
If you want to scan your iPhoto/Photos, Photo Booth, and Music Libraries for duplicates, add them to your list from the bottom left (*please remember to close Photos/iPhoto applications when scanning). Duplicate File Cleaner supports scanning multiple locations at once.
If it detects any duplicates, click “Display Result”.
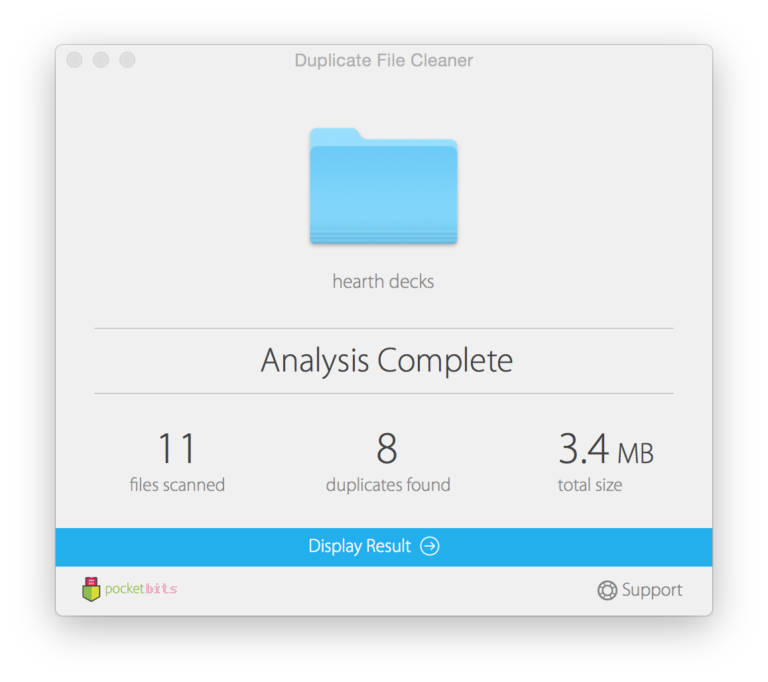
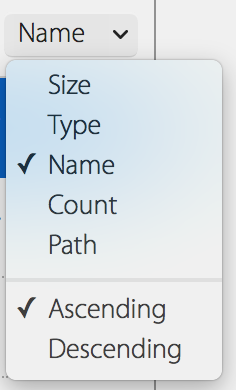
You will see all the duplicates on the left navigation bar. You can sort this list.
In our example we have 8 duplicates. On the right navigation bar, we see that there are 2 different files. The first file has 7 copies. The second file has 3 copies. 10 total files. This gives us a total of 8 duplicates and 2 originals (10 total files).
Selecting “Auto Select All” will do all the work for you and automatically select all the copies and leave 1 original copy for you to keep.
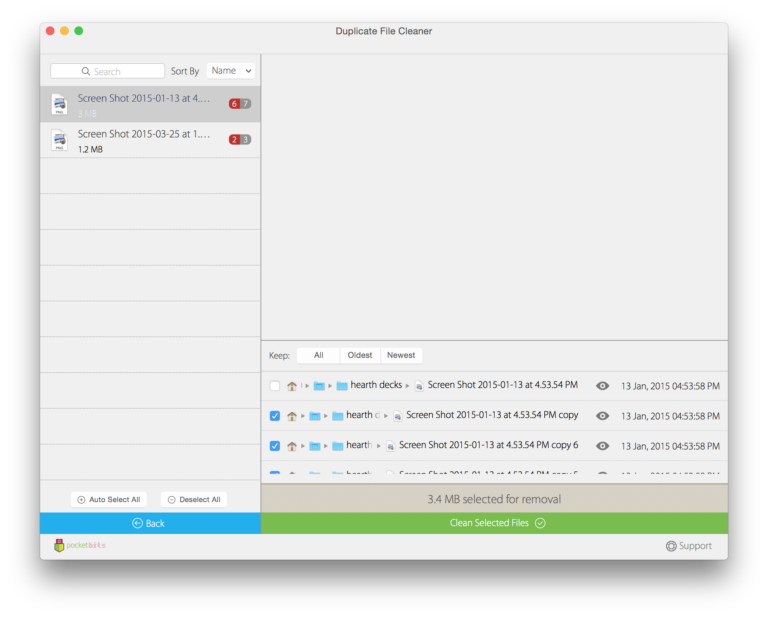
In our example you will now see the 6 duplicates selected out of the 7 total copies for the first file. Second file has 2 duplicates selected out of the 3 total copies.
The bottom navigation window shows you the file details and location. Selecting any of these files will show you the preview up top. Click the “eye” icon to reveal the files in Finder and see exactly where those files are.
Press “Clean Selected Files” to remove all of your duplicates!

Congratulations, you’re done!
For advanced users, you can customize your scan settings under preferences. Located on the bottom right of the home screen or from the drop down menu on the top left.
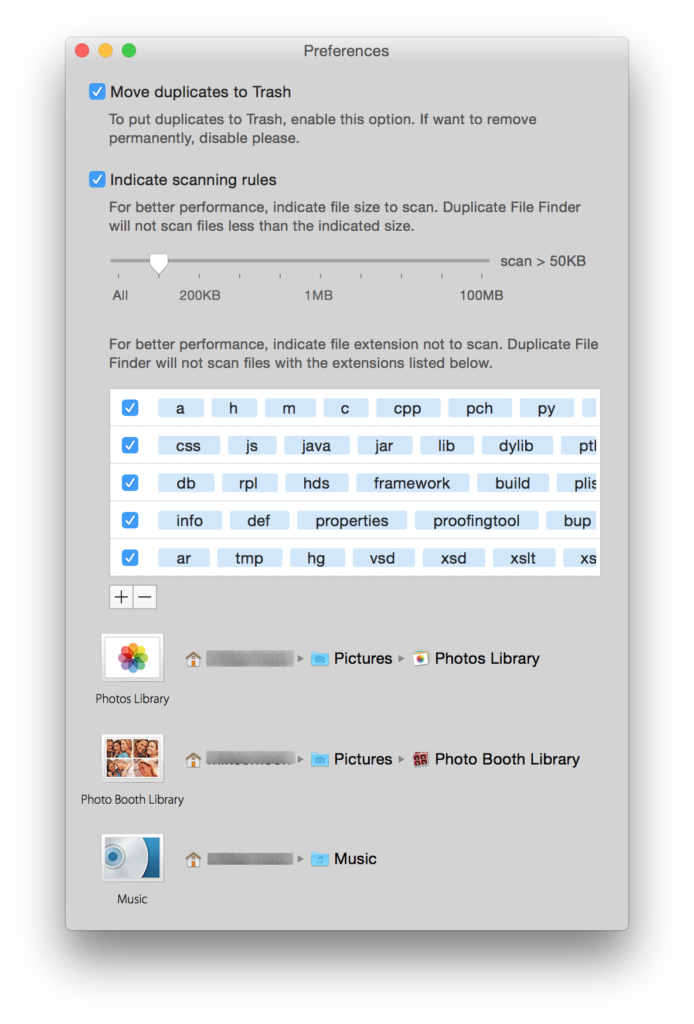
Here you can choose to scan files only greater than a certain file size for faster/optimized scanning of large files. You can also put custom file extensions you do not wish to scan. You will see your Photos, Photo Booth, and Music library locations on the bottom.
Hope you enjoyed the tutorial. Let us know down below. 🙂
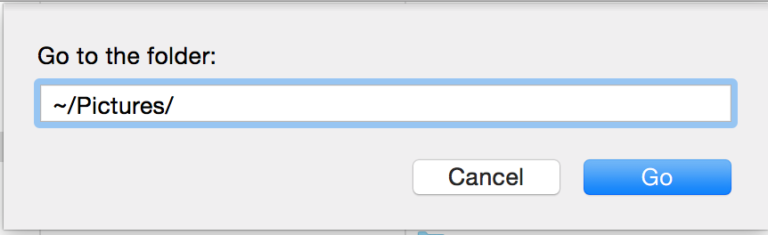
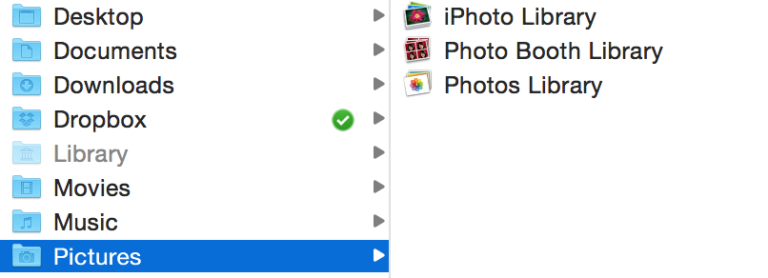
Navigate to your “Pictures” folder. You can also press SHIFT + CMD + G to open up the shortcut and navigate to ~/Pictures/
From here you should see your iPhoto, Photo Booth, and Photos Libraries.
Drag & Drop these to scan for duplicates. That’s it! 🙂
To check the SHA-1 and/or MD5 hash checksum of your files, navigate to your terminal. You can use the shortcut to open up spotlight and type “terminal”.
Once in termal you can type the syntax:
shasum /path/to/file
To verify a file named “test.png” and “test2.png” in the current folder we’re in, it would be:
shasum test.png test2.png

That long hexadecimal string is the SHA1 hash.
Similarly for MD5, you can type the same syntax:
md5 /path/to/file
To verify a file named “test.png” and “test2.png” in the current folder we’re in, it would be:
md5 test.png test2.png
In the above screenshot you can also see the MD5 example.
For more details on checking your hash, you can visit the following links.
http://osxdaily.com/2012/02/05/check-sha1-checksum-in-mac-os-x/
Please remember to close Photos/iPhoto applications when scanning. Run the scanner after you close the applications and it should work. 🙂
If you are on a network drive or external drive, files can only be permanently deleted because they do not have “.trash”. Remember to set settings to permanently delete under preferences/settings in the app for these drives.
Warning: They will be permanently deleted and NOT recoverable.
Duplicate File Cleaner uses a true SHA-1 checksum file compare to ACCURATELY find legitimate duplicates. This basically means that it finds all TRUE duplicate files by looking at the actual HASH value. Renaming a file with a different name doesn’t change this.
If the file contents are altered, then it is no longer a legitimate duplicate and Duplicate File Cleaner will not flag it as a duplicate.
If it is not detecting your images as duplicates, then they are not TRUE duplicates. They were altered. Duplicate File Cleaner only finds all legitimate duplicate files.
You can check your SHA1 and MD5 hash checksums to see if they are true duplicates:
DiskZilla Support
Congratulations on taking a step towards optimizing your Mac with DiskZilla.
We’ve bundled 8 of our best award winning applications to help you optimize and clean your Mac.
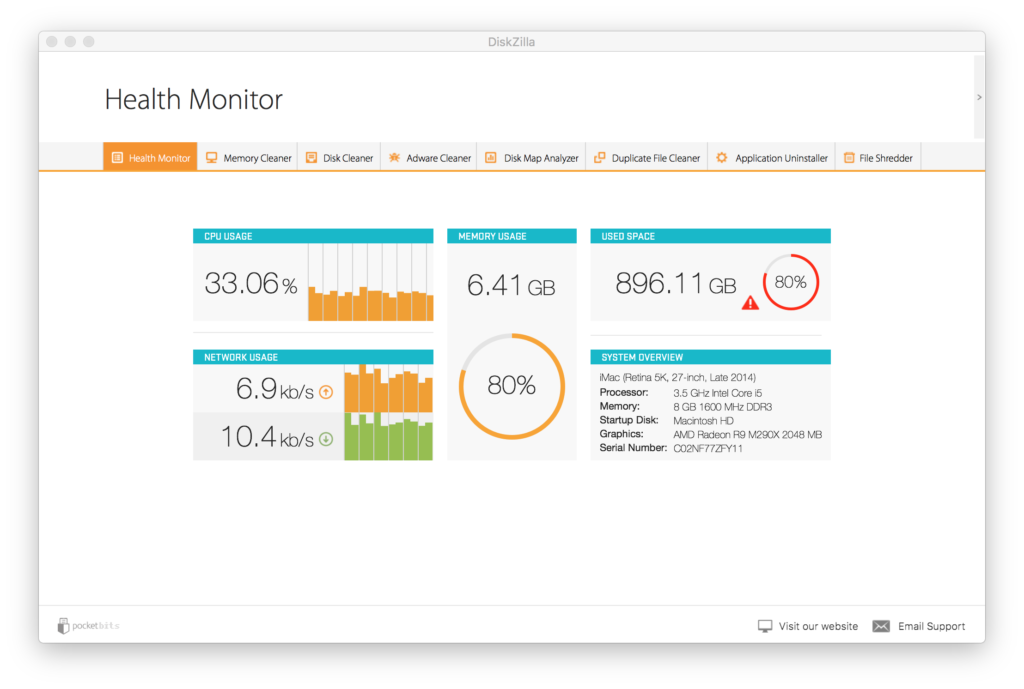
Health Monitor
Here you will see a convenient dashboard of your Mac’s analytics. Used space will be flagged red when DiskZilla detects you are using a significant amount of disk space and is recommending you to use “Disk Cleaner”.
Memory cleaner breaks down your system memory into a more granular view. You will see the exact usage by memory type. (e.g Wired, Compressed, File Cache, App Memory). You will also see which apps are using significant memory.
Click “Optimize” to free up space. You will immediately see the results.
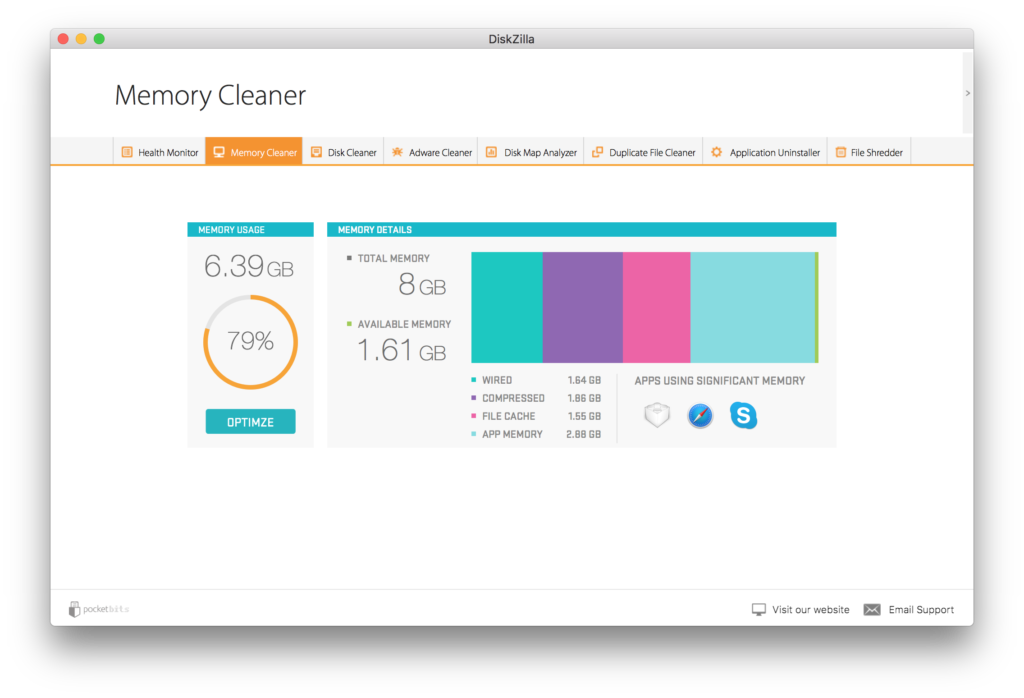
*Tip: Memory cleaner is most efficient when used after closing a memory intensive application you don’t plan on using for a while.
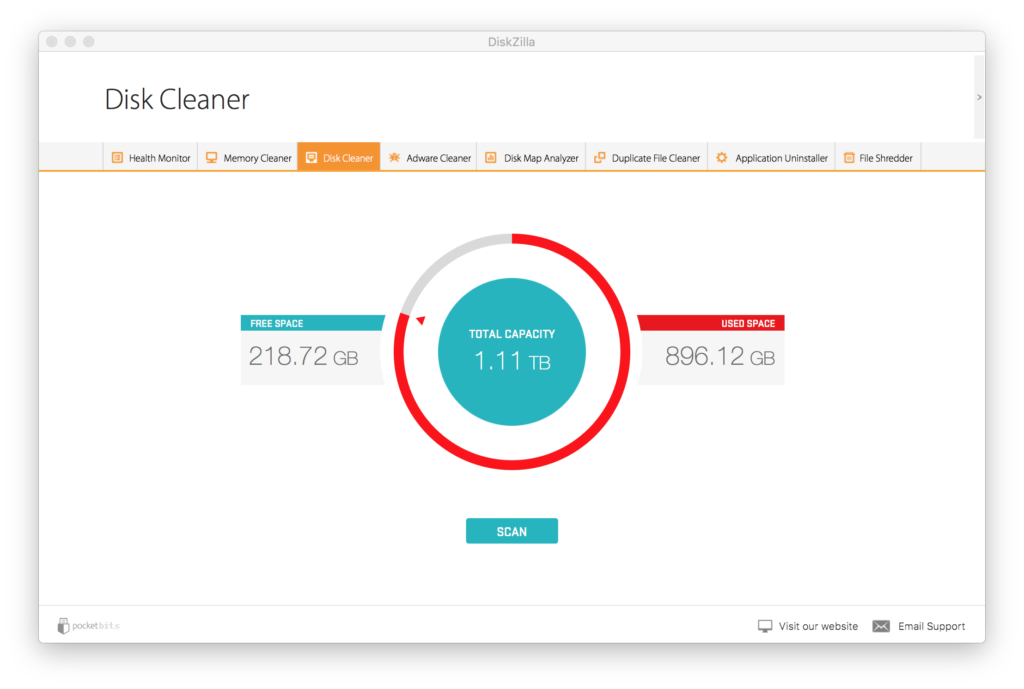
Disk cleaner will first show you your free disk space, used disk space, and total disk space.
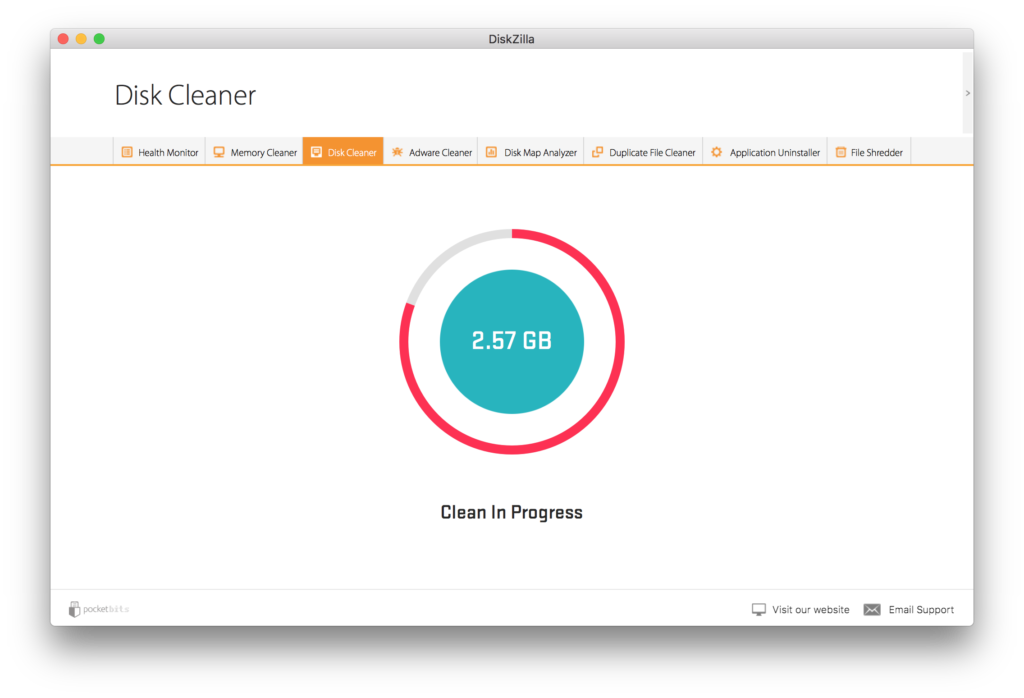
Press “Scan” to have the Disk Cleaner algorithm discover what needs to be cleaned.
By default you will notice that the “safe” items are pre-selected for cleaning. This includes Trash, Browser Data, Application Logs, and Application Caches. Possibly more depending on what Disk Clean
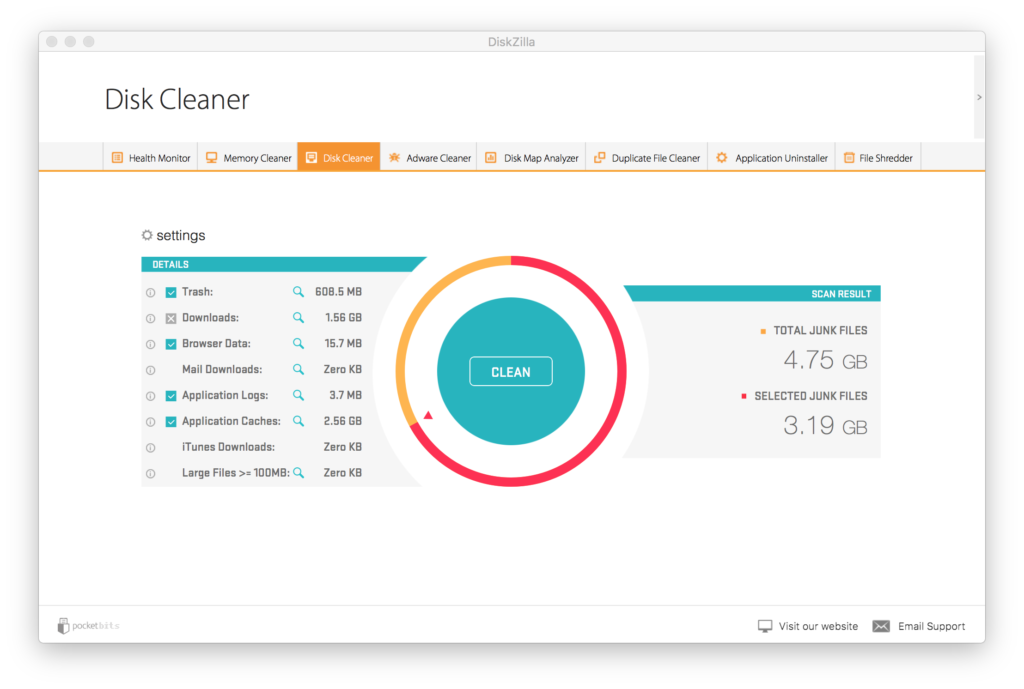
Downloads and Large Files will never be automatically selected. You may have important files under your documents folder, so please use caution and check these files to make sure you want to delete them before cleaning. Clicking the “i” info button will give you a detailed description of what each category is that is marked for deletion.
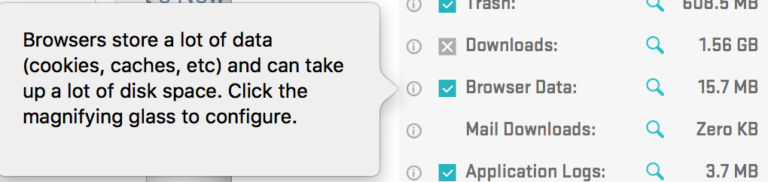
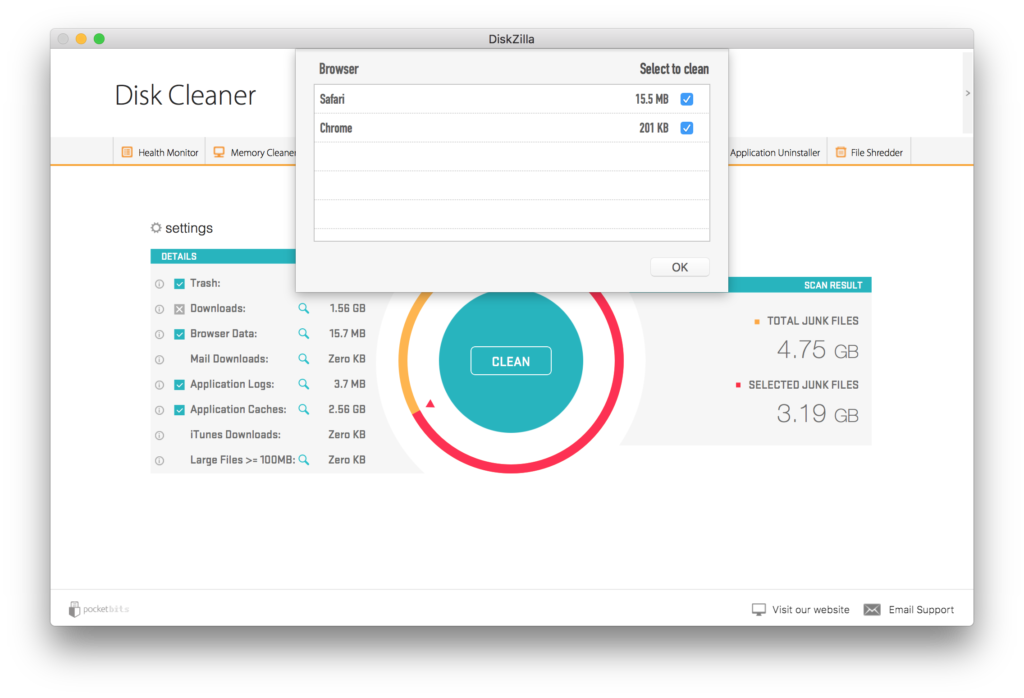
The magnifying glass icon on the right side will show you additional options or take you to the actual folder that the “Downloads” or “Application Logs” are located.
(below example shows your options for “Browser Data”)
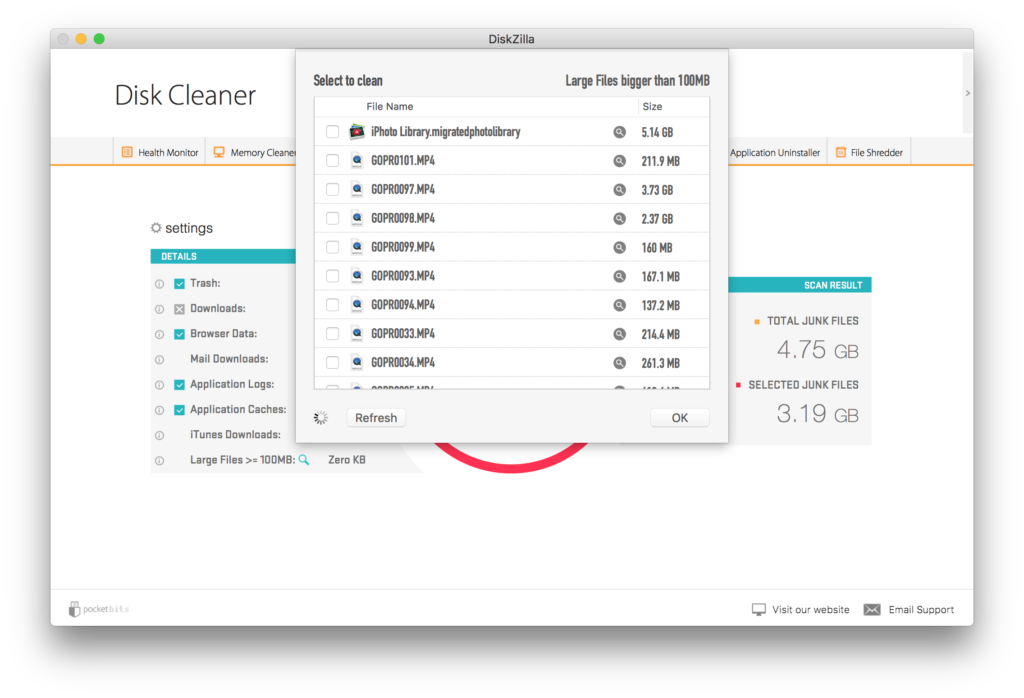
Clicking the magnifying glass for “Large Files > 100MB” will show you an organized list of all files on your Mac that are bigger than 100MB. Here you can identify and select the largest files that you might have forgotten about. You can go to the location of these files by clicking the magnifying glass next to them.
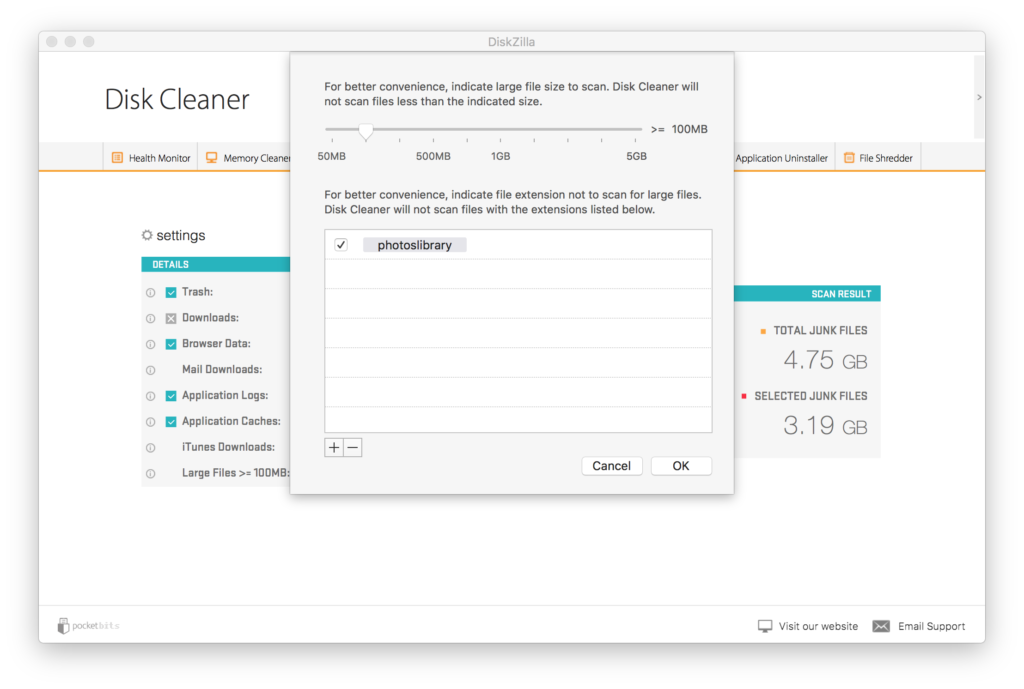
Click the “settings” icon to view the rules for scanning for “Large Files”. Here you can filter the search to exclude anything by file extension. You may also adjust the size for the files you are scanning for. (e.g. If you only want to scan for large files greater than 500MB)
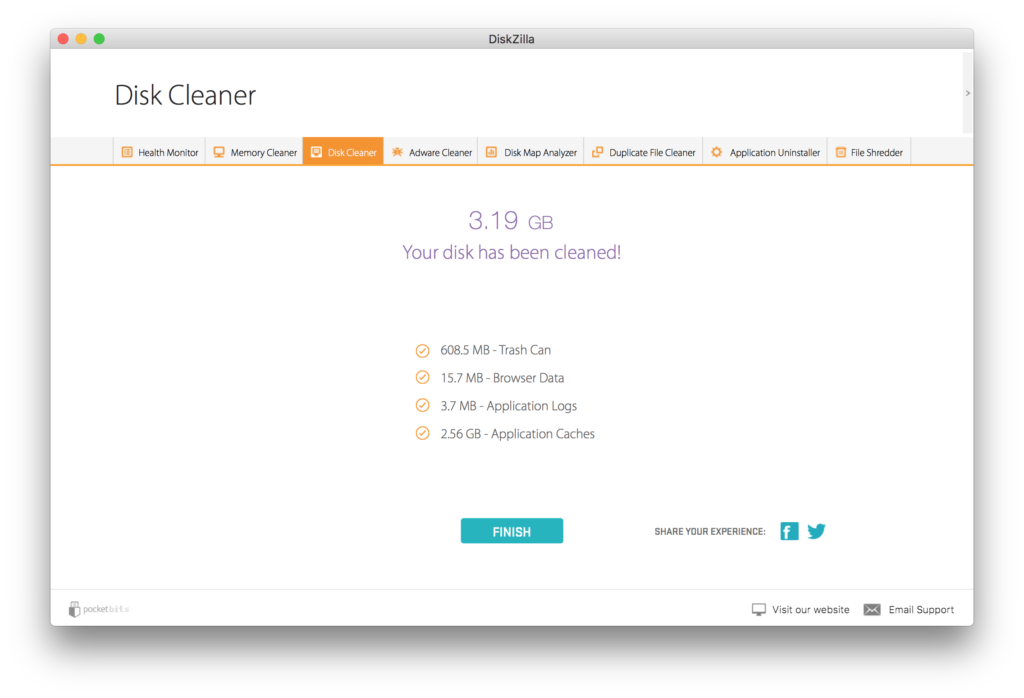
Finally click “Clean” when you are ready to clean the selected items on your Mac.
Congratulations. You’ve finished cleaning your disk!
Click the settings icon in the center to choose which browser extensions to also clean. This is required as a lot of harmful adware will tend to hide in disguise as browser extensions. This will not reset your bookmarks and history. You can reinstall your favorite trusted browser extensions again after the clean is complete.
If you still experience Adware symptoms, please check the support options on the right side. We have documentation, tips, and also a convenient email button to contact support. You will be answered within 24 hours.
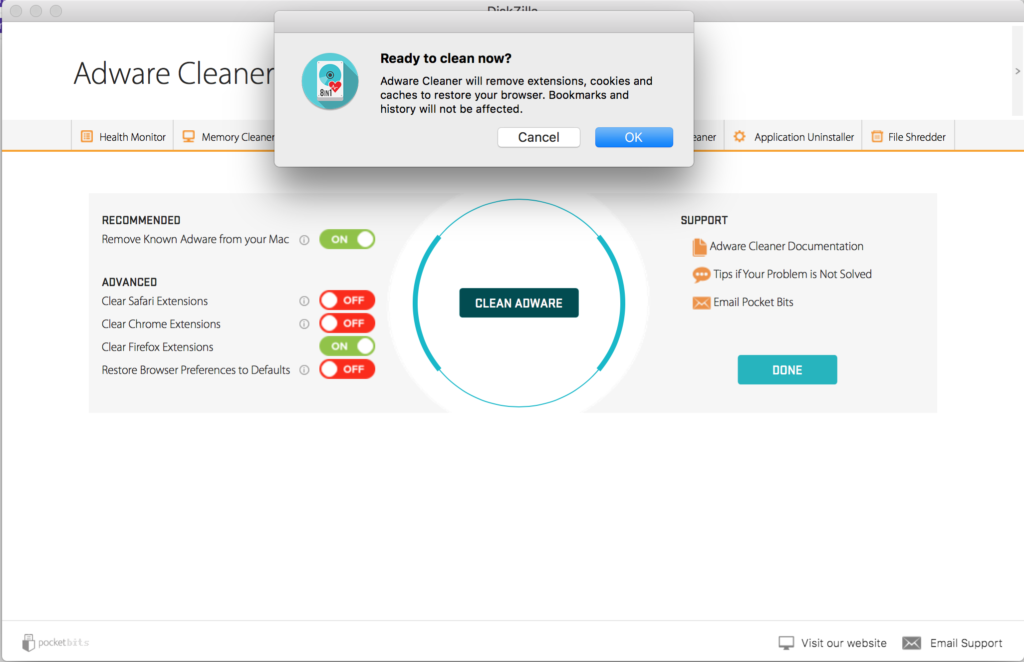
Congratulations! You’re adware has now been cleaned. Please also check out tips on how to prevent more adware in the future.
Disk Map Analyzer
Drag and drop your folder or disk to map your drive.
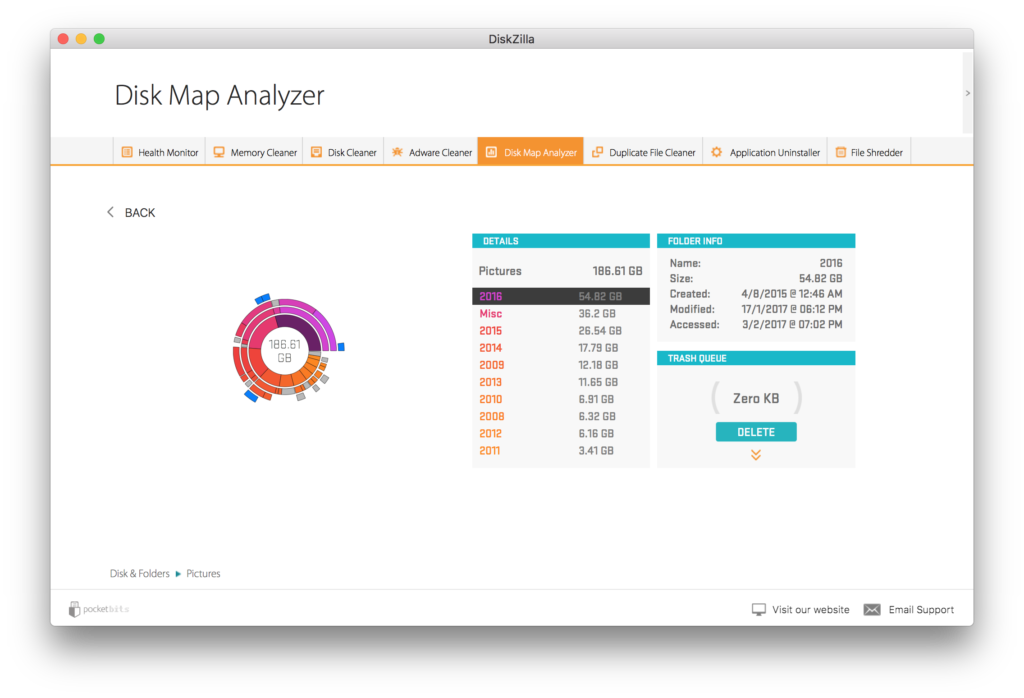
At the highest tier (centermost) you will see the different folders/files. As you move to the outermost layers, you will be traversing down to the lowest tier. Click the very center to navigate back up to the highest tier.
You can hover your mouse over the sunburst map to reveal the file/folder information on the right side. You can also navigate over the file/folder on the right side and you will see that part of the sunburst map highlighted on the left sunburst map. Clicking any part of the sunburst will navigate to that file or folder. Our goal was to create a beautiful and intuitive interface that felt familiar.
The right side toolbar will feel very familiar because it mimics the utility of your native OSX Finder. Just like Finder, you can select a file and preview it by pressing “spacebar”. You can also right click any file/folder to reveal it in Finder. You’ll also notice the top of the window shows the file-path that you are currently in, which you can click around to navigate.
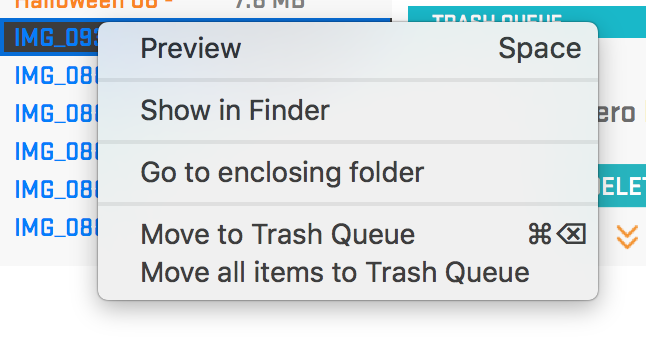
Anything is selectable to move to the trash queue. You can either right click and select “Move to Trash Queue” or you can drag & drop it to the trash queue below.
You’ll see the “Trash Queue” with the blinking animation when you drag & drop a file over the correct area.
The trash queue will then populate and update the size of the total files in the trash queue.
Clicking the down arrow in the trash queue will expand it’s contents to see every file/folder that has been added.
Once you have added all the files/folders for deletion, click “Delete” from the trash queue.
Congratulations, you have just successfully learned more about your hard disk. Not only have you navigated it flawlessly, you have found files to clean up your disk.
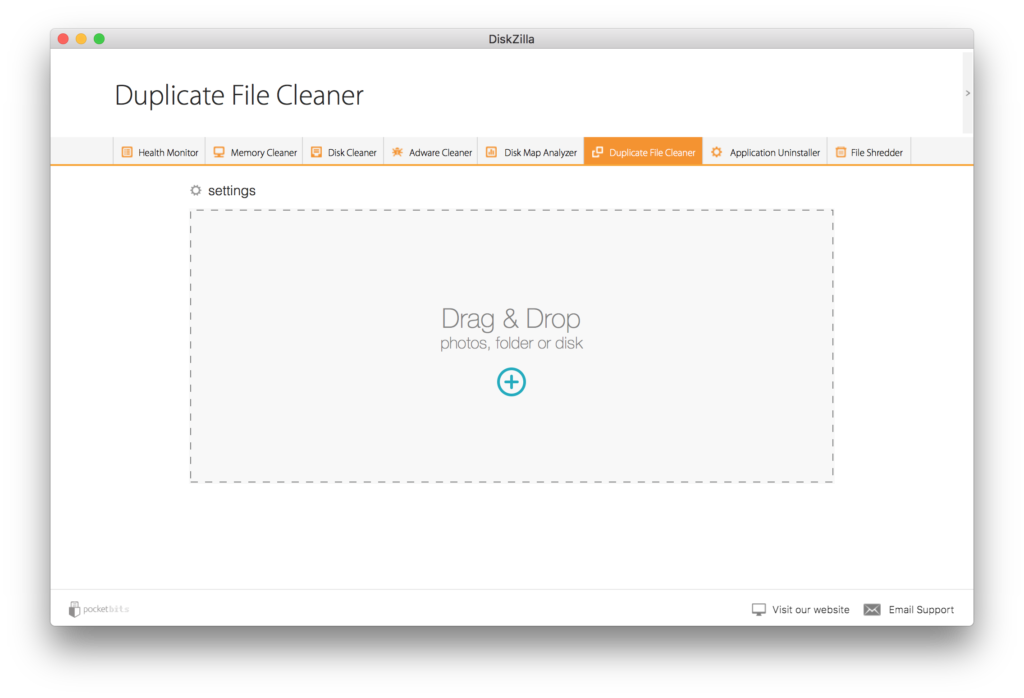
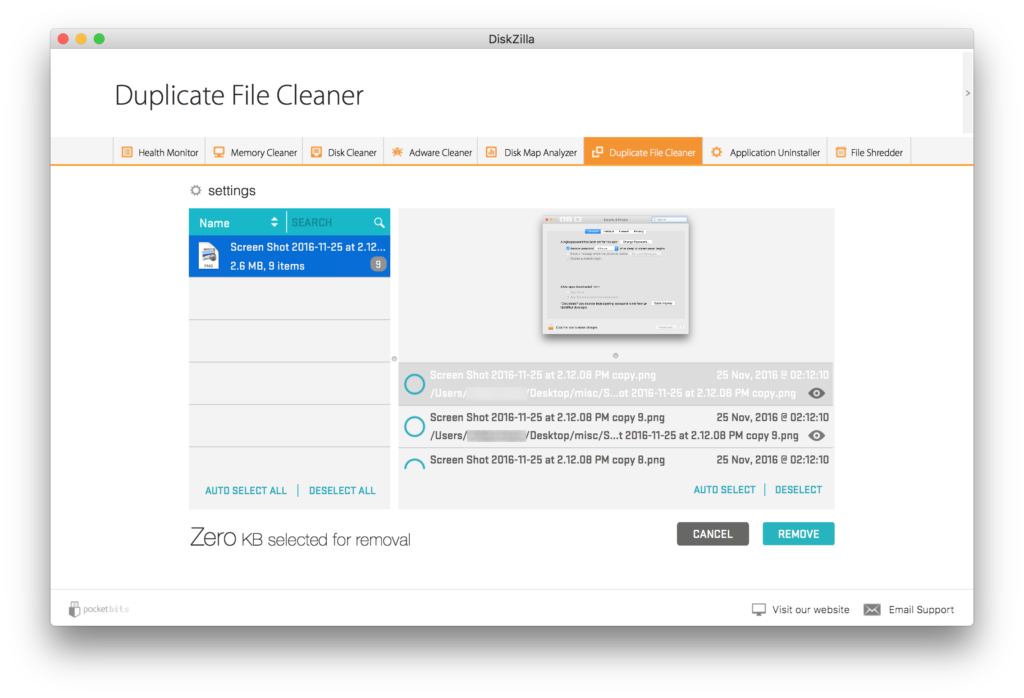
Duplicate File Finder
Duplicate File Cleaner uses a true SHA-1 checksum file compare to ACCURATELY find legitimate duplicates. This means that it finds all duplicate files by looking at the actual HASH value. So if the contents of the file are changed in anyway, then it is no longer a legitimate duplicate since the hash values are different. Renaming a file does not change the file contents, so Duplicate File Cleaner will still find all duplicates even if they are named differently.
Getting started is easy and painless. Just drag & drop any folder to find all your duplicates.
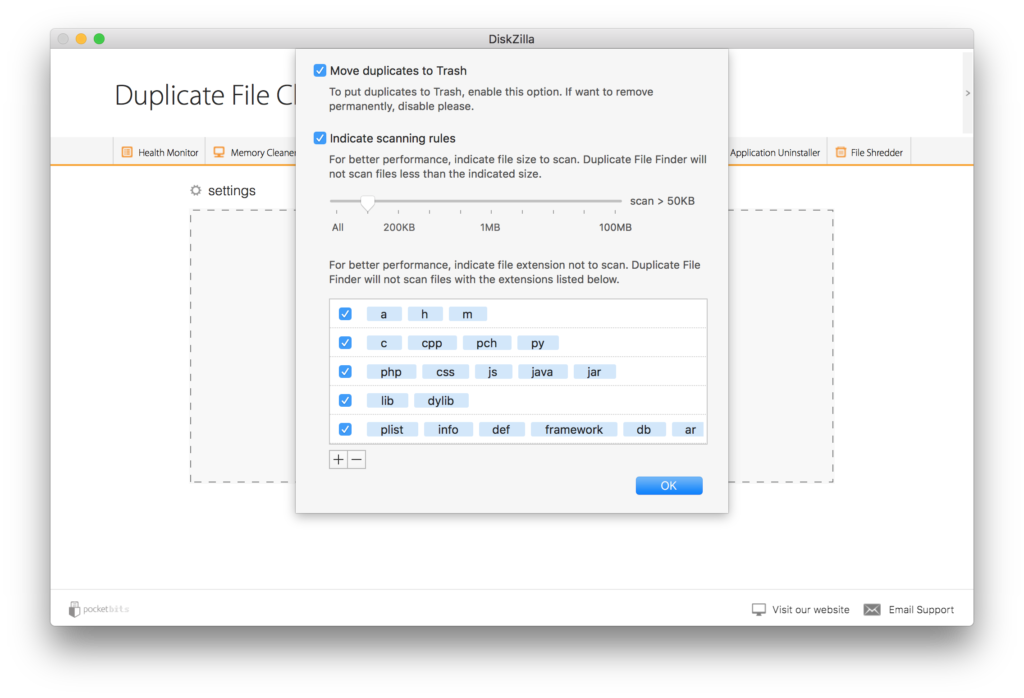
You can also set the scanning “rules” by clicking the settings icon on the top left. For example you might only care about duplicates that are larger than 10MB and want to exclude all mp3 duplicates.
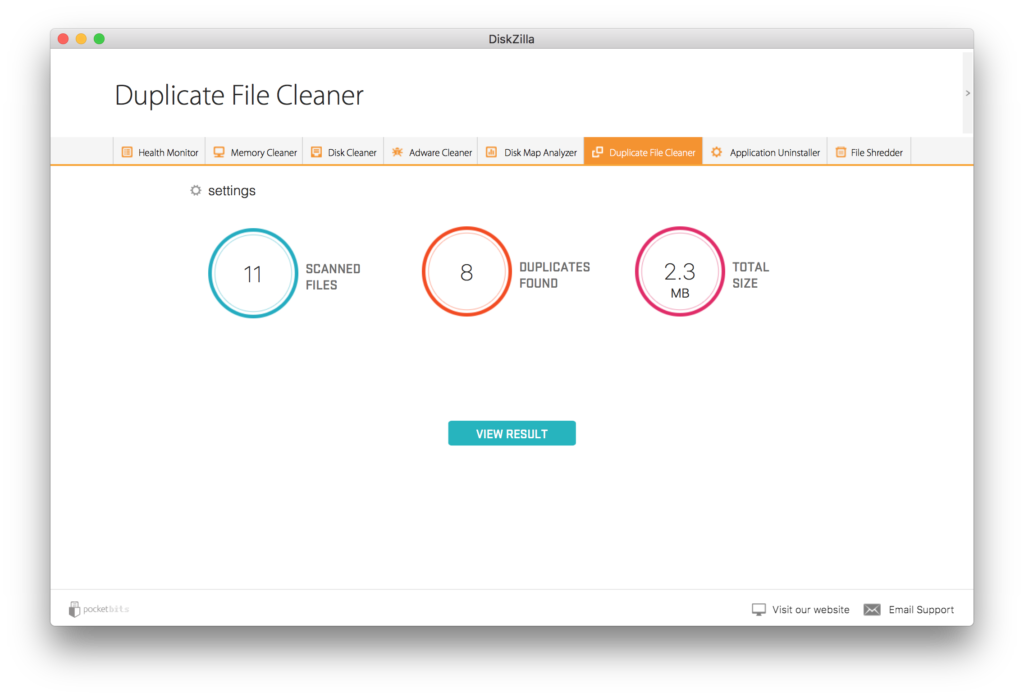
Once scanned, you will see your results.
You will have the option to sort your duplicates by file name, size, path, or even use the search box to search by typing in the name. The duplicate files and the total number of that file will be shown on the left.
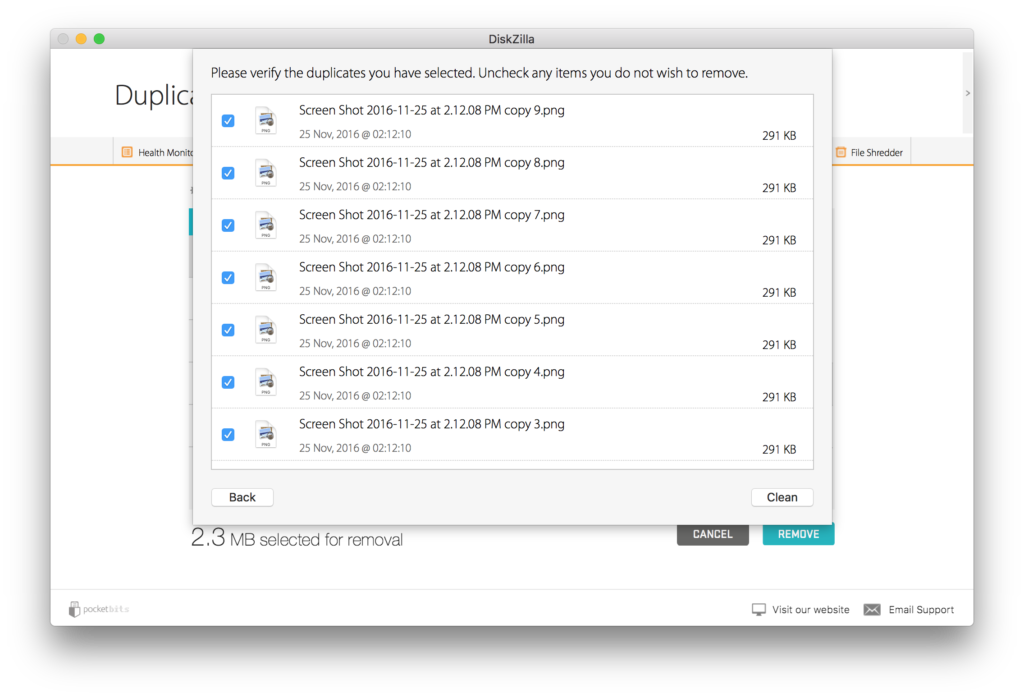
In our example there are a total of 9 files that are the same. 8 are selected for removal as they are all duplicates and we want to keep the 1 original. We’ve clicked the “auto select all” to conveniently mark all the duplicates automatically and save the original version. The preview window on the right is convenient to show a preview of the selected file. Clicking the “eye” icon will open up the file in Finder.
Click “Remove” and confirm on the next screen when ready to remove.
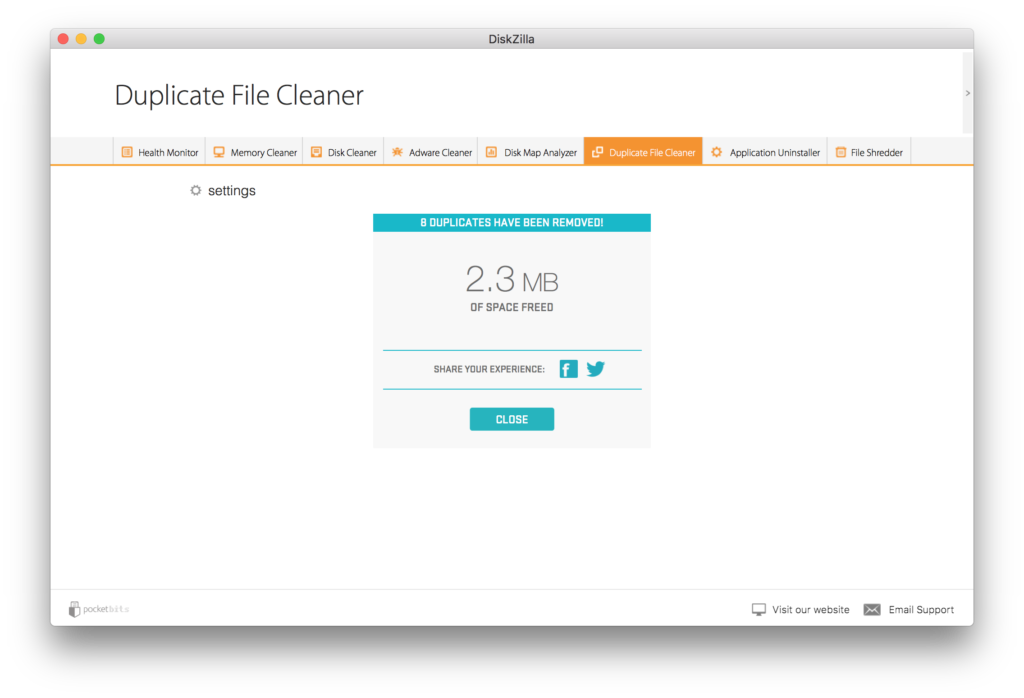
Congrats! You’ve cleaned up even more space by removing your duplicates! 🙂
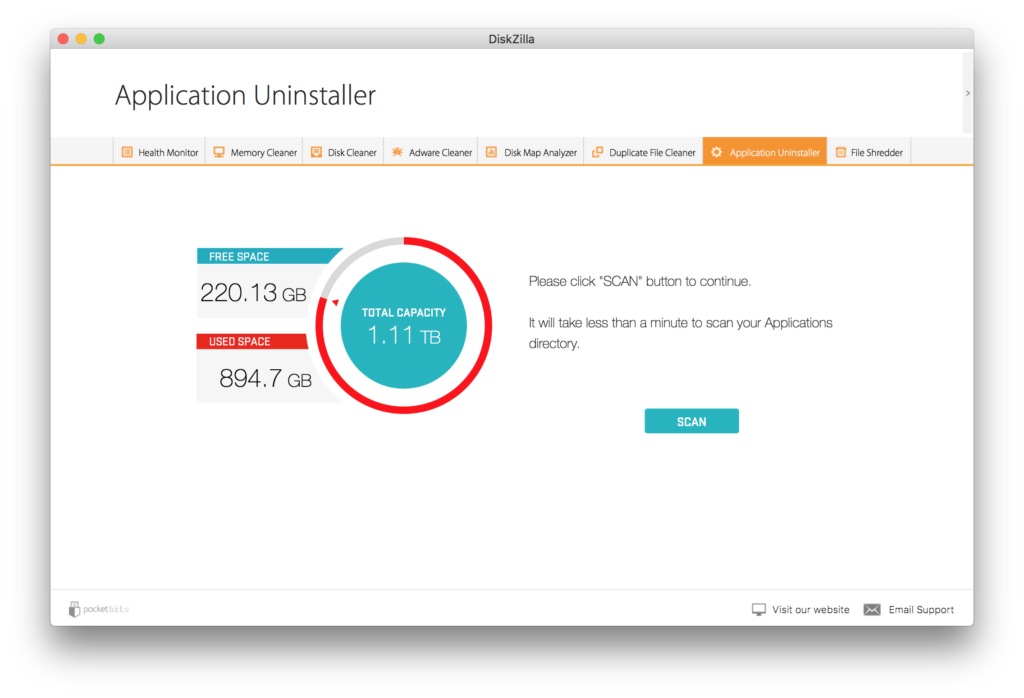
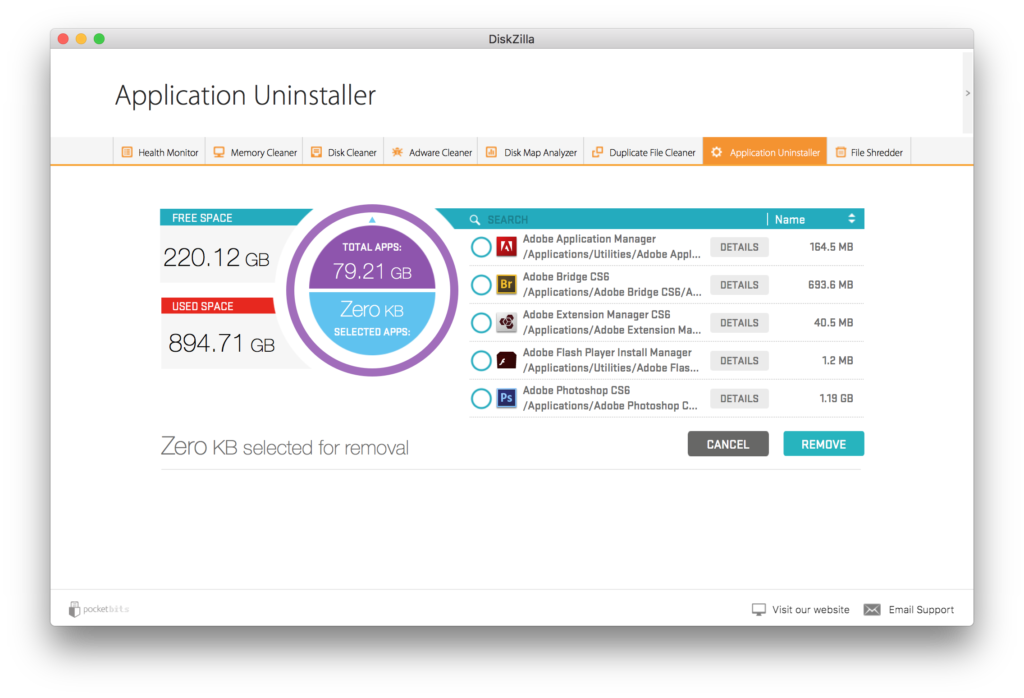
Application Uninstaller
When applications are installed, there are a lot of moving parts in various directories. These files include application logs, application caches, random plist files, and all sorts of other junk that are left on your Mac when all you do is drag and drop the application icon into the trash. Not everything is removed and all this junk adds up and eats up valuable disk space. DiskZilla’s Application Uninstaller intelligently locates your applications so you can properly uninstall these apps with everything associated with them. This includes all that junk that you no longer need.
Press “Scan” to get started.
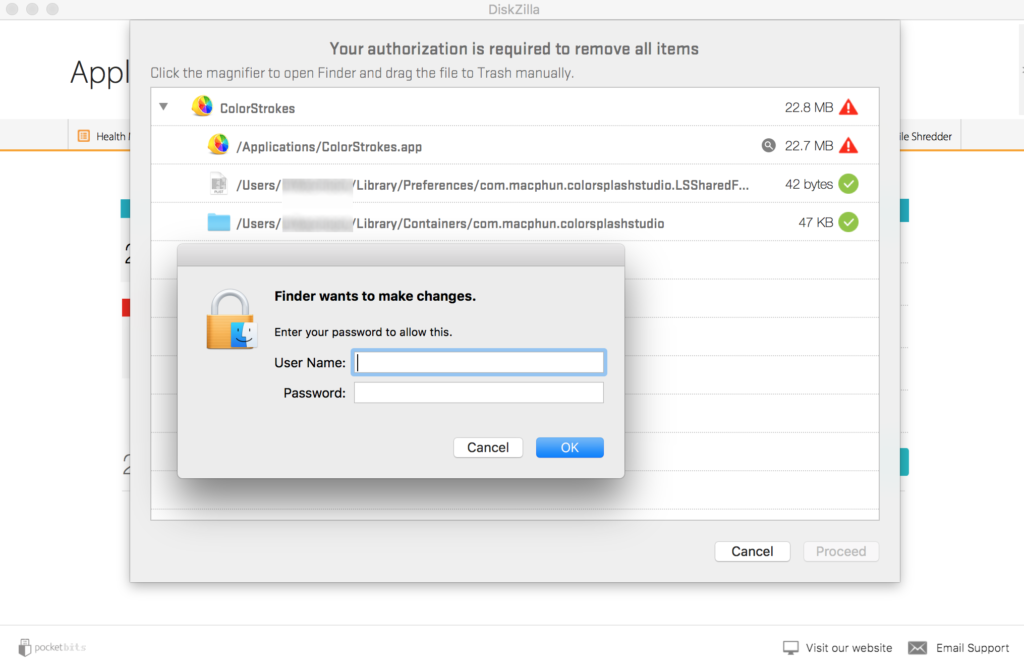
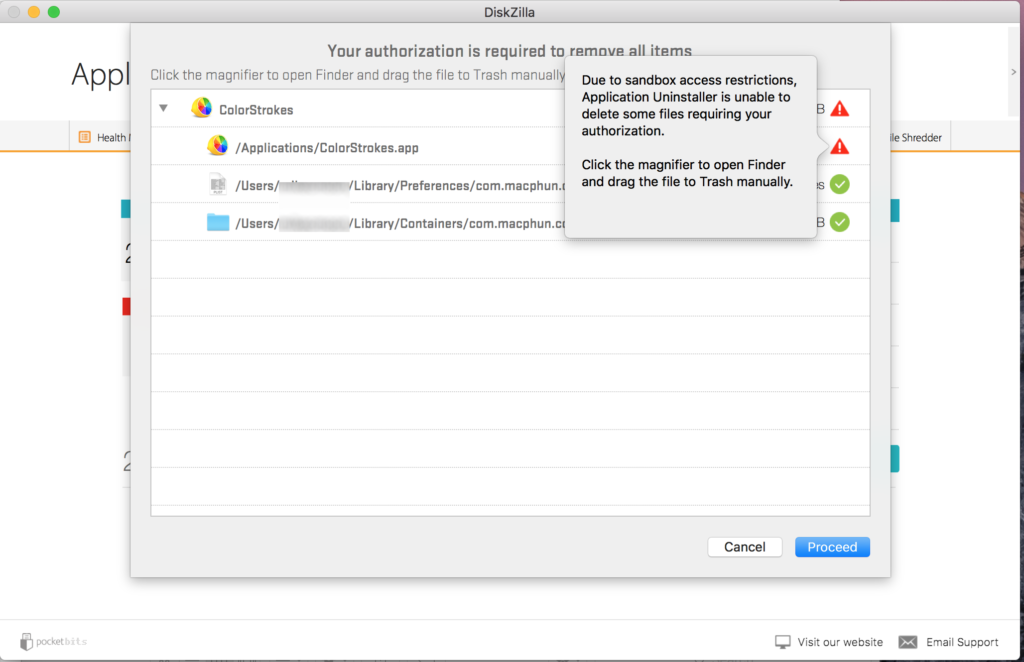
Due to Apple’s sandbox restrictions, you will need to press “Proceed” again and then enter your admin/user password to give your Mac permission to delete these files. Unfortunately Apple only allows apps to be removed in this way. There is no way around this.
Congratulations, you have now successfully properly uninstalled your selected apps along with all of their junk files.
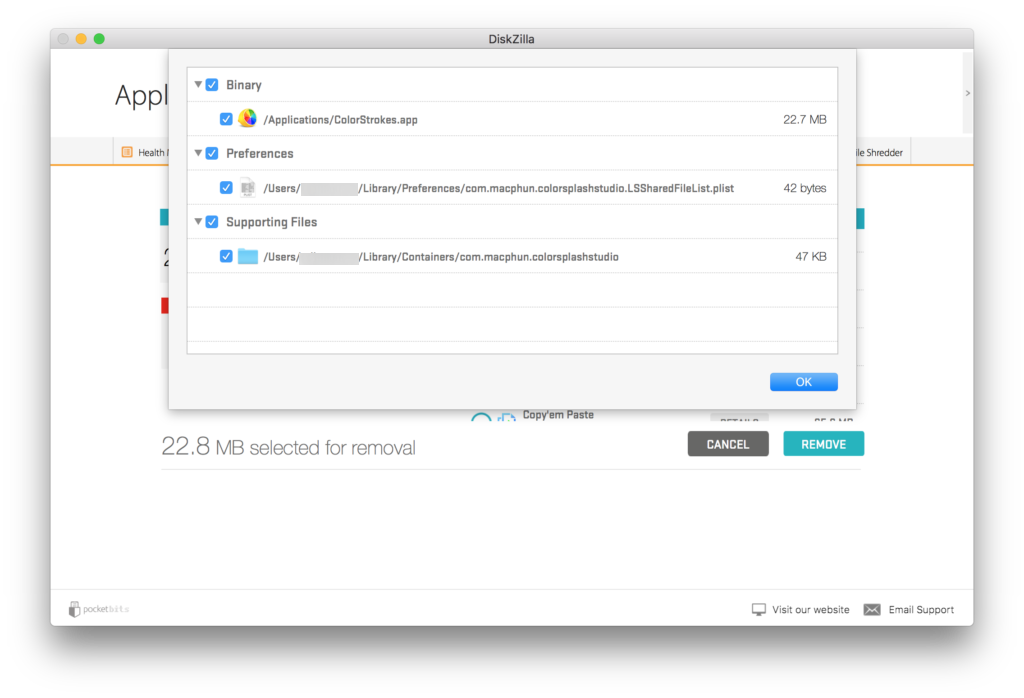
After scanning is completed, you will see a list of apps on the right side. Clicking details will show you all the “junk” or application logs, application caches, and/or anything else related to that app that is hiding on other locations of your hard drive.
*Please note that core Apple products cannot be removed due to Apple’s sandboxing restrictions.
Click “Remove” when ready and then you will be taken to the confirmation screen. When you click “Proceed”, you will notice action items in red that require you attention.
File Shredder
Drag and drop files to securely delete them. They will be permanently deleted and unrecoverable.
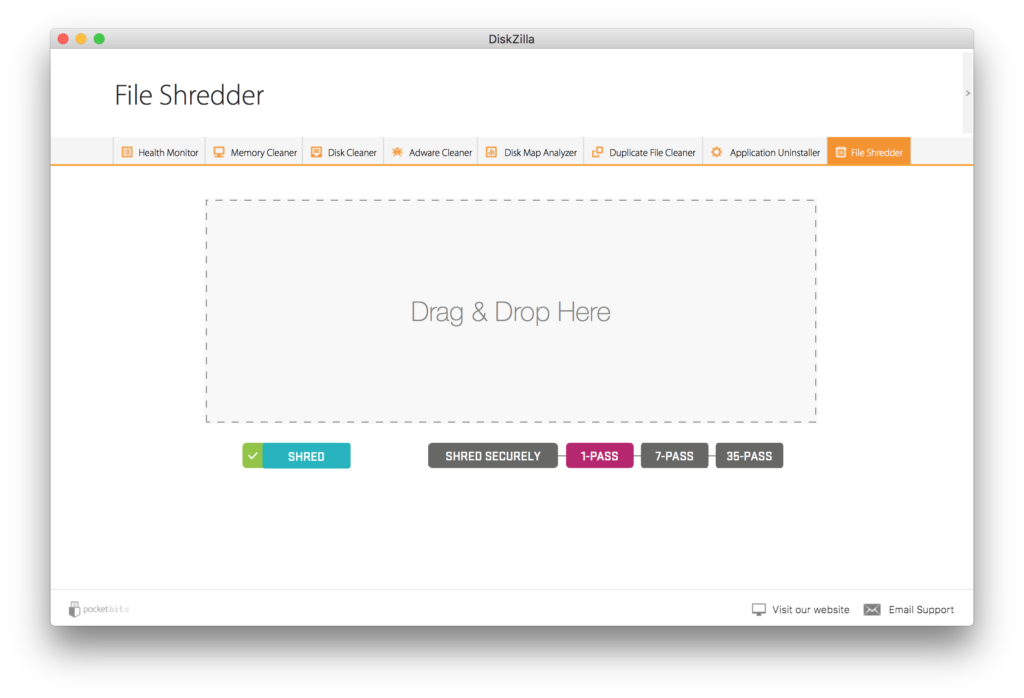
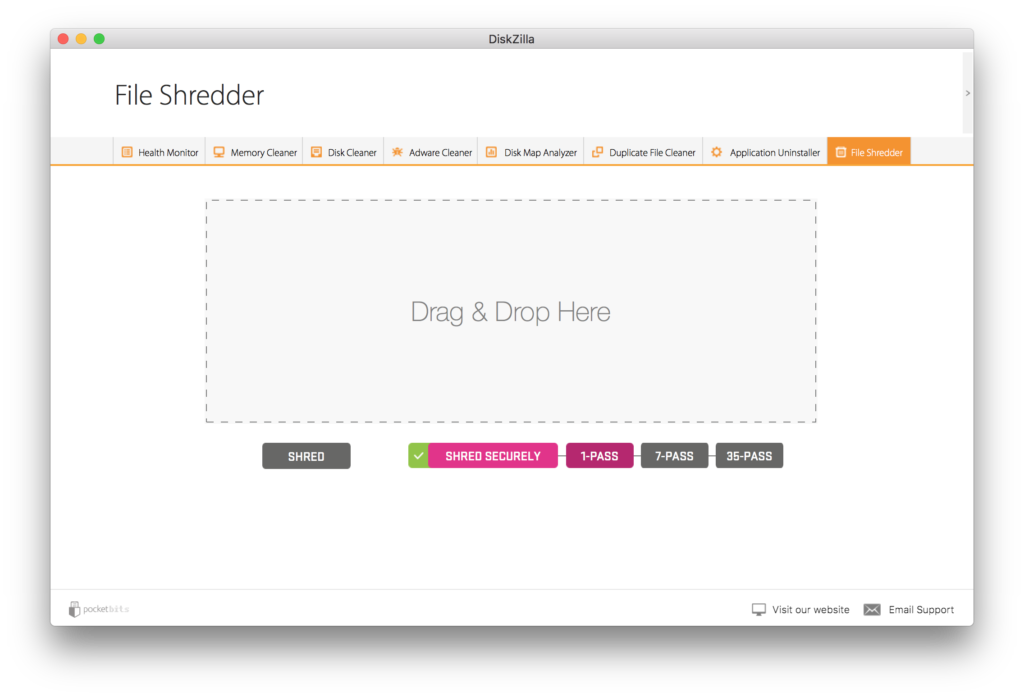
DiskZilla gives you 3 levels of secure deletion and 1 option for standard/normal deletion (not secure).
◎ Quickly and SECURELY overwrite your threats with 1-pass
◎ Overwrite your threats with United States Department of Defense Method (DoD 5220.22-M) 7-pass government standard
◎ File recovery won’t be an option with the MOST SECURE 35-pass Gutmann method
What is a pass and what’s the difference between 1-pass, 7-pass, and 35-pass?
It’s the number of passes you overwrite your data. In theory, overwriting it once should do the trick to make the data unrecoverable. 7-passes of overwriting data will ensure more security, but take a little longer. 35-passes would be the most secure of all.